Image acquisition front-end library with Python (Maintained by volunteers of the official GenICam committee)

Project description


Even though we just wanted to research image processing algorithms, why did we have to change our image acquisition library every time we change the camera that we use for the research? - Anonymous
About Harvester
Harvester was created to be a friendly image acquisition library for all people who those want to learn computer/machine vision. Harvester consists of two Python libraries, Harvester Core and Harvester GUI, and technically speaking, each library is responsible for the following tasks:
Harvester Core:
Image acquisition
Device manipulation
Harvester GUI:
Image data visualization
Harvester consumes image acquisition libraries, so-called GenTL Producers. Just grabbing a GenTL Producer and GenICam compliant machine vision cameras, then Harvester will supply you the acquired image data as numpy array to make your image processing task productive.
You can freely use, modify, distribute Harvester under Apache License-2.0 without worrying about the use of your software: personal, internal or commercial.
Currently, Harvester is being developed by the motivated contributors from all over the world.
Asking questions
We have opened a chat room for you. Please don’t hesitate to drop your message any time when you get a question regarding Harvester!
https://gitter.im/genicam-harvester/chatroom
We have also prepared an FAQ page. Perhaps your issue could be resolved just reading through it.
Harvester… where is the name from?
Harvester’s name was coming from the great Flemish painter, Pieter Bruegel the Elder’s painting so-called “The Harvesters”. Harvesters harvest a crop every season that has been fully grown and the harvested crop is passed to the consumers. On the other hand, image acquisition libraries acquire images as their crop and the images are passed to the following processes. We found the similarity between them and decided to name our library Harvester.
Apart from anything else, we love its peaceful and friendly name. We hope you also like it ;-)
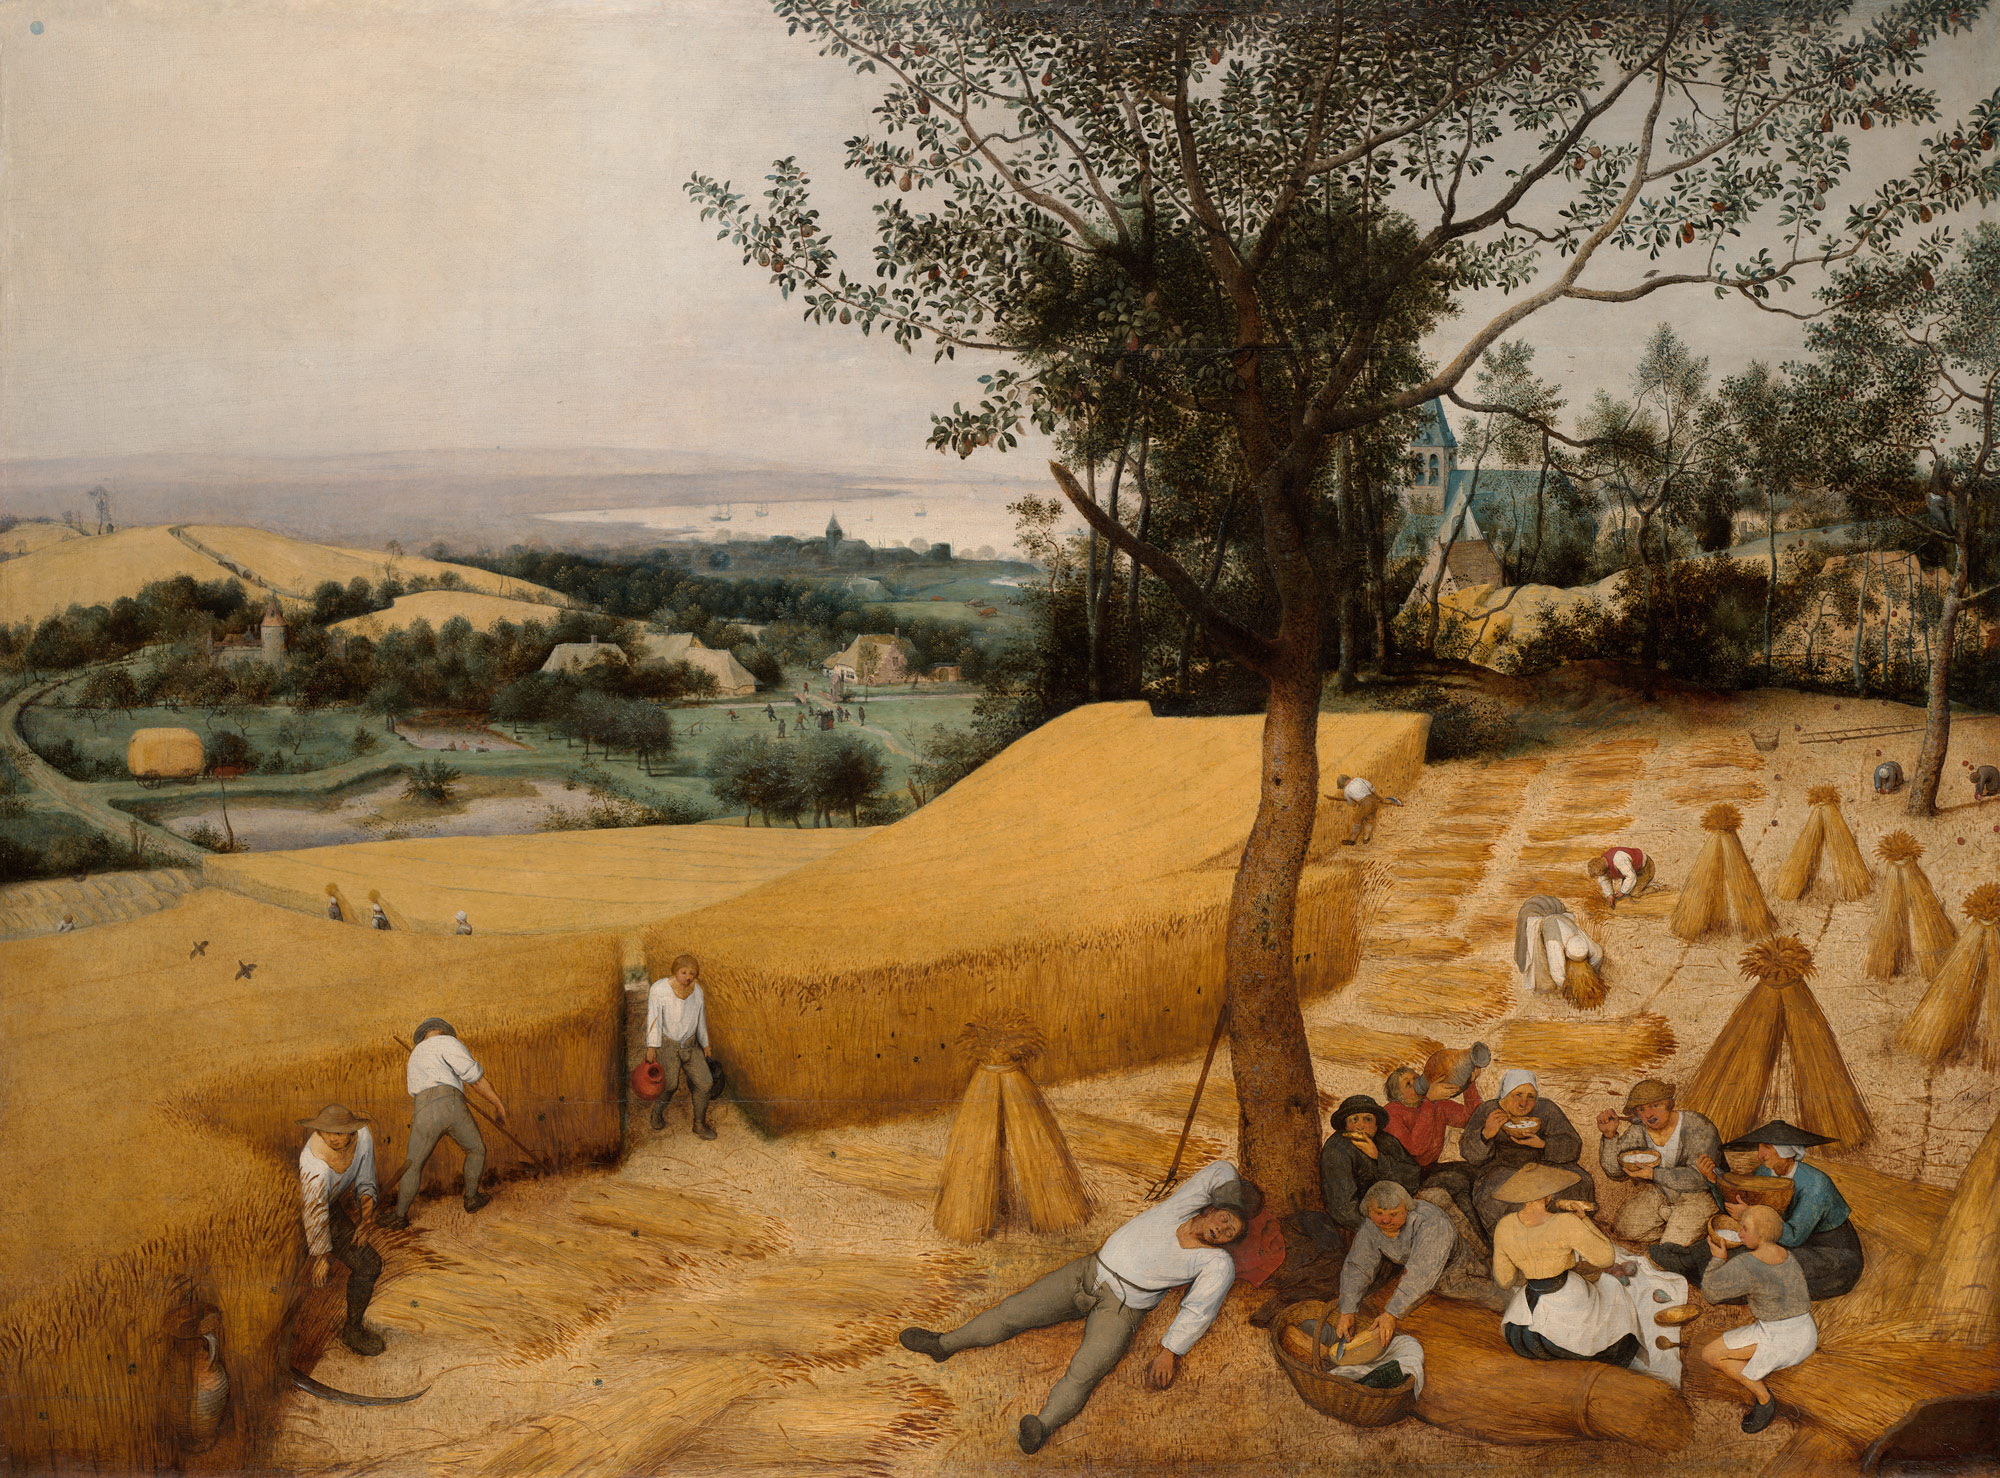
Pieter Bruegel the Elder, The Harvesters, 1565, (c) 2000–2018 The Metropolitan Museum of Art
Important links
Chat room |
|
Documentation |
|
EMVA website |
https://www.emva.org/standards-technology/genicam/genicam-downloads/ |
Harvester at PyPI |
|
Harvester GUI at GitHub |
|
Issue tracker |
|
Source repository |
Development status
The Harvester project has started since April 2018 and it’s still under development as of October 2018 but many developers and researchers over the world have already confirmed that it is actually usable with the popular GenTL Producers and GenICam compliant cameras from the following companies. We have realized the progress had been brought by all interested people’s positive expectation in the machine vision market and we strongly believe it will sustain to the following years. Of course, we will never forget the importance of volunteer companies which provided us their products to test Harvester. Thank you very much! Harvester is here for you all!
Company Name |
CoaXPress |
GigE Vision |
USB3 Vision |
Cameras |
|---|---|---|---|---|
Tested |
- |
- |
N/A |
|
N/A |
N/A |
N/A |
Tested |
|
- |
- |
- |
- |
|
N/A |
N/A |
N/A |
Tested |
|
N/A |
N/A |
N/A |
Tested |
|
N/A |
Tested |
Tested |
Tested |
|
N/A |
- |
Tested |
Tested |
|
Tested |
- |
- |
N/A |
|
N/A |
N/A |
N/A |
Tested |
|
N/A |
N/A |
N/A |
Tested |
|
- |
- |
Tested |
- |
|
N/A |
- |
N/A |
- |
|
N/A |
Tested |
Tested |
- |
|
- |
- |
Tested |
Tested |
|
N/A |
N/A |
N/A |
- |
|
N/A |
N/A |
N/A |
Tested |
|
N/A |
- |
N/A |
- |
|
- |
- |
- |
N/A |
|
- |
Tested |
Tested |
N/A |
|
- |
- |
- |
- |
|
- |
- |
- |
- |
Please don’t hesitate to tell us if you have tested Harvester with your GenTL Producer or GenICam compliant device. We will add your company/organization name to the list.
Wanna have a GUI?
Would you like to have a GUI? Harvester has a sister project that is called Harvester GUI. Oops, there’s no punch line on its name! Please take a look its source repository if you are interested in it:
https://github.com/genicam/harvesters_gui
GenTL Producers
As of today, we have tested Harvester with the following GenTL Producers and it definitely is the shortest way to get one from the following list to get Harvester working with tangible machine vision cameras:
Company Name |
SDK Name |
Camera Manufacture Free |
|---|---|---|
Baumer Optronic |
No |
|
DAHENG VISION |
No |
|
JAI |
Yes |
|
Matrix Vision |
Yes |
|
OMRON SENTECH |
No |
|
STEMMER IMAGING |
Yes |
You might be able to directly download one at their website but please note that perhaps some of them could require you to register your information to get one. In addition, some GenTL Producers might block you to connect other competitors’ cameras.
Terminology
Before start talking about the detail, let’s take a look at some important terminologies that frequently appear in this document. These terminologies are listed as follows:
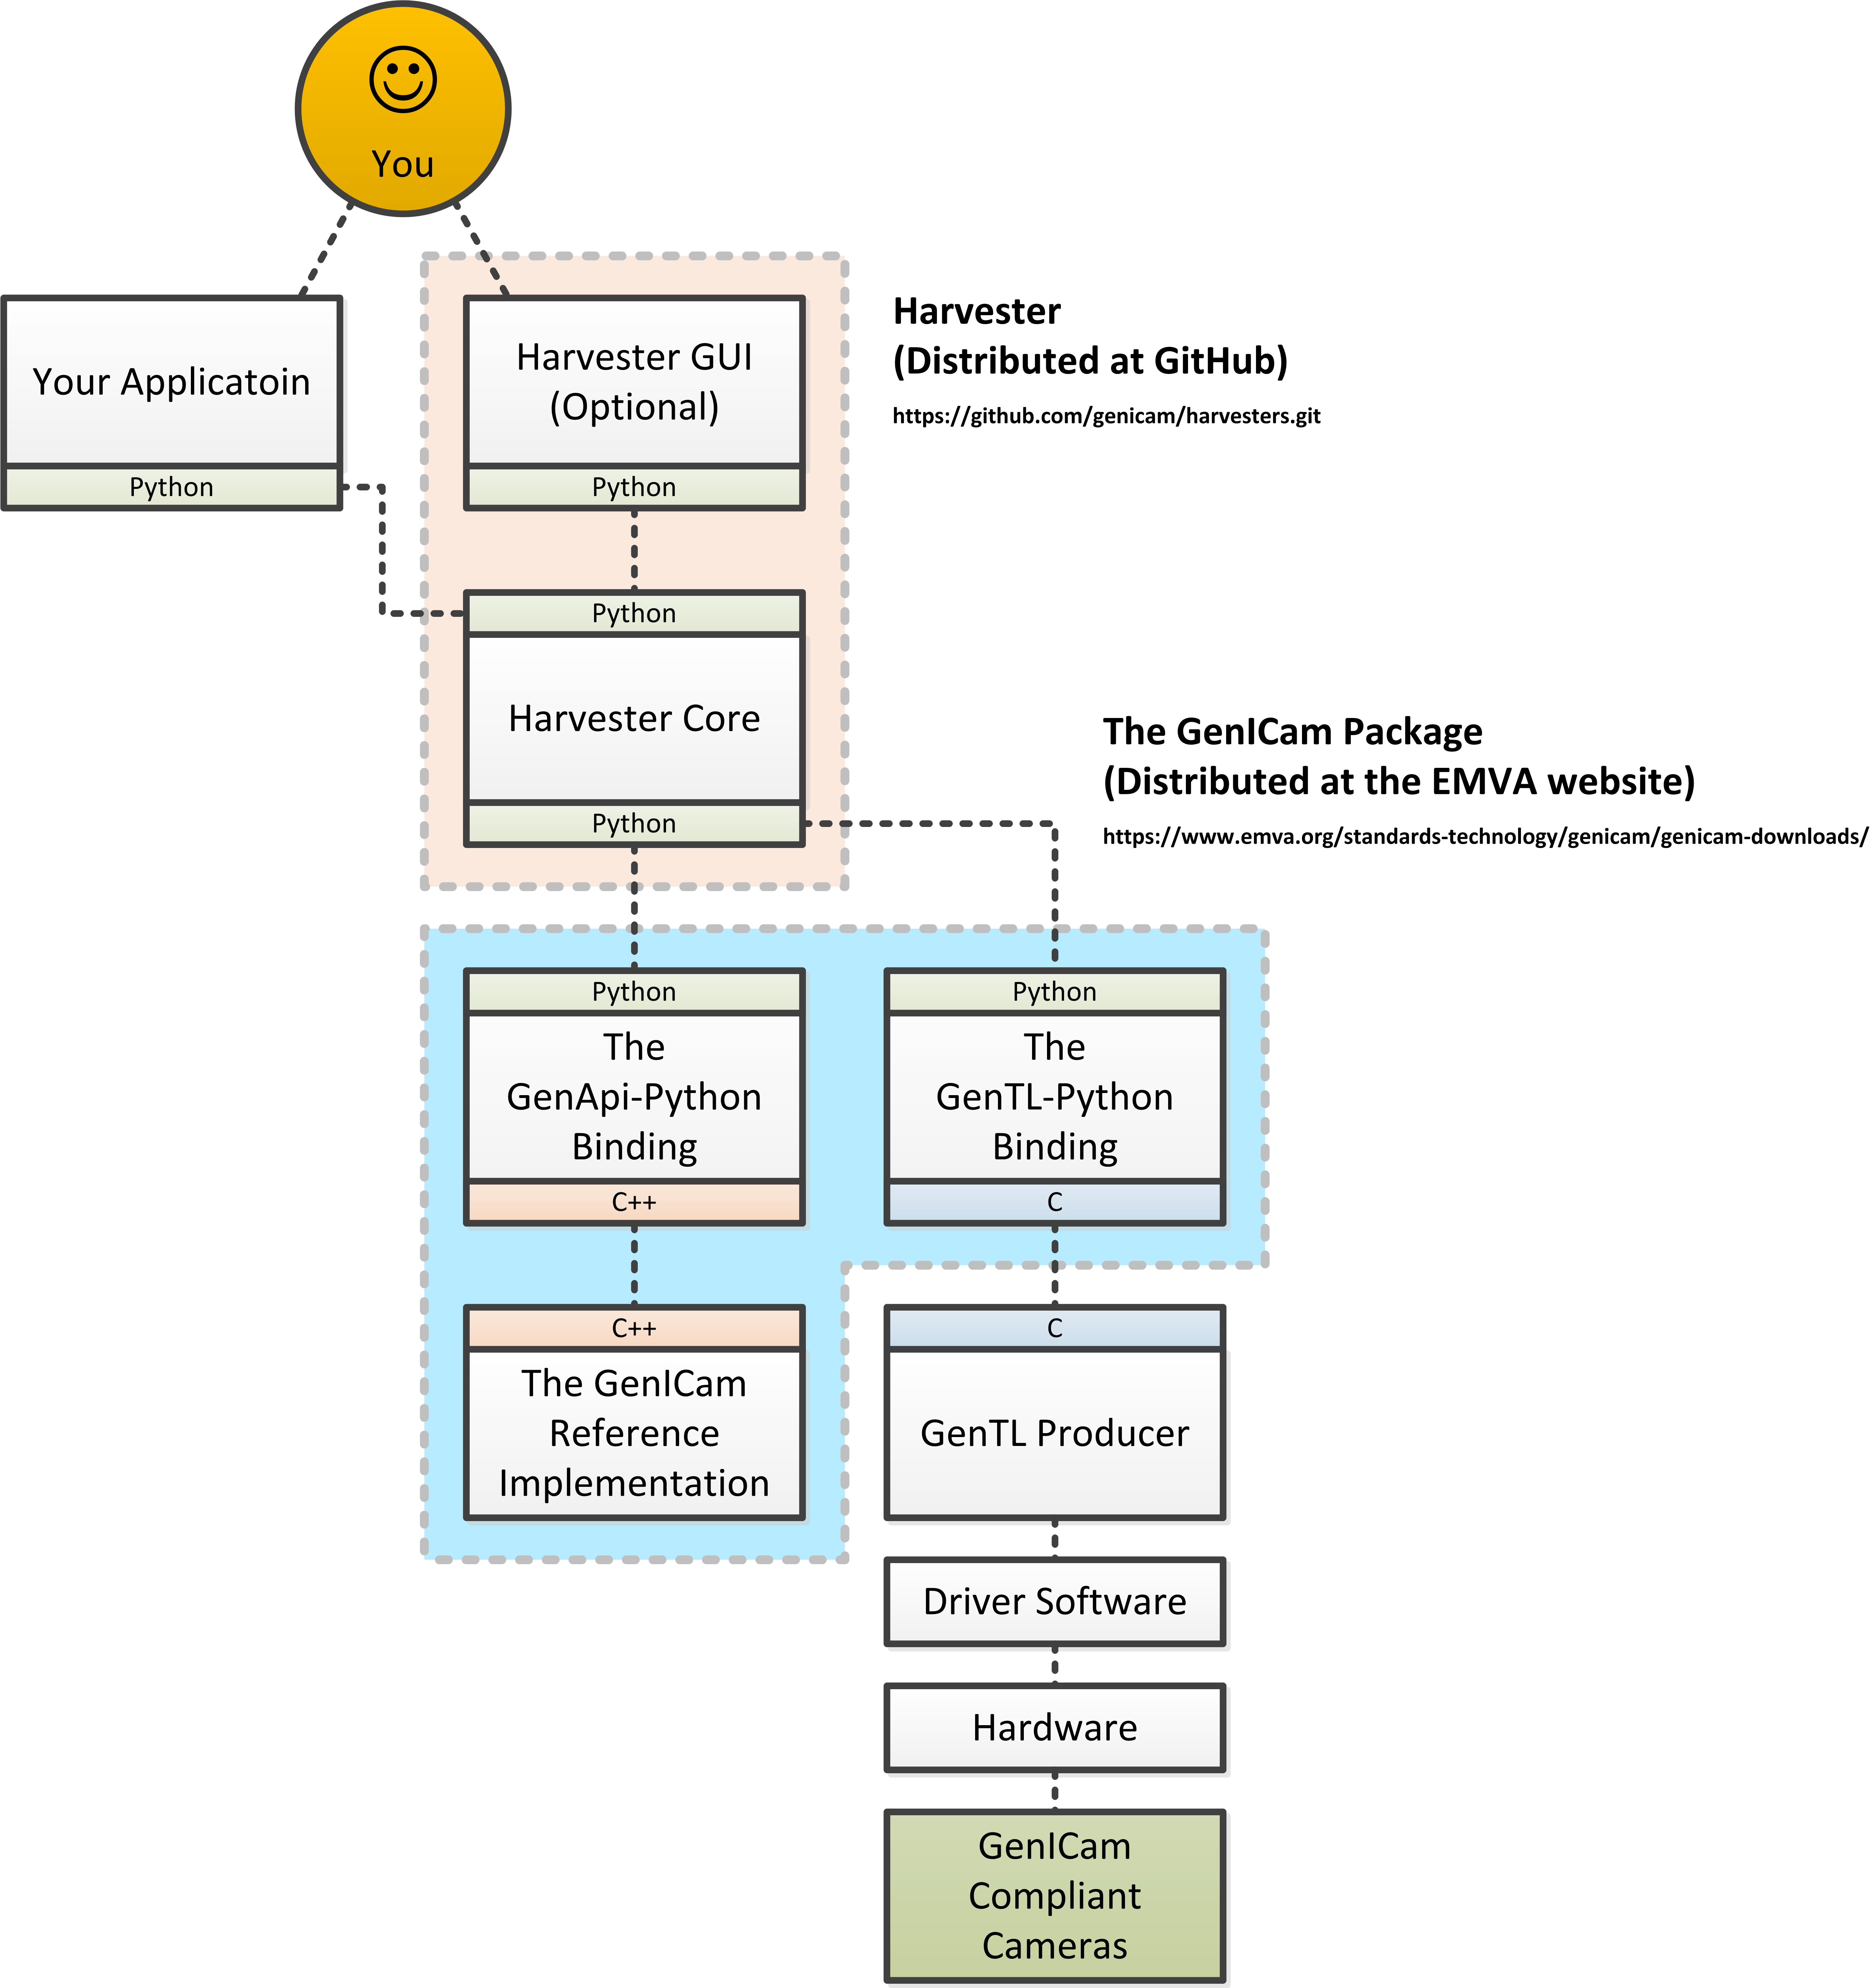
The GenApi-Python Binding: A Python module that communicates with the GenICam reference implementation.
A GenTL Producer: A library that has C interface and offers consumers a way to communicate with cameras over physical transport layer dependent technology hiding the detail from the consumer.
The GenTL-Python Binding: A Python module that communicates with GenTL Producers.
Harvester: A Python module that consists of Harvester Core and Harvester GUI.
Harvester Core: A part of Harvester that works as an image acquisition engine.
Harvester GUI: A part of Harvester that works as a graphical user interface of Harvester Core.
A GenICam compliant device: It’s typically a camera. Just involving the GenICam reference implementation, it offers consumers a way to dynamically configure/control the target devices.
The following diagram shows the hierarchy and relationship of the relevant modules:
Installation
In this section, we will learn how to instruct procedures to get Harvester work.
System Requirements
The following software modules are required to get Harvester working:
Either of Python 3.4, 3.5, 3.6, or 3.7
In addition, you will need the following items to let Harvester make something meaningful:
GenTL Producers
GenICam compliant machine vision cameras
Supported operating systems
Harvester has been tested with the following operating systems:
macOS 10.13
Ubuntu 14.04
Red Hat Enterprise Linux Workstation 7.4
Windows 7
Installing Harvester Core
You can install Harvester via PyPI invoking the following command; note that the package name is harvesters but not harvester; unfortunately, the latter word had been reserved:
$ pip install harvestersFor people who those have already installed it:
$ pip install --upgrade harvestersOr more simply:
$ pip install -U harvestersPerhaps pip could install cached package. If you want to install the newly dowloaded package, you should invoke the following command:
$ pip install -U --no-cache-dir harvestersThese commands will automatically install the required modules such as numpy or genicam2 (the Python Binding for the GenICam GenApi & the GenTL Producers) if the module has not yet installed on your environment.
Getting back to the original topic, you could install the latest development version it using setup.py cloning Harvester from GitHub:
$ git clone https://github.com/genicam/harvesters.git && cd harvesters && python setup.py installHow does Harvester Core help us?
Harvester Core is an image acquisition engine. No GUI. You can use it as an image acquisition library which acquires images from GenTL Producers through the GenTL-Python Binding and controls the target device (it’s typically a camera) through the GenApi-Python Binding.
Harvester Core works as a minimalistic front-end for image acquisition. Just importing it from your Python script, you should immediately be able to set images on your table.
You’ll be able to download the these language binding runtime libraries from the EMVA website, however, it’s not available as of May 2018, because they have not officially released yet. Fortunately they are in the final reviewing process so hopefully they’ll be released by the end of 2018.
If you don’t have to care about the display rate for visualizing acquired images, the combination of Harvester Core and Matplotlib might be a realistic option for that purpose.
Tasks Harvester Core does for you
The main features of Harvester Core are listed as follows:
Image acquisition through GenTL Producers
Multiple loading of GenTL Producers in a single Python script
GenICam feature node manipulation of the target device
Note that the second item implies you can involve multiple types of transport layers in your Python script. Each transport layer has own advantages and disadvantages and you should choose appropriate transport layers following your application’s requirement. You just need to acquire images for some purposes and the GenTL Producers deliver the images somehow. It truly is the great benefit of the GenTL Standard! And of course, not only GenTL Producers but Harvester Core offer you a way to manipulate multiple devices in a single Python script with an intuitive manner.
On the other hand, Harvester Core could be considered as a simplified version of the GenTL-Python Binding; actually, Harvester Core hides it in its back and shows only intuitive interfaces to its clients. Harvester Core just offers you a relationship between you and a device. Nothing more. We say it again, just you and a device. If you need to manipulate more relevant GenTL modules or have to achieve something over a hardcore way, then you should directly work with the GenTL-Python Binding.
Pixel formats that Harvester Core supports
Currently, Harvester Core supports the following pixel formats that are defined by the Pixel Format Naming Convention:
Mono8, Mono10, Mono12, Mono16, RGB8, RGBa8, BayerRG8, BayerGR8, BayerBG8, BayerGB8, BayerRG16, BayerGR16, BayerBG16, BayerGB16
Screenshots
Harvester Core on IPython
The following screenshot shows Harvester Core is running on IPython. An acquired image is delivered as the payload of a buffer and the buffer can be fetched by calling the fetch_buffer method of the ImageAcquirer class. Once you get an image you should be able to immediately start image processing. If you’re running on the Jupyter notebook, you should be able to visualize the image data using Matplotlib. This step should be helpful to check what’s going on your trial in the image processing flow.

In [1]: from harvesters.core import Harvester

In [2]: import numpy as np

In [3]: h = Harvester()

In [4]: h.add_cti_file('/Users/kznr/dev/genicam/bin/Maci64_x64/TLSimu.cti')

In [5]: h.update_device_info_list()

In [6]: h.device_info_list
Out[6]:
[(id_='TLSimuMono', vendor='EMVA_D', model='TLSimuMono', tl_type='Custom', user_defined_name='Center', serial_number='SN_InterfaceA_0', version='1.2.3'),
 (id_='TLSimuColor', vendor='EMVA_D', model='TLSimuColor', tl_type='Custom', user_defined_name='Center', serial_number='SN_InterfaceA_1', version='1.2.3'),
 (id_='TLSimuMono', vendor='EMVA_D', model='TLSimuMono', tl_type='Custom', user_defined_name='Center', serial_number='SN_InterfaceB_0', version='1.2.3'),
 (id_='TLSimuColor', vendor='EMVA_D', model='TLSimuColor', tl_type='Custom', user_defined_name='Center', serial_number='SN_InterfaceB_1', version='1.2.3')]

In [7]: ia = h.create_image_acquirer(serial_number='SN_InterfaceA_0')

In [8]: ia.device.node_map.Width.value, ia.device.node_map.Height.value = 8, 8

In [9]: ia.device.node_map.PixelFormat.value = 'Mono8'

In [10]: ia.start_image_acquisition()

In [11]: buffer = ia.fetch_buffer()

In [12]: type(buffer)
Out[12]: harvesters.core.Buffer

In [13]: type(buffer.payload)
Out[13]: harvesters.core.PayloadImage

In [14]: len(buffer.payload.components)
Out[14]: 1

In [15]: type(buffer.payload.components[0])
Out[15]: harvesters.core.Component2D

In [16]: type(buffer.payload.components[0].data)
Out[16]: numpy.ndarray

In [17]: buffer.payload.components[0].data
Out[17]:
array([[153, 154, 155, 156, 157, 158, 159, 160],
       [154, 155, 156, 157, 158, 159, 160, 161],
       [155, 156, 157, 158, 159, 160, 161, 162],
       [156, 157, 158, 159, 160, 161, 162, 163],
       [157, 158, 159, 160, 161, 162, 163, 164],
       [158, 159, 160, 161, 162, 163, 164, 165],
       [159, 160, 161, 162, 163, 164, 165, 166],
       [160, 161, 162, 163, 164, 165, 166, 167]], dtype=uint8)

In [18]: buffer.queue()

In [19]: with ia.fetch_buffer() as buffer:
    ...:     image = buffer.payload.components[0].data
    ...:     print('Average: {0}'.format(np.average(image)))
    ...:     print(image)
    ...:
Average: 218.0
[[211 212 213 214 215 216 217 218]
 [212 213 214 215 216 217 218 219]
 [213 214 215 216 217 218 219 220]
 [214 215 216 217 218 219 220 221]
 [215 216 217 218 219 220 221 222]
 [216 217 218 219 220 221 222 223]
 [217 218 219 220 221 222 223 224]
 [218 219 220 221 222 223 224 225]]

In [20]: ia.stop_image_acquisition()

In [21]: ia.destroy()
Using Harvester Core
First, let’s import Harvester:
from harvesters.core import HarvesterThen instantiate a Harvester object; we’re going to use h that stands for Harvester as its identifier.
h = Harvester()And load a CTI file; loading a CTI file, you can communicate with the GenTL Producer:
h.add_cti_file('path/to/gentl_producer.cti')Note that you can add one or more CTI files on a single Harvester Core object. To add another CTI file, just repeat calling add_cti_file method passing another target CTI file:
h.add_cti_file('path/to/another_gentl_producer.cti')And the following code will let you know the CTI files that have been loaded on the Harvester object:
h.cti_filesIn a contrary sense, you can remove a specific CTI file that you have added with the following code:
h.remove_cti_file('path/to/gentl_producer.cti')And now yol have to update the list of devices; it fills up your device information list and you’ll select a device to control from the list:
h.update_device_info_list()The following code will let you know the devices that you can control:
h.device_info_listOur friendly GenTL Producer, so called TLSimu, gives you the following information:
[(unique_id='TLSimuMono', vendor='EMVA_D', model='TLSimuMono', tl_type='Custom', user_defined_name='Center', serial_number='SN_InterfaceA_0', version='1.2.3'),
 (unique_id='TLSimuColor', vendor='EMVA_D', model='TLSimuColor', tl_type='Custom', user_defined_name='Center', serial_number='SN_InterfaceA_1', version='1.2.3'),
 (unique_id='TLSimuMono', vendor='EMVA_D', model='TLSimuMono', tl_type='Custom', user_defined_name='Center', serial_number='SN_InterfaceB_0', version='1.2.3'),
 (unique_id='TLSimuColor', vendor='EMVA_D', model='TLSimuColor', tl_type='Custom', user_defined_name='Center', serial_number='SN_InterfaceB_1', version='1.2.3')]
And you create an image acquirer object specifying a target device. The image acquirer does the image acquisition task for you. In the following example it’s trying to create an acquirer object of the first candidate device in the device information list:
ia = h.create_image_acquirer(0)Or equivalently:
ia = h.create_image_acquirer(list_index=0)You can connect the same device passing more unique information to the method such as:
mono_a = h.create_image_acquirer(serial_number='SN_InterfaceA_0')We named the acquirer object ia in the above example but in a practical occasion, you may name it like just camera, mono_cam, or face_detection_cam more specifically even though those entities don’t acquire images by themselves but they transfer images that will be acquired by their image acquirer.
Anyway, then now we start image acquisition:
ia.start_image_acquisition()Once you started image acquisition, you should definitely want to get an image. Images are delivered to the acquirer allocated buffers. To fetch a buffer that has been filled up with an image, you can have 2 options; the first option is to use the with statement:
with ia.fetch_buffer() as buffer:
    # Work with the Buffer object. It consists of everything you need.
    print(buffer)
    # The buffer will automatically be queued.
Having that code, the fetched buffer is automatically queued once the code step out from the scope of the with statement. It’s prevents you to forget queueing it by accident. The other option is to manually queue the fetched buffer by yourself:
buffer = ia.fetch_buffer()
print(buffer)
# Don't forget to queue the buffer.
buffer.queue()
In this option, again, please do not forget that you have to queue the buffer by yourself. If you forget queueing it, then you’ll lose a buffer that could be used for image acquisition. Everything is up to your design, so please choose an appropriate way for you. In addition, once you queued the buffer, the Buffer object will be obsolete. There’s nothing to do with it.
Okay, then you would stop image acquisition with the following code:
ia.stop_image_acquisition()And the following code disconnects the connecting device from the image acquirer; you’ll have to create an image acquirer object again when you have to work with a device:
ia.destroy()Now you can quit the program! Please not that the image acquirer also supports the with statement. So you may write program as follows:
with h.create_image_acquirer(0) as ia:
    # Work, work, and work with the ia object.

# the ia object will automatically call the destroy method.
Acknowledgements
Open source resources
Harvester Core uses the following open source libraries/resources:
Pympler
License: Apache License, Version 2.0Copyright (c) Jean Brouwers, Ludwig Haehne, Robert SchuppeniesVersioneer
Copyright (c) 2018 Brian Warner
Credits
The initial idea about Harvester suddenly came up to a software engineer, Kazunari Kudo’s head in the early April of year 2018 and he immediately decided to bring the first prototype to the International Vision Standards Meeting, IVSM in short, that was going to be held in Frankfurt am Main in the following early May. During the Frankfurt IVSM, interested engineers tried out Harvester and confirmed it really worked using commercial machine vision cameras provided by well-known machine vision camera manufacturers in the world. Having that fact, the attendees of the IVSM warmly welcomed Harvester.
The following individuals have directly or indirectly contributed to the development activity of Harvester or encouraged the developers by their thoughtful warm words; they are our respectable wonderful colleagues:
Rod Barman, Stefan Battmer, David Beek, Jan Becvar, David Bernecker, Chris Beynon, Eric Bourbonnais, Benedikt Busch, George Chamberlain, Thomas Detjen, Friedrich Dierks, Dana Diezemann, Emile Dodin, Reynold Dodson, Sascha Dorenbeck, Erik Eloff, Katie Ensign, Andreas Ertl, James Falconer, Werner Feith, Maciej Gara, Andreas Gau, Sebastien Gendreau, Francois Gobeil, Werner Goeman, Jean-Paul Goglio, Markus Grebing, Eric Gross, Ioannis Hadjicharalambous, Uwe Hagmaier, Tim Handschack, Christopher Hartmann, Reinhard Heister, Gerhard Helfrich, Jochem Herrmann, Heiko Hirschmueller, Tom Hopfner, David Hoese, Karsten Ingeman Christensen, Severi Jaaskelainen, Mattias Johannesson, Mark Jones, Mattias Josefsson, Martin Kersting, Stephan Kieneke, Tom Kirchner, Lutz Koschorreck, Frank Krehl, Maarten Kuijk, Max Larin, Ralf Lay, Min Liu, Sergey Loginonvskikh, Thomas Lueck, Alain Marchand, Rocco Matano, Masahide Matsubara, Stephane Maurice, Robert McCurrach, Mike Miethig, Thies Moeller, Roman Moie, Marcel Naggatz, Hartmut Nebelung, Damian Nesbitt, Quang Nhan Nguyen, Klaus-Henning Noffz, Neerav Patel, Jan Pech, Merlin Plock, Joerg Preckwinkel, Benjamin Pussacq, Dave Reaves, Thomas Reuter, Andreas Rittinger, Ryan Robe, Nicolas P. Rougier, Felix Ruess, Matthias Schaffland, Michael Schmidt, Jan Scholze, Martin Schwarzbauer, Rupert Stelz, Madhura Suresh, Chendra Hadi Suryanto, Timo Teifel, Albert Theuwissen, Laval Tremblay, Tim Vlaar, Silvio Voitzsch, Stefan Von Weihe, Frederik Voncken, Roman Wagner, Ansger Waschki, Anne Wendel, Jean-Michel Wintgens, Manfred Wuetschner, Jang Xu, Christoph Zierl, and Juraj Zopp
Release history Release notifications | RSS feed


Download files
Download the file for your platform. If you're not sure which to choose, learn more about installing packages.
Source Distribution
Built Distribution
Filter files by name, interpreter, ABI, and platform.
If you're not sure about the file name format, learn more about wheel file names.
Copy a direct link to the current filters
File details
Details for the file harvesters-0.post0.dev645.tar.gz.
File metadata
- Download URL: harvesters-0.post0.dev645.tar.gz
- Upload date:
- Size: 70.4 kB
- Tags: Source
- Uploaded using Trusted Publishing? No
- Uploaded via: twine/1.11.0 pkginfo/1.4.2 requests/2.19.1 setuptools/40.2.0 requests-toolbelt/0.8.0 tqdm/4.26.0 CPython/3.5.6
File hashes
| Algorithm | Hash digest | |
|---|---|---|
| SHA256 |
874f0aa8957868b1fc6b69bb802a43ca0c407a7ddb9d500b15be3b8810e3a047
|
|
| MD5 |
59ec12e92f0924f2751092d77d2f0f31
|
|
| BLAKE2b-256 |
37719f809ccc6683e3a2d11f9c5d0d22a30dbcc8fe1a7b38631cf8b493f54f27
|
File details
Details for the file harvesters-0.post0.dev645-py3-none-any.whl.
File metadata
- Download URL: harvesters-0.post0.dev645-py3-none-any.whl
- Upload date:
- Size: 46.3 kB
- Tags: Python 3
- Uploaded using Trusted Publishing? No
- Uploaded via: twine/1.11.0 pkginfo/1.4.2 requests/2.19.1 setuptools/40.2.0 requests-toolbelt/0.8.0 tqdm/4.26.0 CPython/3.5.6
File hashes
| Algorithm | Hash digest | |
|---|---|---|
| SHA256 |
c47a16adf94630522fc5821e299de3a9b1a4b75205c9f98661438a73c2d8ba84
|
|
| MD5 |
1b945e5e72fab9aa3054d3cb54f9cd33
|
|
| BLAKE2b-256 |
a4ef0f0e5d4aa702d7862addea07e9fc694bfc773e0b0cda3983426aefc27081
|


