Python bindings for HiGlass


Project description
higlass-python 🔎
a fresh python library for higlass built
on top of higlass-schema and
higlass-widget.


Usage
Note A release candidate for
higlass-pythonv1 is now available on PyPI and can be installed via pip:
pip install --pre higlass-python
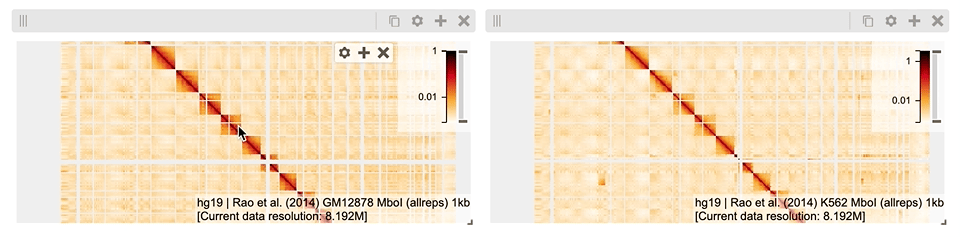
import higlass as hg

# Remote data source (tileset)
tileset1 = hg.remote(
    uid="CQMd6V_cRw6iCI_-Unl3PQ",
    server="https://higlass.io/api/v1/",
    name="Rao et al. (2014) GM12878 MboI (allreps) 1kb",
)

# Local tileset
tileset2 = hg.cooler("../data/dataset.mcool")

# Create a `hg.HeatmapTrack` for each tileset
track1 = tileset1.track("heatmap")
track2 = tileset2.track("heatmap")

# Create two independent `hg.View`s, one for each heatmap
view1 = hg.view(track1, width=6)
view2 = hg.view(track2, width=6)

# Lock zoom & location for each `View`
view_lock = hg.lock(view1, view2)

# Concatenate views horizontally and apply synchronization lock
(view1 | view2).locks(view_lock)
To learn more about the new API, check out the updated documentation.
Development
higlass-python uses the recommended hatchling build-system,
which is convenient to use via the hatch CLI. We recommend installing hatch
globally (e.g., via pipx) and running the various commands defined within pyproject.toml. hatch will take care
of creating and synchronizing a virtual environment with all dependencies defined in pyproject.toml.
Commands Cheatsheet
All commands are run from the root of the project, from a terminal:
| Command | Action |
|---|---|
hatch run fix |
Format project with black . and apply linting with ruff --fix . |
hatch run lint |
Lint project with ruff .. |
hatch run test |
Run unit tests with pytest in latest Python version. |
hatch run test:test |
Run unit tests with pytest in all target Python versions. |
hatch run docs:build |
Build the documentation in docs/_build/html. |
hatch run docs:serve |
Start an dev-server for live editing RST files in docs/. |
Note:
hatch buildandhatch publishare available to build and publish the project to PyPI, but all releases are handled automatically via CI.
Alternatively, you can develop higlass-python by manually creating a virtual environment and
managing installation and dependencies with pip. For example, create a virtual environment
with conda:
conda create -n higlass python=3.11
conda activate higlass
and install higlass-python in editable mode with all optional dependencies:
pip install -e ".[dev,fuse,docs]"
Our CI checks formatting (black .), linting (ruff .), and tests (pytest).
Release history Release notifications | RSS feed


Download files
Download the file for your platform. If you're not sure which to choose, learn more about installing packages.
Source Distribution
Built Distribution
Filter files by name, interpreter, ABI, and platform.
If you're not sure about the file name format, learn more about wheel file names.
Copy a direct link to the current filters
File details
Details for the file higlass_python-1.0.0rc2.tar.gz.
File metadata
- Download URL: higlass_python-1.0.0rc2.tar.gz
- Upload date:
- Size: 2.2 MB
- Tags: Source
- Uploaded using Trusted Publishing? No
- Uploaded via: twine/4.0.1 CPython/3.11.3
File hashes
| Algorithm | Hash digest | |
|---|---|---|
| SHA256 |
6045ba6a3f7dcfc07961b7e433026d4bf4a880574041f5e10e7fe1e64d409b21
|
|
| MD5 |
8706bb90dcd2116bc32b5ff0ffc208e3
|
|
| BLAKE2b-256 |
07ba490abb4dbb79f78c7fd5728d59650cc1b3c7753c9c839de4801c594d1892
|
File details
Details for the file higlass_python-1.0.0rc2-py2.py3-none-any.whl.
File metadata
- Download URL: higlass_python-1.0.0rc2-py2.py3-none-any.whl
- Upload date:
- Size: 23.1 kB
- Tags: Python 2, Python 3
- Uploaded using Trusted Publishing? No
- Uploaded via: twine/4.0.1 CPython/3.11.3
File hashes
| Algorithm | Hash digest | |
|---|---|---|
| SHA256 |
10e416cfcb55e1911753c5b6c16810d906cb845d2742a560b6773d9e04a9d694
|
|
| MD5 |
ab7e9231b0c698601937c67c88c72c15
|
|
| BLAKE2b-256 |
b11d7fbbaab8f588b30385959a878d1bcf1cca3e982e41fe7f0e120b522a8f9c
|


