Lightly Purple is a lightweight, fast, and easy-to-use data exploration tool for data scientists and engineers.

Project description

The open-source tool curating datasets


🚀 Welcome to Lightly Purple!
We at Lightly created Lightly Purple, an open-source tool designed to supercharge your data curation workflows for computer vision datasets. Explore your data, visualize annotations and crops, tag samples, and export curated lists to improve your machine learning pipelines. And much more!
Lightly Purple runs entirely locally on your machine, keeping your data private. It consists of a Python library for indexing your data and a web-based UI for visualization and curation.
✨ Core Workflow
Using Lightly Purple typically involves these steps:
- Index Your Dataset: Run a Python script using the
lightly-purplelibrary to process your local dataset (images and annotations) and save metadata into a localpurple.dbfile. - Launch the UI: The script then starts a local web server.
- Explore & Curate: Use the UI to visualize images, annotations, and object crops. Filter and search your data (experimental text search available). Apply tags to interesting samples (e.g., "mislabeled", "review").
- Export Curated Data: Export information (like filenames) for your tagged samples from the UI to use downstream.
- Stop the Server: Close the terminal running the script (Ctrl+C) when done.
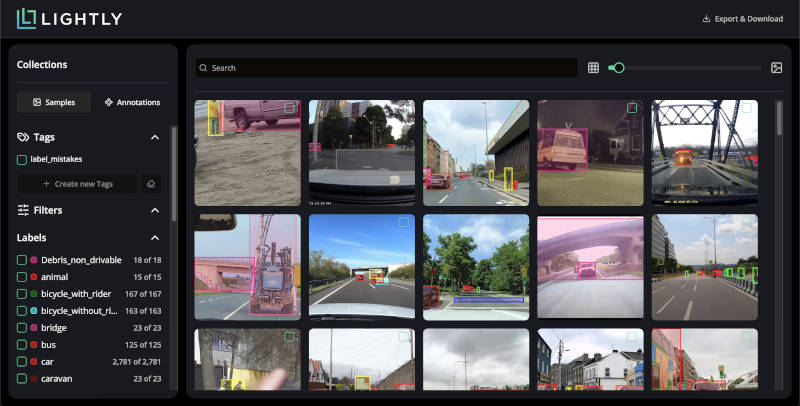
Visualize your dataset samples with annotations in the grid view.
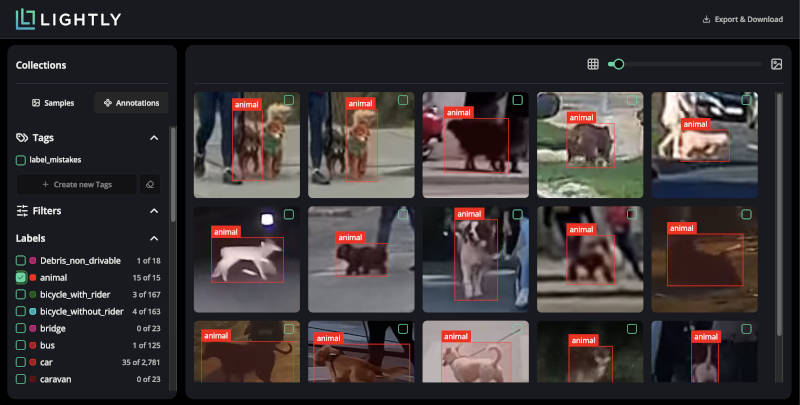
Switch to the annotation view to inspect individual object crops easily.
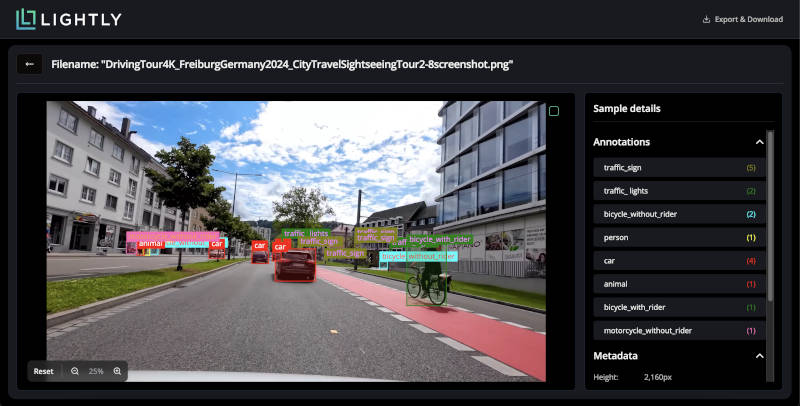
Inspect individual samples in detail, viewing all annotations and metadata.
🎯 Features
- Local Web GUI: Explore and curate your dataset in your browser. Works completelly offline, your data never leaves your machine.
- Flexible Input Formats: Load your image dataset from a folder, or with annotations from a number of popular formats like e.g. COCO or YOLO.
- Metadata: Attach your custom metadata to every sample.
- Tags: Mark subsets of your dataset for later use.
- Embeddings: Run similarity search queries on your data.
- Selection: Run advanced selection algorithms to tag a subset of your data.
💻 Installation
Ensure you have Python 3.8 or higher. We strongly recommend using a virtual environment.
The library is OS-independent and works on Windows, Linux, and macOS.
# 1. Create and activate a virtual environment (Recommended)
# On Linux/macOS:
python3 -m venv venv
source venv/bin/activate

# On Windows:
python -m venv venv
.\venv\Scripts\activate

# 2. Install Lightly Purple
pip install lightly-purple
Quickstart
Download the dataset and run a quickstart script to load your dataset and launch the app.
YOLO Object Detection
To run an example using a yolo dataset, clone the example repository and run the example script:
git clone https://github.com/lightly-ai/datasets_examples_purple dataset_examples_purple
python dataset_examples_purple/road_signs_yolo/example_yolo.py
The YOLO format details:
road_signs_yolo/
├── train/
│   ├── images/
│   │   ├── image1.jpg
│   │   ├── image2.jpg
│   │   └── ...
│   └── labels/
│       ├── image1.txt
│       ├── image2.txt
│       └── ...
├── valid/  (optional)
│   ├── images/
│   │   └── ...
│   └── labels/
│       └── ...
└── data.yaml
Each label file should contain YOLO format annotations (one per line):
<class> <x_center> <y_center> <width> <height>
Where coordinates are normalized between 0 and 1.
Let's break down the `example_yolo.py` script to explore the dataset:
# We import the DatasetLoader class from the lightly_purple module
from lightly_purple import DatasetLoader
from pathlib import Path

# Create a DatasetLoader instance
loader = DatasetLoader()

data_yaml_path = Path(__file__).resolve().parent / "data.yaml"
loader.from_yolo(
    data_yaml_path=str(data_yaml_path),
    input_split="test",
)

# We start the UI application on the port defined with the PURPLE_PORT env variable or 8001 by default.
loader.start_gui()
COCO Instance Segmentation
To run an instance segmentation example using a COCO dataset, clone the example repository and run the example script:
git clone https://github.com/lightly-ai/datasets_examples_purple dataset_examples_purple
python dataset_examples_purple/coco_subset_128_images/example_coco.py
The COCO format details:
coco_subset_128_images/
├── images/
│   ├── image1.jpg
│   ├── image2.jpg
│   └── ...
└── instances_train2017.json        # Single JSON file containing all annotations
COCO uses a single JSON file containing all annotations. The format consists of three main components:
- Images: Defines metadata for each image in the dataset.
- Categories: Defines the object classes.
- Annotations: Defines object instances.
Let's break down the `example_coco.py` script to explore the dataset:
# We import the DatasetLoader class from the lightly_purple module
from lightly_purple import DatasetLoader
from pathlib import Path

# Create a DatasetLoader instance
loader = DatasetLoader()

current_dir = Path(__file__).resolve().parent
loader.from_coco_instance_segmentations(
    annotations_json_path=str(current_dir / "instances_train2017.json"),
    img_dir=str(current_dir / "images"),
)

# We start the UI application on the port defined with the PURPLE_PORT env variable or 8001 by default.
loader.start_gui()
🔍 How It Works
- Your Python script uses the
lightly-purpleDataset Loader. - The Loader reads your images and annotations, calculates embeddings, and saves metadata to a local
purple.dbfile (using DuckDB). loader.start_gui()starts a local Backend API server.- This server reads from
purple.dband serves data to the UI Application running in your browser (http://localhost:8001). - Images are streamed directly from your disk for display in the UI.
🎯 Python Interface
Load Image Dataset From A Folder
from lightly_purple import DatasetLoader

loader = DatasetLoader()
loader.from_directory(
    dataset_name="my-dataset",
    img_dir="/path/to/image_dataset",
)
loader.start_gui()
Load Image Dataset With Annotations
The DatasetLoader currently supports:
- YOLOv8 Object Detection: Reads
.yamlfile. Supports bounding boxes. - COCO Object Detection: Reads
.jsonannotations. Supports bounding boxes. - COCO Instance Segmentation: Reads
.jsonannotations. Supports instance masks in RLE (Run-Length Encoding) format.
from lightly_purple import DatasetLoader

# Create a DatasetLoader instance
loader = DatasetLoader()

# Load a dataset in YOLO format
dataset = loader.from_yolo(
    data_yaml_path="my_yolo_dataset/data.yaml",
    input_split="test",
)

# Load an object detection dataset in COCO format
dataset = loader.from_coco_object_detections(
    annotations_json_path="my_coco_dataset/detections_train.json",
    img_dir="my_coco_dataset/images",
)

# Load an instance segmentation dataset in COCO format
dataset = loader.from_coco_instance_segmentations(
    annotations_json_path="my_coco_dataset/instances_train.json",
    img_dir="my_coco_dataset/images",
)

# Launch the GUI
loader.start_gui()
Samples
The dataset consists of samples. Every sample corresponds to an image. Dataset samples can be fetched and accessed as follows, for a full list of attributes see src/lightly_purple/models/sample.py.
# Get all dataset samples
samples = dataset.get_samples()

# Access sample attributes
s = samples[0]
s.sample_id        # Sample ID
s.file_name        # Image file name
s.file_path_abs    # Full image file path
s.tags             # The list of sample tags
...
Sample Filtering
You can efficiently fetch filtered dataset samples with the get_samples() method.
All arguments are optional. A database object UUID is needed for filtering by
annotation labels, tags and samples. They would be obtained by other function calls.
from lightly_purple.resolvers.samples_filter import FilterDimensions, SampleFilter
from lightly_purple.resolvers.metadata_resolver.metadata_filter import Metadata

sample1 = ...
sample2 = ...
ann1 = ...
tag1 = ...

# Example with available filters, all arguments are optional.
samples = dataset.get_samples(
    # Set offset and limit to the list of returned samples.
    # Samples are ordered by their creation date.
    offset=0,
    limit=10,

    filters=SampleFilter(
        # Filter by width and/or height.
        width=FilterDimensions(min=10, max=200),
        height=FilterDimensions(min=10, max=None),

        # Filter by annotations.
        annotation_label_ids=[ann1.annotation_label_id],

        # Filter by tags.
        tag_ids=[tag1.tag_id],

        # Filter by metadata.
        metadata_filters=[
            Metadata("temperature") > 25.0,
            Metadata("nested.bool_key") == True,
        ]
    ),

    # Fetch only specific samples by IDs.
    sample_ids=[sample1.sample_id, sample2.sample_id],
)
Alternatively, samples can be filtered directly in python code:
my_samples = [
    sample in dataset.get_samples()
    if sample.file_name in ["image1.jpg", "image2.jpg"]
]
Add Custom Metadata
Attach values to custom fields for every sample.
from lightly_purple import DatasetLoader

# Load your dataset
loader = DatasetLoader()
dataset = loader.from_directory(
    dataset_name="my-dataset",
    img_dir="/path/to/image_dataset",
)

# Attach metadata
for sample in dataset.get_samples():
    sample["my_metadata"] = f"Example metadata field for {sample.file_name}"
    sample["my_dict"] = {"my_int_key": 10, "my_bool_key": True}

# View metadata in GUI
loader.start_gui()
Tags
You can easily mark subsets of your data with tags.
from lightly_purple.resolvers import tag_resolver
from lightly_purple.models.tag import TagCreate

# Load your dataset
loader = DatasetLoader()
dataset = ...

# Create a tag
my_tag = tag_resolver.create(
    session=loader.session,
    tag=TagCreate(dataset_id=dataset.dataset_id, name="my-tag"),
)

# Tag some samples, for example the first 10 samples:
for sample in dataset.get_samples()[:10]:
    tag_resolver.add_tag_to_sample(
        session=loader.session,
        tag_id=my_tag.tag_id,
        sample=sample,
    )
Find existing tags and tagged samples as follows.
from lightly_purple.resolvers import tag_resolver
from lightly_purple.resolvers.samples_filter import SampleFilter

# Get all tags
all_tags = tag_resolver.get_all_by_dataset_id(
    session=loader.session,
    dataset_id=dataset.dataset_id,
)

# Get a tag by name
my_tag = tag_resolver.get_by_name(
    session=loader.session,
    tag_name="my-tag"
)

# Get tagged samples
tagged_samples = dataset.get_samples(filters=SampleFilter(tag_ids=[my_tag.tag_id]))
Selection
Lightly Purple offers as a premium feature advanced methods for subselecting dataset samples.
Prerequisites: The selection functionality requires a valid Lightly Purple license key.
Set the LIGHTLY_PURPLE_LICENSE_KEY environment variable before using selection features:
export LIGHTLY_PURPLE_LICENSE_KEY="license_key_here"
Alternatively, set it inside your Python script:
import os
os.environ["LIGHTLY_PURPLE_LICENSE_KEY"] = "license_key_here"
The selection can be configured with a rich interface of the Selection object. The
example below showcases a simple case of selecting diverse samples.
import os
from lightly_purple import DatasetLoader
from lightly_purple.selection.select import Selection

# Load your dataset
loader = DatasetLoader()
dataset = loader.from_directory(
    dataset_name="my-dataset",
    img_dir="/path/to/image_dataset",
)

# Select a diverse subset of 10 samples.
select = Selection(dataset_id=dataset.dataset_id, session=loader.session)
select.diverse(
    n_samples_to_select=10,
    selection_result_tag_name="diverse_selection",
)

loader.start_gui()
The selected sample paths can be exported via the GUI, or by a script:
from lightly_purple.resolvers import tag_resolver
from lightly_purple.resolvers.samples_filter import SampleFilter

tag = tag_resolver.get_by_name(session=loader.session, tag_name="diverse_selection")
selected_samples = dataset.get_samples(filters=SampleFilter(tag_ids=[tag.tag_id]))

with open("export.txt", "w") as f:
    for sample in selected_samples:
        f.write(f"{sample.file_name}\n")
📚 FAQ
Are the datasets persistent?
Yes, the information about datasets is persistent and stored in the db file. You can see it after the dataset is processed. If you rerun the loader it will create a new dataset representing the same dataset, keeping the previous dataset information untouched.
Can I change the database path?
Not yet. The database is stored in the working directory by default.
Can I launch in another Python script or do I have to do it in the same script?
It is possible to use only one script at the same time because we lock the db file for the duration of the script.
Can I change the API backend port?
Yes. To change the port set the PURPLE_PORT variable to your preffered value. If at runtime the port is unavailable it will try to set it to a random value.
Release history Release notifications | RSS feed


Download files
Download the file for your platform. If you're not sure which to choose, learn more about installing packages.
Source Distribution
Built Distribution
Filter files by name, interpreter, ABI, and platform.
If you're not sure about the file name format, learn more about wheel file names.
Copy a direct link to the current filters
File details
Details for the file lightly_purple-0.3.0.tar.gz.
File metadata
- Download URL: lightly_purple-0.3.0.tar.gz
- Upload date:
- Size: 1.4 MB
- Tags: Source
- Uploaded using Trusted Publishing? No
- Uploaded via: uv/0.5.4
File hashes
| Algorithm | Hash digest | |
|---|---|---|
| SHA256 |
df9d81f015fa47d086cf1594d5af389211d2e092174e87fa15000b74760f7b2c
|
|
| MD5 |
e2d7a299344c1b5b4a3670f176a651ba
|
|
| BLAKE2b-256 |
1d6f24c7173509a516b333f468586ce2570899dd568e0905bc4a895d0824cbf8
|
File details
Details for the file lightly_purple-0.3.0-py3-none-any.whl.
File metadata
- Download URL: lightly_purple-0.3.0-py3-none-any.whl
- Upload date:
- Size: 1.5 MB
- Tags: Python 3
- Uploaded using Trusted Publishing? No
- Uploaded via: uv/0.5.4
File hashes
| Algorithm | Hash digest | |
|---|---|---|
| SHA256 |
12ebd346e07783189eb0310dc4658c426f748e0dcd0f1b59467c86f6724fe6c1
|
|
| MD5 |
acd740864bf3dc2e90b1e0c41bb0e92b
|
|
| BLAKE2b-256 |
01b98a9c915237363f2736d90c864a1ff66d5133db4c780f1e87d31bea2a4b02
|


