LLM testing framework for validating agent behavior and tool usage

Project description
LLM Goose 🪿
LLM-powered testing for LLM agents — define expectations as you'd describe them to a human


Goose is a Python library, CLI, and web dashboard that helps developers build and iterate on LLM agents faster.
Write tests in Python, run them from the terminal or dashboard, and instantly see what went wrong when things break.
Currently designed for LangChain-based agents, with plans for framework-agnostic support.
Why Goose?
Think of Goose as pytest for LLM agents:
- Natural language expectations – Describe what should happen in plain English; an LLM validator checks if the agent delivered.
- Tool call assertions – Verify your agent called the right tools, not just that it sounded confident.
- Full execution traces – See every tool call, response, and validation result in the web dashboard.
- Pytest-style fixtures – Reuse agent setup across tests with
@fixturedecorators. - Hot-reload during development – Edit your agent code, re-run tests instantly without restarting the server.
- Persistent test history – Track test results over time with file-based persistence.
- Interactive chat – Chat with your agents directly in the dashboard.
- Tool playground – Test your tools in isolation with the Tooling view.

Dashboard Views
The Goose dashboard provides three main views:
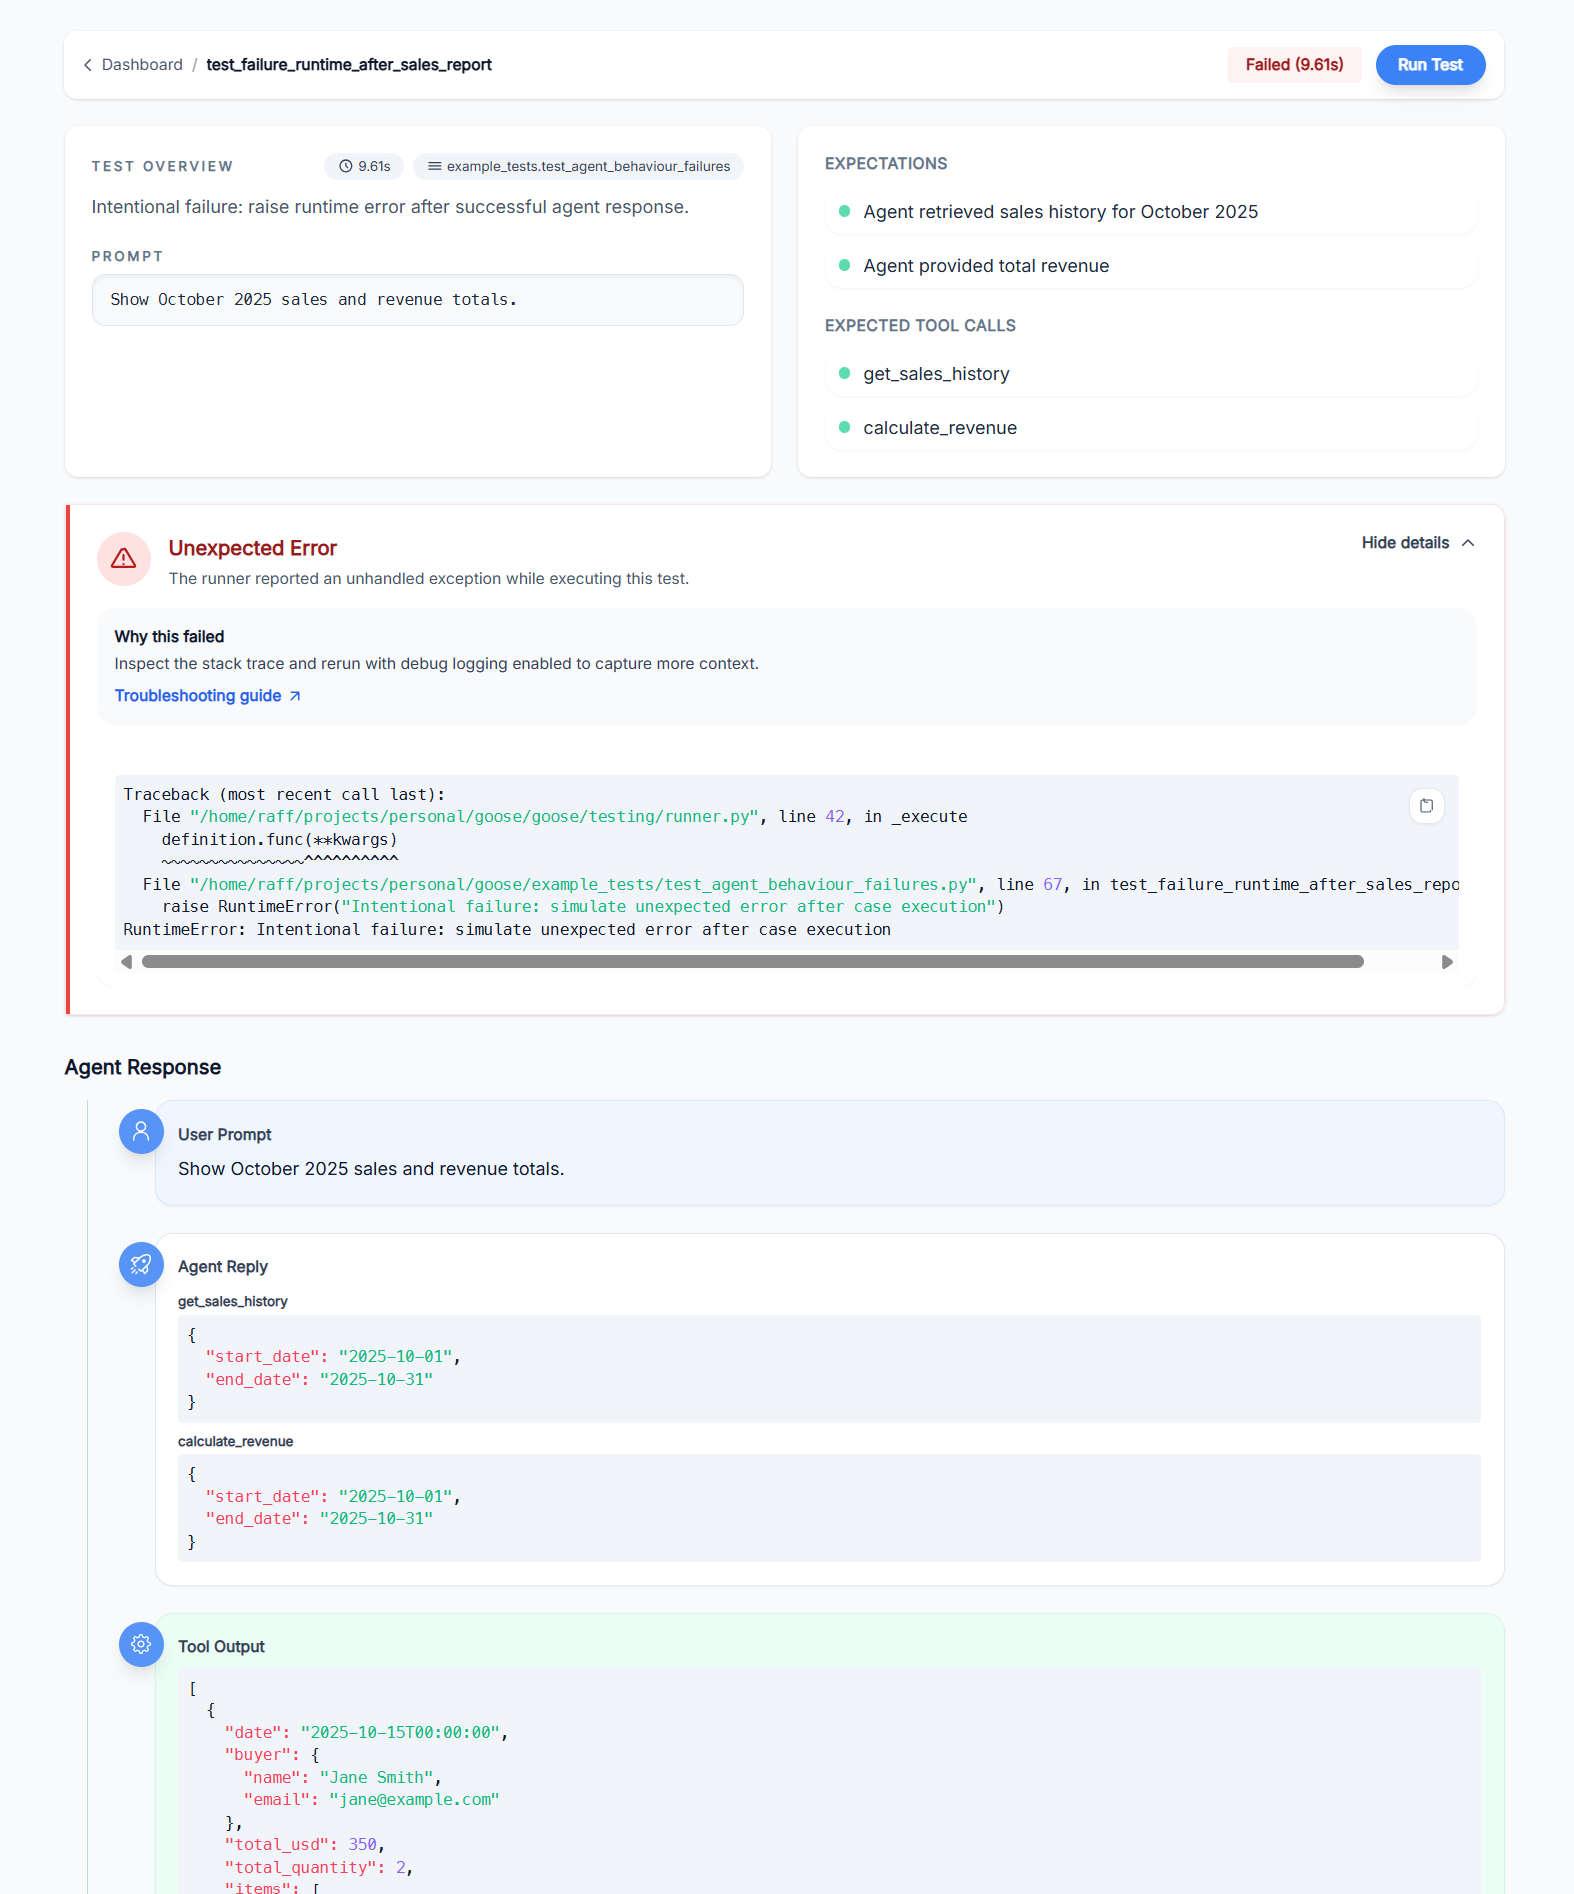
Testing View
Run and monitor your LLM agent tests. See test results in real-time with full execution traces, tool calls, and validation results. Test history is persisted to disk, so you can track results over time and compare runs.
Tooling View
A playground for testing your agent's tools in isolation. Browse all registered tools, see their schemas, and invoke them directly with custom parameters. Supports tool groups for organized display.
Chat View
Interactive chat interface for your agents. Start conversations, see tool calls in real-time, and explore your agent's behavior without writing tests. Great for rapid prototyping and debugging.
Install 🚀
pip install llm-goose
npm install -g @llm-goose/dashboard-cli
CLI
# Initialize a new gooseapp/ project structure
goose init

# run tests from the terminal
goose test run gooseapp.tests

# list tests without running them
goose test list gooseapp.tests

# add -v / --verbose to stream detailed steps
goose test run -v gooseapp.tests
API & Dashboard
# Start the dashboard (auto-discovers gooseapp/ in current directory)
goose api

# Custom host and port
goose api --host 0.0.0.0 --port 3000

# run the dashboard (connects to localhost:8730 by default)
goose-dashboard

# or point the dashboard at a custom API URL
GOOSE_API_URL="http://localhost:8730" goose-dashboard
GooseApp Configuration
Run goose init to create a gooseapp/ folder with centralized configuration:
# gooseapp/app.py
from goose import GooseApp
from langgraph.prebuilt import create_react_agent
from langchain_openai import ChatOpenAI
from my_agent.tools import get_weather, get_forecast

# Create an agent for interactive chatting
agent = create_react_agent(
    ChatOpenAI(model="gpt-4o-mini"),
    tools=[get_weather, get_forecast],
)
agent.name = "Weather Assistant"  # Required: agents must have a name

app = GooseApp(
    # Option 1: Simple flat list of tools
    tools=[get_weather, get_forecast],

    # Option 2: Grouped tools for UI organization (cannot use both)
    # tool_groups={
    #     "Weather": [get_weather, get_forecast],
    # },

    agents=[agent],                      # Agents available in Chat view
    reload_targets=["my_agent"],         # Modules to hot-reload during development
    reload_exclude=["my_agent.data"],    # Modules to skip during reload
)
Quick Start: Minimal Example 🏃♂️
Here's a complete, runnable example of testing an LLM agent with Goose. This creates a simple weather assistant agent and tests it.
1. Set up your agent
Create my_agent.py:
from dotenv import load_dotenv
from langchain_openai import ChatOpenAI
from langchain_core.messages import HumanMessage
from langchain_core.tools import tool
from langgraph.prebuilt import create_react_agent
from goose.testing.models.messages import AgentResponse

load_dotenv()

@tool
def get_weather(location: str) -> str:
    """Get the current weather for a given location."""
    return f"The weather in {location} is sunny and 75°F."

agent = create_react_agent(
    ChatOpenAI(model="gpt-4o-mini"),
    tools=[get_weather],
)

def query_weather_agent(question: str) -> AgentResponse:
    """Query the agent and return a normalized response."""
    result = agent.invoke({"messages": [HumanMessage(content=question)]})
    return AgentResponse.from_langchain(result)
2. Set up fixtures
Create gooseapp/conftest.py:
from langchain_openai import ChatOpenAI

from goose.testing import Goose, fixture
from my_agent import query_weather_agent

@fixture(name="weather_goose")  # name is optional - defaults to func name
def weather_goose_fixture() -> Goose:
    """Provide a Goose instance wired up to the sample LangChain agent."""

    return Goose(
        agent_query_func=query_weather_agent,
        validator_model=ChatOpenAI(model="gpt-4o-mini"),
    )
3. Write a test
Create gooseapp/tests/test_weather.py. Fixture will be injected into recognized test functions. Test function and file names need to start with test_ in order to be discovered.
from goose.testing import Goose
from my_agent import get_weather

def test_weather_query(weather_goose: Goose) -> None:
    """Test that the agent can answer weather questions."""

    weather_goose.case(
        query="What's the weather like in San Francisco?",
        expectations=[
            "Agent provides weather information for San Francisco",
            "Response mentions sunny weather and 75°F",
        ],
        expected_tool_calls=[get_weather],
    )
4. Run the test
goose test run gooseapp.tests
That's it! Goose will run your agent, check that it called the expected tools, and validate the response against your expectations.
Writing tests
At its core, Goose lets you describe what a good interaction looks like and then assert that your agent and tools actually behave that way.
Pytest-inspired syntax
Goose cases combine a natural‑language query, human‑readable expectations, and (optionally) the tools
you expect the agent to call. This example is adapted from
example_tests/agent_behaviour_test.py and shows an analytical workflow where the agent both
retrieves data and creates records:
def test_sale_then_inventory_update(goose_fixture: Goose) -> None:
    """Complex workflow: Sell 2 Hiking Boots and report the remaining stock."""

    count_before = Transaction.objects.count()
    inventory = ProductInventory.objects.get(product__name="Hiking Boots")
    assert inventory is not None, "Expected inventory record for Hiking Boots"

    goose_fixture.case(
        query="Sell 2 pairs of Hiking Boots to John Doe and then tell me how many we have left",
        expectations=[
            "Agent created a sale transaction for 2 Hiking Boots to John Doe",
            "Agent then checked remaining inventory after the sale",
            "Response confirmed the sale was processed",
            "Response provided updated stock information",
        ],
        expected_tool_calls=[check_inventory, create_sale],
    )

    count_after = Transaction.objects.count()
    inventory_after = ProductInventory.objects.get(product__name="Hiking Boots")

    assert count_after == count_before + 1, f"Expected 1 new transaction, got {count_after - count_before}"
    assert inventory_after is not None, "Expected inventory record after sale"
    assert inventory_after.stock == inventory.stock - 2, f"Expected stock {inventory.stock - 2}, got {inventory_after.stock}"
Custom lifecycle hooks
You can use existing lifecycle hooks or implement yours to suit your needs. Hooks are invoked before a test starts and after it finishes. This lets you setup your environment and teardown it afterwards.
from goose.testing.hooks import TestLifecycleHook

class MyLifecycleHooks(TestLifecycleHook):
    """Suite and per-test lifecycle hooks invoked around Goose executions."""

    def pre_test(self, definition: TestDefinition) -> None:
        """Hook invoked before a single test executes."""
        setup()

    def post_test(self, definition: TestDefinition) -> None:
        """Hook invoked after a single test completes."""
        teardown()


# gooseapp/conftest.py
from langchain_openai import ChatOpenAI

from goose.testing import Goose, fixture
from my_agent import query

@fixture()
def goose_fixture() -> Goose:
    """Provide a Goose instance wired up to the sample LangChain agent."""

    return Goose(
        agent_query_func=query,
        validator_model=ChatOpenAI(model="gpt-4o-mini"),
        hooks=MyLifecycleHooks(),
    )
Test History & Persistence
Goose automatically persists test results to disk under gooseapp/data/:
gooseapp/
└── data/
    ├── latest.json              # Index of most recent results (fast loading)
    └── history/
        ├── test_one.json        # Full history for each test
        └── test_two.json
This enables:
- Fast startup – The dashboard loads quickly by reading only the latest index
- History tracking – Compare current results with previous runs
- Persistence across restarts – Test results survive server restarts
The dashboard provides endpoints for managing history:
- View latest results for all tests
- Browse full history for individual tests
- Clear history (all or per-test)
License
MIT License – see LICENSE for full text.
Release history Release notifications | RSS feed


Download files
Download the file for your platform. If you're not sure which to choose, learn more about installing packages.
Source Distribution
Built Distribution
Filter files by name, interpreter, ABI, and platform.
If you're not sure about the file name format, learn more about wheel file names.
Copy a direct link to the current filters
File details
Details for the file llm_goose-0.1.33.tar.gz.
File metadata
- Download URL: llm_goose-0.1.33.tar.gz
- Upload date:
- Size: 59.2 kB
- Tags: Source
- Uploaded using Trusted Publishing? No
- Uploaded via: twine/6.2.0 CPython/3.13.6
File hashes
| Algorithm | Hash digest | |
|---|---|---|
| SHA256 |
522f865184d977a745c758b3a8d3ab6ae09e5282146a281c168f430b970d1327
|
|
| MD5 |
88845085ffd06496c85ee85bbf0488e1
|
|
| BLAKE2b-256 |
f5a7af40fa6b268ebff84f326b9dc079739de37479899eae88e7f68e31f04889
|
File details
Details for the file llm_goose-0.1.33-py3-none-any.whl.
File metadata
- Download URL: llm_goose-0.1.33-py3-none-any.whl
- Upload date:
- Size: 72.8 kB
- Tags: Python 3
- Uploaded using Trusted Publishing? No
- Uploaded via: twine/6.2.0 CPython/3.13.6
File hashes
| Algorithm | Hash digest | |
|---|---|---|
| SHA256 |
4409cf0538aa4f959cfa4b6a809c23f32714f7efcc25c5b710e00ad9ff40f47a
|
|
| MD5 |
d7030a460ff66ed3aac83f3aafdff606
|
|
| BLAKE2b-256 |
0211c93acfbdbb8255cb787b172123d8737c71a919b232cc0f9d6186e53f084d
|


