Dynamic CLI for modular-api

Project description
Modular-CLI Documentation
Content
- General Information
- Installation and Configuration
- Authentication and Authorization
- Command Usage
- Output Formats
- Autocomplete
- Advanced Configuration
- Modular-CLI Schema
- Annexes
- Project Information
1. General Information
Modular-CLI is a specialized command-line interface tool for interacting with Modular-API. It provides a seamless way to execute commands, manage resources, and interact with multiple modules through a unified CLI interface.
Key Features
- Automatic Authentication: JWT token generation and management
- Dynamic Command Loading: Automatically discovers available commands based on user permissions
- Multiple Output Formats: JSON, table, and plain text output
- Autocomplete Support: Command and parameter autocompletion (Unix-based systems; doesn't work in Docker containers as it depends on shell configuration)
- Secure Credential Storage: Encrypted local storage of authentication credentials
- Real-time Validation: Parameter validation before sending requests
- Unified Interface: Single entry point for all Modular-API modules
Architecture Overview
Modular-CLI acts as a client-side interface that:
- Authenticates users with Modular-API
- Retrieves available commands based on user permissions
- Dynamically generates CLI commands from API metadata
- Validates inputs before sending requests
- Formats and displays responses in user-friendly formats
- Manages JWT tokens and session persistence
Prerequisites
Before using Modular-CLI, ensure you have:
- Python 3.10+ installed
- pip package manager
- Active Modular-API server with network accessibility
- Valid user credentials (username and password)
- Network connectivity to Modular-API server
2. Installation and Configuration
Prerequisites
Download and install Python 3.10 or higher:
Verify installation:
python --version
# Expected: Python 3.10.x or higher

pip --version
# Expected: pip 21.x or higher
IMPORTANT: Using a virtual environment is highly recommended to prevent dependency conflicts.
Installation Steps
1. Create Virtual Environment
On Linux/Mac:
python3.10 -m venv modular_cli_venv
source modular_cli_venv/bin/activate
On Windows (PowerShell):
python -m venv modular_cli_venv
.\modular_cli_venv\Scripts\Activate.ps1
2. Install Modular-CLI
From Source:
# Clone repository
git clone https://github.com/epam/modular-cli.git
cd modular-cli

# Install
pip install .

# Or download from PYPI
pip install modular-cli

# Verify installation
modular_cli --version
3. Custom Entry Point (Optional)
You can customize the command name by setting an environment variable before installation:
On Linux/Mac:
export MODULAR_CLI_ENTRY_POINT=modular
pip install .

# Now use your custom command name
modular --help
On Windows:
$env:MODULAR_CLI_ENTRY_POINT="modular"
pip install .

# Now use your custom command name
modular --help
NOTE: This documentation uses modular_cli as the default entry point. Replace it with your custom name if configured differently.
Initial Configuration
Configure Connection to Modular-API
Before using Modular-CLI, you must configure the connection to your Modular-API server.
Basic Setup:
modular_cli setup \
  --username YOUR_USERNAME \
  --password YOUR_PASSWORD \
  --api_path https://your-modular-api.example.com/integration
Example:
modular_cli setup \
  --username john_doe \
  --password SecureP@ssw0rd \
  --api_path https://api.company.com/modular/integration
Expected output:
Response:
Great! The CLI tool 'modular_cli' has been set up
IMPORTANT: The Modular-API server must be running and accessible when executing the setup command.
Update Configuration
To update existing configuration (change credentials or API path):
modular_cli setup \
  --username new_username \
  --password new_password \
  --api_path https://new-api.example.com/integration
Remove Configuration
To delete all stored credentials and configuration:
modular_cli cleanup
Expected output:
Response:
Configuration for the CLI tool 'modular_cli' has been deleted
WARNING: This command removes all local configuration. You'll need to run setup again before using Modular-CLI.
Configuration File Location
Modular-CLI stores configuration in the following locations:
On Linux/Mac:
~/.modular_cli/
├── commands_meta.json   # Commands metadata file
└── credentials          # User credentials file
On Windows:
C:\Users\<Username>\.modular_cli\
├── commands_meta.json   # Commands metadata file
└── credentials          # User credentials file
3. Authentication and Authorization
Login Process
After configuring Modular-CLI, you must authenticate to receive a JWT token and retrieve available commands.
Execute Login
modular_cli login
Expected output:
Response:
Login successful
Credentials file example (~/.modular_cli/credentials):
access_token: eyJhbGciOiJIUzI1NiIsInR5cCI6IkpXVCJ9.eyJ1c2VybmFtZSI6ImpvaG5fZG9lIiwiaWF0IjoxNzYzNDU1MTQ3LCJleHAiOjE3NjM1NDE1NDcsIm1ldGFfdmVyc2lvbiI6IjUzMDkxMTdlYTE2YTc4OWZiZmFjZDZjYzk4MGY4OTM4ZmFkYjA2NWIifQ.yw3RUDFj-gbl8IPavxlQvMgAUlrDE9PI6zY_K7hKFY4
api_link: http://127.0.0.1:8088/integration
password: qwertyuiasdfghjk21
refresh_token: eyJhbGciOiJIUzI1NiIsInR5cCI6IkpXVCJ9.eyJ1c2VybmFtZSI6ImpvaG5fZG9lIiwidmVyc2lvbiI6ImZlMWQ3MWNlMWM2MTllZjcyMTljZDJmYzk3YzVkY2JiMWMzM2FmYTA5ZmJkZWE4MmQ4ODI1OGQ1YTBiZTdkOTkiLCJpYXQiOjE3NjM0NTUxNDcsImV4cCI6MTc2NDY2NDc0N30.Z6M628PTxOsvrm5Owzmau6o7UJrsIBPfAQKP7QRkIsY
username: john_doe
version: 4.3.8
Token Management
Automatic Token Refresh
Modular-CLI automatically manages token lifecycle:
- Access tokens are valid for 24 hours
- Refresh tokens are valid for 14 days
- Expired access tokens trigger automatic re-authentication using the refresh token
- Expired refresh tokens require manual login with
modular_cli login
What happens during login:
- Sends credentials to Modular-API
- Receives two JWT tokens:
- Access token with 24-hour expiration (for command execution)
- Refresh token with 14-day expiration (for automatic re-authentication)
- Retrieves command metadata based on user permissions
- Caches tokens and metadata locally
- Generates dynamic CLI commands
How token refresh works:
- When access token expires, Modular-CLI automatically uses the refresh token to obtain a new access token
- This happens transparently without user intervention
- Only when the refresh token expires (after 14 days of inactivity) must you manually run
modular_cli login
Manual Token Refresh
To manually refresh your token:
modular_cli login
Token Information
To check token status and permissions:
modular_cli version --detailed
Authorization Model
Available commands depend on your user permissions defined in Modular-API:
- Policies define allowed/denied operations
- Groups combine multiple policies
- Users inherit permissions from assigned groups
Example:
User john_doe in group l3support can only execute commands allowed by L3 support policies:
# This works - allowed by policy
modular_cli tenant describe --tenant AWS-MSTR-DEV

# This fails - denied by policy
modular_cli tenant deactivate_region --tenant AWS-MSTR-DEV --cloud AWS --all_regions
# Error: Access denied. Insufficient permissions.
Security Best Practices
- Never share credentials or token files
- Use strong passwords with complexity requirements
- Logout when done to clear cached tokens
- Rotate credentials regularly
- Use read-only accounts for auditing
- Monitor audit logs for suspicious activity
- Store credentials securely in password managers
4. Command Usage
Command Structure
The Modular-CLI follows a hierarchical, multi-layered command structure designed for intuitive navigation and organization.
The CLI is organized into three main levels:
- Root Commands - Top-level commands available directly under
modular_cli - Command Groups - Collections of related commands (can contain both commands and subgroups)
- Subcommands - Specific actions within a group or subgroup
Hierarchical Structure
modular_cli
├── [Command]           # Direct executable commands
├── [Command]
└── [Group]             # Command groups
    ├── [Command]       # Commands within the group
    ├── [Command]
    └── [Subgroup]      # Nested subgroups
        ├── [Command]
        └── [Command]
Getting Help
You can access help documentation at any level of the command hierarchy:
modular_cli --help                    # Show all root-level commands and groups
modular_cli [group] --help            # Show commands within a specific group
modular_cli [group] [subgroup] --help # Show commands within a subgroup
Navigation
- Each group logically organizes related functionality
- Commands follow a consistent naming pattern for predictability
Built-in Commands
setup - Configure Connection
modular_cli setup --username <USER> --password <PASS> --api_path <URL>
Parameters:
--username(required): Your Modular-API username--password(required): Your password--api_path(required): Modular-API server URL
Example:
modular_cli setup \
  --username admin \
  --password Admin123! \
  --api_path https://modular.company.com/integration
login - Authenticate and Refresh Commands
modular_cli login
Purpose: Authenticate user, retrieve JWT token, and refresh available commands.
Example:
modular_cli login
Output:
Response:
Login successful
cleanup - Remove Configuration
modular_cli cleanup
Purpose: Remove all stored configuration and credentials.
Example:
modular_cli cleanup
Output:
Response:
Configuration for the CLI tool 'modular_cli' has been deleted
version - Display Version Information
modular_cli version --detailed
Parameters:
--detailed(optional): Show all modules with detailed information
Examples:
# Show server and client versions
modular_cli version
Output:
Server: 4.3.8
Client: 2.3.15
# Show detailed information
modular_cli version --detailed
Output:
Server: 4.3.6
Client: 2.3.13
Billing: 1.1.1
Private: 1.0.6
Low_level: 1.0.15
Maintenance: 1.0.9
Permissions: 2.0.22
Notifications: 1.0.14
Chef: 1.0.2
M3admin: 4.150.5
health_check - Check API Server Status
modular_cli health_check
Purpose: Verify Modular-API server connectivity and health.
Example:
modular_cli health_check
Output:
Response:
Health check successful
Discovering Available Commands
List All Available Commands
modular_cli --help
Expected output:
Description: Here are the commands supported by the current version of modular_cli.
IMPORTANT: The scope of commands you can execute depends on your user permissions
Usage: modular_cli [module] group [subgroup] command [parameters]
Options:
  --help     Show this message and exit.

Available modules:
  chef
  stm

Available groups:
  application
  approval
  aws
  azure
  configure
  enterprise
  environment
  google
  ...

Available commands:
  cleanup
  get_operation_status
  health_check
  login
  setup
  version
Get Module-Specific Help
modular_cli chef --help
Expected output:
Description: Here are the commands supported by the current version of modular_cli.
IMPORTANT: The scope of commands you can execute depends on your user permissions
Usage: modular_cli [module] group [subgroup] command [parameters]
Options:
  --help     Show this message and exit.

Available groups:
  setting

Available commands:
  add_configuration
  assign_configuration
  delete_client
  delete_configuration
  describe_configuration
  get_client
  set_configuration
  unassign_configuration
  update_configuration
  update_role
Get Command-Specific Help
modular_cli tenant describe --help
Expected output:
Description:
    Lists tenants by certain filters.

Usage: modular_cli tenant describe [parameters]
Parameters:
    --tenant,              -tn,     Apply filter by tenant display name
    --customer_id,         -cid,    Apply filter by customer
    --cloud,               -c,      Apply filter by cloud AZURE|GOOGLE|AWS|OPEN_STACK|HARDWARE|YANDEX|WORKSPACE|ENTERPRISE|VSPHERE|VMWARE|NUTANIX
    --active,              -A,      Apply filter by active
    --account,             -acc,    Apply filter by tenant's account. This parameter is case sensitive
    --get_linked_tenants,  -glt,    Flag. Set this flag if you wish to retrieve linked tenants
    --json,                         Use this parameter to show command's response in a JSON view.
    --table,                        Use this parameter to show command's response in a Table view.
Command Execution Examples
Example 1: Simple Command
modular_cli tenant describe --tenant AWS-MSTR-DEV
Example 2: Command with Multiple Parameters
modular_cli tenant add_contacts \
  --tenant AWS-MSTR-DEV \
  --cloud AWS \
  --default_owner john.doe@example.com \
  --primary_contact admin@example.com
Example 3: Command with List Parameters
modular_cli tenant describe_regions \
  --customer_id EPAM \
  --cloud AWS \
  --cloud AZURE \
  --cloud GOOGLE
Example 4: Module-Specific Command
modular_cli chef add_configuration \
  --name prod-chef-config \
  --chef_server_url https://chef.company.com \
  --validator_key_path /path/to/validator.pem
Common Parameters
Most commands support these common parameters:
--json: Output response in JSON format--table: Output response in table format--help: Display command-specific help
5. Output Formats
Modular-CLI supports three output formats: plain text (default), JSON, and table.
Plain Text Output (Default)
By default, commands display output in table format when the response is large:
modular_cli tenant describe
Output:
The command's response is pretty huge and the result table structure can be broken.
Do you want to show the response in the JSON format? [y/n]: n

List of tenants
Status: SUCCESS
+----------------------+------------+---------------+------------------+...+----------+...+
|    Tenant name       |   Cloud    | Display name  |    Customer      |...|  Active  |...|
+----------------------+------------+---------------+------------------+...+----------+...+
| AWS-MSTR-DEV         | AWS        | MSTR-DEV      | EPAM Systems     |...|   True   |...|
| AWS-SFTG-MSTR-RES2   | AWS        | SFTG-MSTR     | EPAM Systems     |...|   True   |...|
| VSPHERE_TEST         | VSPHERE    | TEST          | EPAM Systems     |...|   True   |...|
+----------------------+------------+---------------+------------------+...+----------+...+
For specific tenant:
modular_cli tenant describe --tenant TEST-TENANT-001
Output:
Response:
Tenants not found by tenant: 'TEST-TENANT-001'
JSON Output
Use the --json flag to get structured JSON output suitable for parsing and automation:
modular_cli tenant describe --tenant TEST-TENANT-001 --json
Output:
{
    "status": "SUCCESS",
    "code": 200,
    "message": "Tenants not found by tenant: 'TEST-TENANT-001'",
    "warnings": [],
    "meta": {}
}
Example with data:
modular_cli tenant describe --json
Output (truncated):
{
    "status": "SUCCESS",
    "code": 200,
    "table_title": "List of tenants",
    "items": [
        {
            "Tenant name": "AWS-MSTR-DEV",
            "Cloud": "AWS",
            "Display name": "MSTR-DEV",
            "Customer": "EPAM Systems",
            "Linked to": "",
            "Contacts": {
                "default_owner": "some_user1@epam.com",
                "primary_contacts": [
                    "some_user2@gmail.com",
                    "some_user3@epam.com"
                ],
                "secondary_contacts": [],
                "tenant_manager_contacts": []
            },
            "Active": true,
            "Billing settings": {
                "deactivation_request_date": null,
                "default_for_common_cost": "AWS-EUCENTRAL",
                "last_rate_cards": null,
                "most_recent_record_date": null,
                "personal": false,
                "tenant_type": "NOT_BILLABLE"
            },
            "Account ID": "958173500045",
            "Activation Date": "2021-04-16T10:51:45.615Z",
            "Deactivation Date": ""
        }
    ],
    "warnings": [],
    "meta": {}
}
Use cases for JSON output:
- Automation scripts: Parse output programmatically
- CI/CD pipelines: Process results in build scripts
- Logging: Store structured logs for analysis
- Integration: Feed data into other tools
Example: Parsing JSON in Bash
#!/bin/bash

# Get tenant info and extract account ID
RESULT=$(modular_cli tenant describe --tenant AWS-MSTR-DEV --json)
ACCOUNT_ID=$(echo $RESULT | jq -r '.items[0]."Account ID"')

echo "Account ID: $ACCOUNT_ID"
Example: Parsing JSON in Python
import subprocess
import json

# Execute command
result = subprocess.run(
    ['modular_cli', 'tenant', 'describe', '--tenant', 'AWS-MSTR-DEV', '--json'],
    capture_output=True,
    text=True,
)

# Parse JSON
data = json.loads(result.stdout)
if data['status'] == 'SUCCESS':
    tenant_info = data['items'][0]
    print(f"Account ID: {tenant_info['Account ID']}")
Table Output
Use the --table flag for formatted table output (this is the default for most commands):
modular_cli tenant describe --tenant AWS-MSTR-DEV --table
Use cases for table output:
- Human-readable reports: Easy to read in terminal
- Documentation: Copy-paste into documents
- Presentations: Clear visual format
- Quick checks: Rapid information scanning
Response Structure
All responses follow this structure:
{
  "status": "SUCCESS|FAILED",
  "code": 200-599,
  "message": "string|object|array",
  "warnings": [],
  "meta": {}
}
Fields:
- status: Operation result (
SUCCESSorFAILED) - code: HTTP status code (200, 400, 401, 403, 404, 500, etc.)
- message: Response data (format depends on command)
- warnings: Non-critical warnings during execution
- meta: Additional metadata
6. Autocomplete
Modular-CLI supports command autocompletion for enhanced productivity on Unix-based systems (Linux and macOS).
Supported Shells:
- Bash
- Zsh
NOTE: Autocomplete is not available on Windows. Attempting to enable it on Windows will result in an error:
OSError: The OS is not applicable for autocompletion setup. Current OS is win32
Prerequisites
Before enabling autocomplete:
- Virtual environment must be activated
- Modular-CLI must be installed
- You must have sudo/root privileges
Enable Autocomplete
Step 1: Activate Virtual Environment
source /path/to/modular_cli_venv/bin/activate
Step 2: Create Symlink
sudo ln -s /path/to/modular_cli_venv/bin/modular_cli /usr/local/bin/modular_cli
Example:
sudo ln -s /usr/local/project/modular/.cli_venv/bin/modular_cli /usr/local/bin/modular_cli
Step 3: Start New Terminal Session
Close and reopen your terminal or open a new tab.
Step 4: Enable Autocomplete
sudo modular_cli enable_autocomplete
Expected output:
Autocomplete for 'modular_cli' has been successfully set up.
Path to the 'profile.d' file: /etc/profile.d/profile_modular_cli_complete.sh
Or for RC file setup:
Autocomplete has been successfully installed and will start work after the current terminal session reload.
If you want to manually activate autocomplete without reloading the terminal session,
please run the following command:
source ~/.bashrc
Step 5: Restart Terminal
Close and reopen your terminal for changes to take effect.
Using Autocomplete
After enabling autocomplete, you can use Tab key to complete commands:
Complete group names:
modular_cli ten[TAB]
# Result: modular_cli tenant
Complete command names:
modular_cli tenant des[TAB]
# Result: modular_cli tenant describe
View available options:
modular_cli tenant describe --[TAB][TAB]
# Result: --tenant --customer_id --cloud --active --account --get_linked_tenants --json --table
Disable Autocomplete
To remove autocomplete functionality:
sudo modular_cli disable_autocomplete
Expected output:
Autocomplete for 'modular_cli' has been successfully removed
Troubleshooting Autocomplete
Autocomplete Not Working
Issue: Tab completion doesn't work after enabling.
Solution:
-
Verify symlink exists:
ls -l /usr/local/bin/modular_cli
-
Check shell configuration:
grep modular_cli ~/.bashrc  # For Bash
grep modular_cli ~/.zshrc   # For Zsh
-
Restart terminal session
-
Try enabling again:
sudo modular_cli enable_autocomplete
Permission Denied
Issue: Cannot create symlink or enable autocomplete.
Solution: Ensure you're using sudo:
sudo ln -s /path/to/venv/bin/modular_cli /usr/local/bin/modular_cli
sudo modular_cli enable_autocomplete
Symlink Already Exists
Issue: Error when creating symlink: "File exists"
Solution: Remove old symlink and create new one:
sudo rm /usr/local/bin/modular_cli
sudo ln -s /path/to/venv/bin/modular_cli /usr/local/bin/modular_cli
7. Advanced Configuration
Environment Variables
Modular-CLI supports several environment variables for advanced configuration:
MODULAR_CLI_LOG_PATH
Custom path for storing Modular-CLI log files.
Default locations:
- Linux/Mac:
~/.modular_cli/logs/ - Windows:
C:\Users\<Username>\.modular_cli\logs\
Example:
export MODULAR_CLI_LOG_PATH=/var/log/modular-cli
modular_cli login
MODULAR_CLI_ENTRY_POINT
Custom command name for Modular-CLI.
Default: modular_cli
Example:
export MODULAR_CLI_ENTRY_POINT=modular
pip install .

# Now use custom command
modular --help
MODULAR_CLI_LOG_LEVEL
Logging verbosity level.
Possible values: DEBUG, INFO, WARNING, ERROR, CRITICAL
Default: INFO
Example:
export MODULAR_CLI_LOG_LEVEL=DEBUG
modular_cli login
Configuration File Structure
Credentials are stored in ~/.modular_cli/credentials:
access_token: eyJhbGciOiJIUzI1NiIsInR5cCI6IkpXVCJ9...
api_link: http://127.0.0.1:8088/integration
m3admin_version: 4.154.3
password: qwertyuiasdfghjk
refresh_token: eyJhbGciOiJIUzI1NiIsInR5cCI6IkpXVCJ9...
username: john_doe
version: 4.3.8
WARNING: Do not manually edit configuration files. Use modular_cli setup command instead.
Multiple Profiles
To work with multiple Modular-API instances, you can switch configurations:
Profile 1: Production
modular_cli setup \
  --username prod_user \
  --password ProdPass123! \
  --api_path https://prod-modular.company.com/integration

modular_cli login
Profile 2: Staging
modular_cli setup \
  --username stage_user \
  --password StagePass123! \
  --api_path https://stage-modular.company.com/integration

modular_cli login
NOTE: Only one profile can be active at a time. Running setup overwrites the current configuration.
Logging Configuration
View Logs
# Default location (Linux/Mac)
tail -f ~/.modular_cli/logs/modular_cli.log

# Default location (Windows)
type %USERPROFILE%\.modular_cli\logs\modular_cli.log

# Custom location (if MODULAR_CLI_LOG_PATH is set)
tail -f $MODULAR_CLI_LOG_PATH/modular_cli.log
Log Format
2025-01-19 10:30:45,123 - INFO - Starting Modular-CLI v2.3.15
2025-01-19 10:30:45,234 - INFO - Loading configuration from /home/user/.modular_cli/credentials
2025-01-19 10:30:45,456 - INFO - Authenticating user: john_doe
2025-01-19 10:30:46,789 - INFO - JWT token received and cached
2025-01-19 10:30:47,012 - INFO - Command metadata refreshed
Debug Logging
Enable debug logging for troubleshooting:
export MODULAR_CLI_LOG_LEVEL=DEBUG
modular_cli login
Debug output includes:
- HTTP request/response details
- Token validation steps
- Command parsing process
- Parameter validation
- Error stack traces
8. Modular-CLI Schema
Architecture Diagram
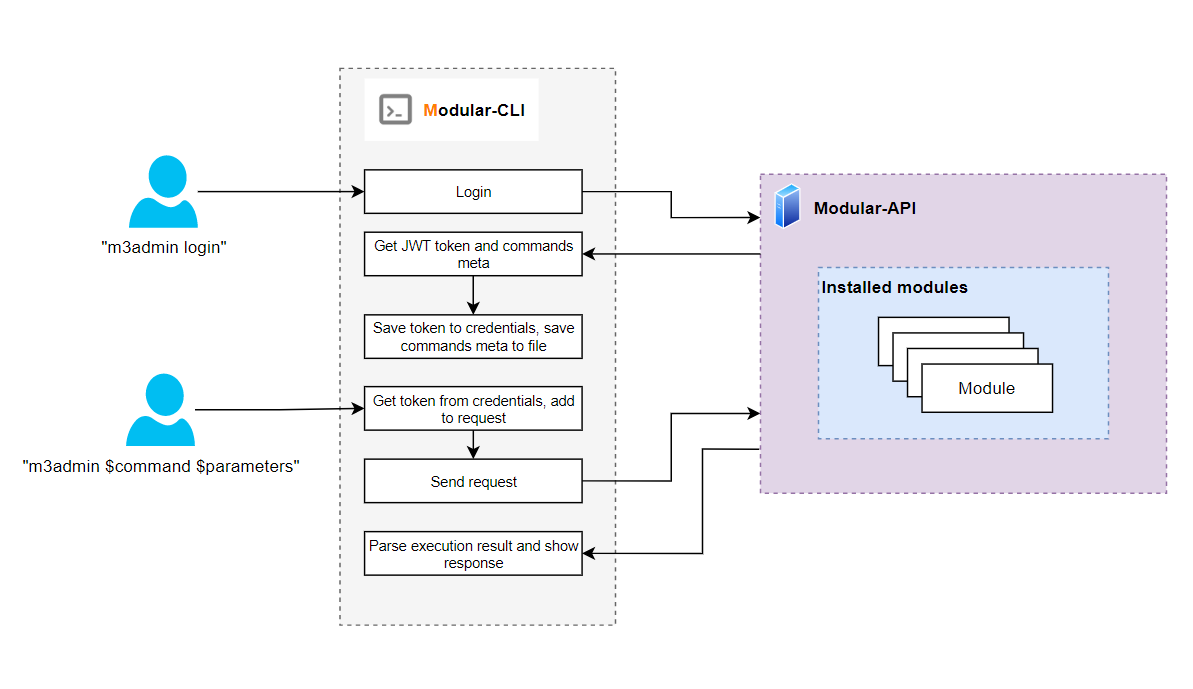
Request Flow
Authentication Flow:
- User executes
modular_cli login - CLI reads credentials from local configuration
- Sends authentication request to Modular-API
- Receives JWT token and command metadata
- Caches token and metadata locally
- Generates dynamic Click commands from metadata
Command Execution Flow:
- User executes command:
modular_cli tenant describe - CLI validates command exists in cached metadata
- CLI validates required parameters provided
- CLI constructs HTTP request with JWT token
- CLI sends request to Modular-API
- Modular-API validates token and permissions
- Modular-API executes command on backend module
- Modular-API returns response
- CLI formats and displays response
Component Interaction
┌─────────────────────────────────────────────────────┐
│                     User                            │
└─────────────────────┬───────────────────────────────┘
                      │
                      │ Command Execution
                      ▼
┌─────────────────────────────────────────────────────┐
│                 Modular-CLI                         │
│                                                     │
│  ┌─────────────────────────────────────────────┐    │
│  │  Configuration Manager                      │    │
│  │  - Load/Save config                         │    │
│  │  - Credential storage                       │    │
│  └─────────────────────────────────────────────┘    │
│                                                     │
│  ┌─────────────────────────────────────────────┐    │
│  │  Authentication Manager                     │    │
│  │  - JWT token handling                       │    │
│  │  - Token expiry checks                      │    │
│  └─────────────────────────────────────────────┘    │
│                                                     │
│  ┌─────────────────────────────────────────────┐    │
│  │  Command Generator                          │    │
│  │  - Dynamic Click command creation           │    │
│  │  - Parameter validation                     │    │
│  └─────────────────────────────────────────────┘    │
│                                                     │
│  ┌─────────────────────────────────────────────┐    │
│  │  HTTP Client                                │    │
│  │  - Request construction                     │    │
│  │  - Response handling                        │    │
│  └─────────────────────────────────────────────┘    │
│                                                     │
│  ┌─────────────────────────────────────────────┐    │
│  │  Output Formatter                           │    │
│  │  - JSON formatting                          │    │
│  │  - Table generation                         │    │
│  └─────────────────────────────────────────────┘    │
└─────────────────────┬───────────────────────────────┘
                      │
                      │ HTTPS Requests
                      ▼
┌─────────────────────────────────────────────────────┐
│                 Modular-API                         │
│  - Authentication                                   │
│  - Authorization                                    │
│  - Command Execution                                │
│  - Response Generation                              │
└─────────────────────────────────────────────────────┘
9. Annexes
Annex 1: Common Use Cases
This annex provides real-world examples and workflows for common Modular-CLI tasks.
Use Case 1: First-Time Setup
Scenario: Setting up Modular-CLI for the first time.
Step 1: Create Virtual Environment
python3.10 -m venv ~/.venv/modular_cli
source ~/.venv/modular_cli/bin/activate
Step 2: Install Modular-CLI
pip install /path/to/modular-cli
Step 3: Configure Connection
modular_cli setup \
  --username your_username \
  --password your_password \
  --api_path https://modular-api.company.com/integration
Step 4: Authenticate
modular_cli login
Step 5: Verify Setup
modular_cli health_check
modular_cli version --detailed
modular_cli --help
Use Case 2: Automation Script
Scenario: Create a script to describe all tenants and export to JSON.
Script: export_tenants.sh
#!/bin/bash

# Configuration
OUTPUT_DIR="/opt/reports/tenants"
TIMESTAMP=$(date +%Y%m%d_%H%M%S)
OUTPUT_FILE="${OUTPUT_DIR}/tenants_${TIMESTAMP}.json"

# Create output directory
mkdir -p ${OUTPUT_DIR}

# Activate virtual environment
source ~/.venv/modular_cli/bin/activate

# Ensure authenticated
modular_cli login > /dev/null 2>&1

# Export tenants to JSON
echo "Exporting tenants to ${OUTPUT_FILE}..."
modular_cli tenant describe --json > ${OUTPUT_FILE}

# Check if export succeeded
if [ $? -eq 0 ]; then
    echo "Export successful"
    echo "File: ${OUTPUT_FILE}"

    # Parse and display summary
    TENANT_COUNT=$(jq '.items | length' ${OUTPUT_FILE})
    echo "Total tenants: ${TENANT_COUNT}"
else
    echo "Export failed"
    exit 1
fi
Usage:
chmod +x export_tenants.sh
./export_tenants.sh
Use Case 3: CI/CD Integration
Scenario: Integrate Modular-CLI into GitLab CI/CD pipeline.
.gitlab-ci.yml
stages:
  - setup
  - deploy
  - verify

variables:
  MODULAR_API_URL: "https://modular-api.company.com/integration"

before_script:
  - python -m venv venv
  - source venv/bin/activate
  - pip install modular-cli

setup_modular:
  stage: setup
  script:
    - modular_cli setup
        --username ${MODULAR_USERNAME}
        --password ${MODULAR_PASSWORD}
        --api_path ${MODULAR_API_URL}
    - modular_cli login
  artifacts:
    paths:
      - ~/.modular_cli/
    expire_in: 1 hour

verify_tenant:
  stage: verify
  script:
    - source venv/bin/activate
    - |
      modular_cli tenant describe \
        --tenant ${CI_ENVIRONMENT_NAME} \
        --json | tee verify_result.json
    - |
      ACTIVE=$(jq -r '.items[0].Active' verify_result.json)
      if [ "${ACTIVE}" != "true" ]; then
        echo "Tenant not active"
        exit 1
      fi
  dependencies:
    - setup_modular
Use Case 4: Batch Operations
Scenario: Process multiple tenants from a list.
Script: batch_describe.sh
#!/bin/bash

# Tenant list file
TENANT_LIST="tenants.txt"
OUTPUT_DIR="tenant_reports"

# Create output directory
mkdir -p ${OUTPUT_DIR}

# Activate virtual environment
source ~/.venv/modular_cli/bin/activate

# Authenticate
modular_cli login

# Process each tenant
while IFS= read -r tenant; do
    echo "Processing tenant: ${tenant}"

    # Describe tenant
    modular_cli tenant describe \
        --tenant "${tenant}" \
        --json > "${OUTPUT_DIR}/${tenant}.json"

    # Check status
    if [ $? -eq 0 ]; then
        echo "✓ ${tenant} - Success"
    else
        echo "✗ ${tenant} - Failed"
    fi

    # Small delay to avoid rate limiting
    sleep 1
done < "${TENANT_LIST}"

echo "Batch processing complete"
echo "Reports saved in: ${OUTPUT_DIR}"
tenants.txt:
AWS-MSTR-DEV
AWS-SFTG-MSTR-RES1-DEV
AWS-SFTG-MSTR-RES2-DEV
VSPHERE_TEST
Usage:
chmod +x batch_describe.sh
./batch_describe.sh
Use Case 5: Monitoring Script
Scenario: Monitor API health and alert on failures.
Script: monitor_api.sh
#!/bin/bash

# Configuration
LOG_FILE="/var/log/modular-cli-monitor.log"
ALERT_EMAIL="ops-team@company.com"
CHECK_INTERVAL=300  # 5 minutes

# Activate virtual environment
source ~/.venv/modular_cli/bin/activate

# Function to log messages
log_message() {
    echo "$(date '+%Y-%m-%d %H:%M:%S') - $1" | tee -a ${LOG_FILE}
}

# Function to send alert
send_alert() {
    local subject="$1"
    local message="$2"
    echo "${message}" | mail -s "${subject}" ${ALERT_EMAIL}
}

# Monitoring loop
while true; do
    # Check API health
    HEALTH_OUTPUT=$(modular_cli health_check 2>&1)
    HEALTH_STATUS=$?

    if [ ${HEALTH_STATUS} -eq 0 ]; then
        log_message "API Health: OK"
    else
        log_message "API Health: FAILED"
        send_alert "Modular-API Health Check Failed" "${HEALTH_OUTPUT}"
    fi

    # Try to get version
    VERSION_OUTPUT=$(modular_cli version 2>&1)
    VERSION_STATUS=$?

    if [ ${VERSION_STATUS} -eq 0 ]; then
        log_message "Version Check: OK - ${VERSION_OUTPUT}"
    else
        log_message "Version Check: FAILED"
        send_alert "Modular-API Version Check Failed" "${VERSION_OUTPUT}"
    fi

    # Wait before next check
    sleep ${CHECK_INTERVAL}
done
Use Case 6: Python Integration
Scenario: Use Modular-CLI from Python scripts.
Script: tenant_manager.py
#!/usr/bin/env python3

import subprocess
import json
import sys

class ModularCLI:
    """Wrapper for Modular-CLI commands"""

    def __init__(self, cli_path='modular_cli'):
        self.cli_path = cli_path

    def execute(self, command, json_output=True):
        """Execute Modular-CLI command"""
        cmd = [self.cli_path] + command

        if json_output and '--json' not in cmd:
            cmd.append('--json')

        try:
            result = subprocess.run(
                cmd,
                capture_output=True,
                text=True,
                check=True,
            )

            if json_output:
                return json.loads(result.stdout)
            return result.stdout

        except subprocess.CalledProcessError as e:
            print(f"Command failed: {' '.join(cmd)}", file=sys.stderr)
            print(f"Error: {e.stderr}", file=sys.stderr)
            return None

    def describe_tenant(self, tenant_name):
        """Describe specific tenant"""
        return self.execute(['tenant', 'describe', '--tenant', tenant_name])

    def list_tenants(self):
        """List all tenants"""
        return self.execute(['tenant', 'describe'])

    def health_check(self):
        """Check API health"""
        return self.execute(['health_check'])

def main():
    cli = ModularCLI()

    # Check health
    print("Checking API health...")
    health = cli.health_check()
    if health and health['status'] == 'SUCCESS':
        print("✓ API is healthy")
    else:
        print("✗ API health check failed")
        return 1

    # List tenants
    print("\nListing all tenants...")
    tenants = cli.list_tenants()

    if tenants and tenants['status'] == 'SUCCESS':
        tenant_list = tenants['items']
        print(f"Found {len(tenant_list)} tenants")

        for tenant in tenant_list:
            tenant_name = tenant.get('Tenant name', 'Unknown')
            status = tenant.get('Active', 'Unknown')
            print(f"  - {tenant_name}: {'Active' if status else 'Inactive'}")
    else:
        print("Failed to list tenants")
        return 1

    return 0

if __name__ == '__main__':
    sys.exit(main())
Usage:
chmod +x tenant_manager.py
./tenant_manager.py
Annex 2: Troubleshooting Guide
This annex provides solutions to common issues encountered when using Modular-CLI.
Issue 1: Command Not Found
Problem:
modular_cli --help
# bash: modular_cli: command not found
Causes:
- Virtual environment not activated
- Modular-CLI not installed
- Incorrect entry point name
Solutions:
# 1. Activate virtual environment
source /path/to/venv/bin/activate

# 2. Verify installation
pip list | grep modular-cli

# 3. Reinstall if necessary
pip install --force-reinstall /path/to/modular-cli

# 4. Check custom entry point
echo $MODULAR_CLI_ENTRY_POINT
Issue 2: Authentication Failed
Problem:
modular_cli login
# Error: Authentication failed. Invalid credentials.
Causes:
- Incorrect username or password
- User account blocked in Modular-API
- API server unreachable
Solutions:
# 1. Verify credentials
modular_cli setup \
  --username correct_username \
  --password correct_password \
  --api_path https://correct-url.com/integration

# 2. Check API server connectivity
curl https://your-api-server.com/integration/health

# 3. Verify user is not blocked (contact admin)

# 4. Check logs for detailed error
cat ~/.modular_cli/logs/modular_cli.log
Issue 3: Token Expired
Problem:
modular_cli tenant describe
# Error: Token expired. Please login again.
Cause:
- Access token has expired (default: 24 hours) and refresh token failed
- Refresh token has expired (default: 14 days)
- Cached tokens are corrupted
Understanding Token Lifecycle:
Modular-CLI uses two types of tokens:
- Access token: Valid for 24 hours, used for command execution
- Refresh token: Valid for 14 days, used to automatically renew access tokens
Automatic Refresh:
When your access token expires (after 24 hours), Modular-CLI automatically uses the refresh token to get a new access token. This happens transparently without user action.
Manual Login Required:
You only need to manually login when:
- Refresh token expires (after 14 days of no activity)
- Tokens are corrupted or invalid
- You see "Token expired" error despite automatic refresh
Solution:
# Simply login again
modular_cli login
Prevention:
To avoid manual logins:
- Use Modular-CLI at least once every 14 days to keep refresh token active
- Automated scripts should handle authentication errors and re-login automatically
Issue 4: Permission Denied
Problem:
modular_cli tenant deactivate_region --tenant AWS-TEST --cloud AWS --all_regions
# Error: Access denied. Insufficient permissions.
Causes:
- User doesn't have required permissions
- Command not allowed by user's policies
Solutions:
# 1. Check your permissions (contact admin)
modular_cli version --detailed

# 2. View available commands
modular_cli --help

# 3. Request access from administrator
# Administrator should update your group policies
Issue 5: Connection Timeout
Problem:
modular_cli tenant describe
# Error: Connection timeout. Unable to reach API server.
Causes:
- API server is down
- Network connectivity issues
- Firewall blocking connection
Solutions:
# 1. Check API server status
curl -v https://your-api-server.com/integration/health

# 2. Check network connectivity
ping api-server-domain.com

# 3. Verify firewall rules (contact network admin)
Issue 6: SSL Certificate Error
Problem:
modular_cli login
# Error: SSL certificate verification failed
Causes:
- Self-signed certificate
- Expired certificate
- Certificate chain issues
Solutions:
# Option 1: Install certificate authority (recommended)
# Contact your system administrator

# Option 2: Disable SSL verification (NOT RECOMMENDED for production)
# This is a security risk - use only in development
export PYTHONHTTPSVERIFY=0
modular_cli login
Issue 7: Command Not Available
Problem:
modular_cli chef add_configuration
# Error: Command not found or not available
Causes:
- Command not in your policy
- Module not installed on server
- Typo in command name
Solutions:
# 1. Check available commands
modular_cli --help

# 2. Verify module is installed
modular_cli version --detailed

# 3. Check correct command syntax
modular_cli chef --help

# 4. Contact admin to grant permissions
Issue 8: Invalid Parameter
Problem:
modular_cli tenant describe --tenant AWS-TEST --invalid_param value
# Error: Unknown parameter: --invalid_param
Cause: Invalid or unsupported parameter
Solution:
# Check command help for valid parameters
modular_cli tenant describe --help
Issue 9: Configuration Corrupted
Problem:
modular_cli login
# Error: Failed to load configuration
Cause: Configuration file corrupted
Solution:
# 1. Remove corrupted configuration
modular_cli cleanup

# 2. Reconfigure
modular_cli setup \
  --username your_username \
  --password your_password \
  --api_path https://api.example.com/integration

# 3. Login
modular_cli login
Issue 10: Rate Limit Exceeded
Problem:
modular_cli tenant describe
# Error: Rate limit exceeded. Please try again later.
Cause: Too many requests in short time
Solution:
# Wait and retry after a few seconds
sleep 10
modular_cli tenant describe

# For batch operations, add delays
for tenant in $(cat tenants.txt); do
    modular_cli tenant describe --tenant $tenant
    sleep 2  # Add delay between requests
done
Issue 11: JSON Parse Error
Problem:
modular_cli tenant describe --json
# Error: Failed to parse JSON response
Causes:
- API returned non-JSON response
- Response contains invalid JSON
Solutions:
# 1. Check response without --json flag
modular_cli tenant describe

# 2. Enable debug logging
export MODULAR_CLI_LOG_LEVEL=DEBUG
modular_cli tenant describe --json

# 3. Check logs
cat ~/.modular_cli/logs/modular_cli.log

# 4. Report issue to support with debug logs
Issue 12: Module Not Found
Problem:
modular_cli chef add_configuration
# Error: Module 'chef' not found
Causes:
- Module not installed on server
- Module not available for your user
Solutions:
# 1. Check installed modules
modular_cli version --detailed

# 2. Login to refresh available commands
modular_cli login

# 3. Contact admin to install module
Getting Help
If issues persist after trying these solutions:
-
Collect Information:
# Get version info
modular_cli version --detailed > version_info.txt

# Get logs
cat ~/.modular_cli/logs/modular_cli.log > cli_logs.txt

# Get configuration (remove sensitive data)
cat ~/.modular_cli/credentials > config_info.txt
-
Contact Support:
- Email: SupportSyndicateTeam@epam.com
- Include: version info, logs, and detailed issue description
- Response time: 5 business days
10. Project Information
Modular-CLI
Source Code: https://github.com/epam/modular-cli
Documentation: https://github.com/epam/modular-cli/blob/main/README.md
Changelog: https://github.com/epam/modular-cli/blob/main/CHANGELOG.md
Supported Python Version: 3.10+
Related Projects
- Modular-API: https://github.com/epam/modular-api
- Modular-SDK: https://github.com/epam/modular-sdk
- Modular-CLI-SDK: https://github.com/epam/modular-cli-sdk
Support
Email: SupportSyndicateTeam@epam.com
Response Time: 7 calendar days (5 business days, excluding weekends)
How to Report an Issue
When reporting issues, provide:
- Python version: Run
python --version - Modular-CLI version: Run
modular_cli version --detailed - Modular-API version: Included in version output
- Clear description: Concise issue description
- Steps to reproduce: Detailed reproduction steps
- Error messages: Complete error output
- Log files: Contents of
~/.modular_cli/logs/modular_cli.log - Environment details: OS, shell type, network setup
Example Issue Report:
Subject: Authentication fails with SSL error

Environment:
- OS: Ubuntu 22.04
- Python: 3.10.12
- Modular-CLI: 2.3.15
- Modular-API: 4.3.8
- Shell: bash

Issue Description:
When executing `modular_cli login`, I receive an SSL certificate
verification error.

Steps to Reproduce:
1. Configure CLI with: modular_cli setup --username user --password pass
   --api_path https://api.example.com/integration
2. Execute: modular_cli login
3. Error occurs: SSL certificate verification failed

Error Message:
[Paste complete error message]

Logs:
[Paste relevant log entries from ~/.modular_cli/logs/modular_cli.log]

Expected Behavior:
Login should succeed and JWT token should be retrieved.

Actual Behavior:
SSL verification error prevents authentication.
Communication Tips
- Be clear and concise in your issue description
- Provide all necessary information upfront
- Include command outputs and logs
- Mask sensitive information (passwords, tokens, URLs)
- Be respectful and patient - support team responds within 5 business days
Version Information
# Check Modular-CLI version
modular_cli version

# Check detailed version info
modular_cli version --detailed

# Check Python version
python --version

# Check pip version
pip --version
License
Please refer to the project repository for licensing information.
Last Updated: November 2025
Document Version: 2.0.0
Company: EPAM
Release history Release notifications | RSS feed


Download files
Download the file for your platform. If you're not sure which to choose, learn more about installing packages.
Source Distribution
Built Distribution
Filter files by name, interpreter, ABI, and platform.
If you're not sure about the file name format, learn more about wheel file names.
Copy a direct link to the current filters
File details
Details for the file modular_cli-2.3.17.tar.gz.
File metadata
- Download URL: modular_cli-2.3.17.tar.gz
- Upload date:
- Size: 72.2 kB
- Tags: Source
- Uploaded using Trusted Publishing? Yes
- Uploaded via: twine/6.1.0 CPython/3.13.7
File hashes
| Algorithm | Hash digest | |
|---|---|---|
| SHA256 |
66d3f494d0b0be31c34630bc4a4c15c725d0f4de59b1d3017036b154578b6b6c
|
|
| MD5 |
1368c08a4b369e0e1053bbbde7cae647
|
|
| BLAKE2b-256 |
a5f4a3e304d33b1d7c9762919d10eae9019d6883c5b1ae2b97bafd7e6c386e3b
|
Provenance
The following attestation bundles were made for modular_cli-2.3.17.tar.gz:
Publisher:
pypi-package.yml on epam/modular-cli
-
Statement:
-
Statement type:
https://in-toto.io/Statement/v1 -
Predicate type:
https://docs.pypi.org/attestations/publish/v1 -
Subject name:
modular_cli-2.3.17.tar.gz -
Subject digest:
66d3f494d0b0be31c34630bc4a4c15c725d0f4de59b1d3017036b154578b6b6c - Sigstore transparency entry: 768390069
- Sigstore integration time:
-
Permalink:
epam/modular-cli@c38bc2556fe4cc6af241d20b4898e25a0d15aab3 -
Branch / Tag:
refs/tags/2.3.17 - Owner: https://github.com/epam
-
Access:
public
-
Token Issuer:
https://token.actions.githubusercontent.com -
Runner Environment:
github-hosted -
Publication workflow:
pypi-package.yml@c38bc2556fe4cc6af241d20b4898e25a0d15aab3 -
Trigger Event:
release
-
Statement type:
File details
Details for the file modular_cli-2.3.17-py3-none-any.whl.
File metadata
- Download URL: modular_cli-2.3.17-py3-none-any.whl
- Upload date:
- Size: 51.4 kB
- Tags: Python 3
- Uploaded using Trusted Publishing? Yes
- Uploaded via: twine/6.1.0 CPython/3.13.7
File hashes
| Algorithm | Hash digest | |
|---|---|---|
| SHA256 |
0d0667e645e3b416e047aa36b66c1ac8745a4d5be1754ecd5bbbd5a0d79ed0b2
|
|
| MD5 |
67aed2020084b5831be272c305dae9de
|
|
| BLAKE2b-256 |
014b5571a5790157f71c82593b6529d06e96ea7d4b9bded69d891c8d88f60771
|
Provenance
The following attestation bundles were made for modular_cli-2.3.17-py3-none-any.whl:
Publisher:
pypi-package.yml on epam/modular-cli
-
Statement:
-
Statement type:
https://in-toto.io/Statement/v1 -
Predicate type:
https://docs.pypi.org/attestations/publish/v1 -
Subject name:
modular_cli-2.3.17-py3-none-any.whl -
Subject digest:
0d0667e645e3b416e047aa36b66c1ac8745a4d5be1754ecd5bbbd5a0d79ed0b2 - Sigstore transparency entry: 768390072
- Sigstore integration time:
-
Permalink:
epam/modular-cli@c38bc2556fe4cc6af241d20b4898e25a0d15aab3 -
Branch / Tag:
refs/tags/2.3.17 - Owner: https://github.com/epam
-
Access:
public
-
Token Issuer:
https://token.actions.githubusercontent.com -
Runner Environment:
github-hosted -
Publication workflow:
pypi-package.yml@c38bc2556fe4cc6af241d20b4898e25a0d15aab3 -
Trigger Event:
release
-
Statement type:


