Claude Code IoT Bridge — connect Claude to hardware via USB

Project description
nff — Your bench hardware as a CI target
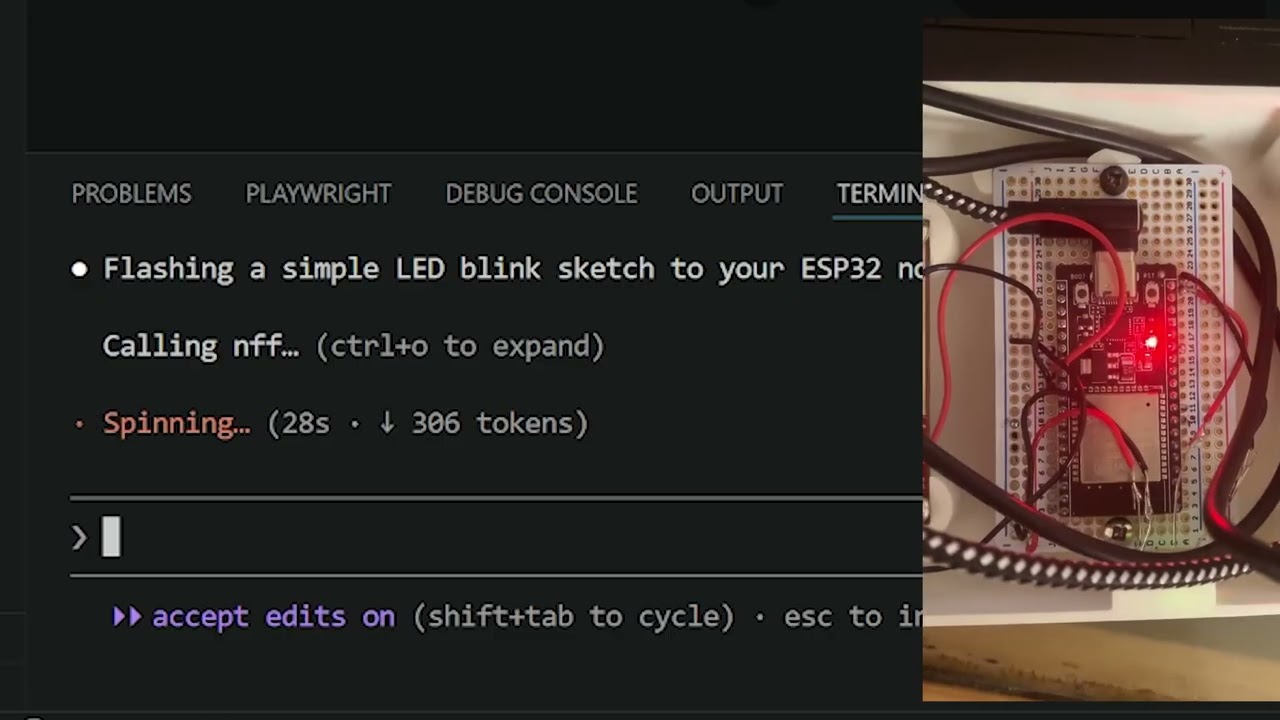
Firmware iteration is slow because the hardware loop is manual. nff connects your existing bench hardware to Claude Code — push code, it compiles, flashes, and returns serial output automatically. No new hardware. No cloud boards. Your device, automated.
you: "Run the sensor init sequence and assert the calibration values over serial"
Claude: [writes test] → [compiles] → [flashes ESP32] → [reads serial] → returns structured output
Supported boards: ESP32 (CP210x / CH340) · ESP8266 (FTDI) · Arduino AVR (Uno, Mega, Nano, Leonardo)
STM32 and RP2040 support in progress — open a PR, adding a board is two lines of code.
Why this exists
Every firmware iteration means manually compiling, flashing, and reading serial by hand. On a real bench. One cycle takes minutes. Multiply that by a day of debugging and you've lost hours to logistics. nff closes that loop — your board becomes a CI target.
It doesn't replace your toolchain — it automates the logistics around it. arduino-cli handles compilation, esptool handles flashing, your board stays on your bench. nff just closes the loop.
MCP Tools (what Claude can call)
Once registered, Claude Code has access to these tools:
| Tool | What it does |
|---|---|
list_devices() |
List all connected USB boards |
flash(code, board?, port?) |
Write, compile, and upload a sketch |
serial_read(duration_ms?, port?, baud?) |
Capture serial output for N ms |
serial_write(data, port?, baud?) |
Send a string to the device |
reset_device(port?) |
Toggle DTR to hardware-reset the board |
get_device_info(port?) |
Return port, board name, FQBN, baud rate |
All tools fall back to the default device in ~/.nff/config.json when port and board are omitted.
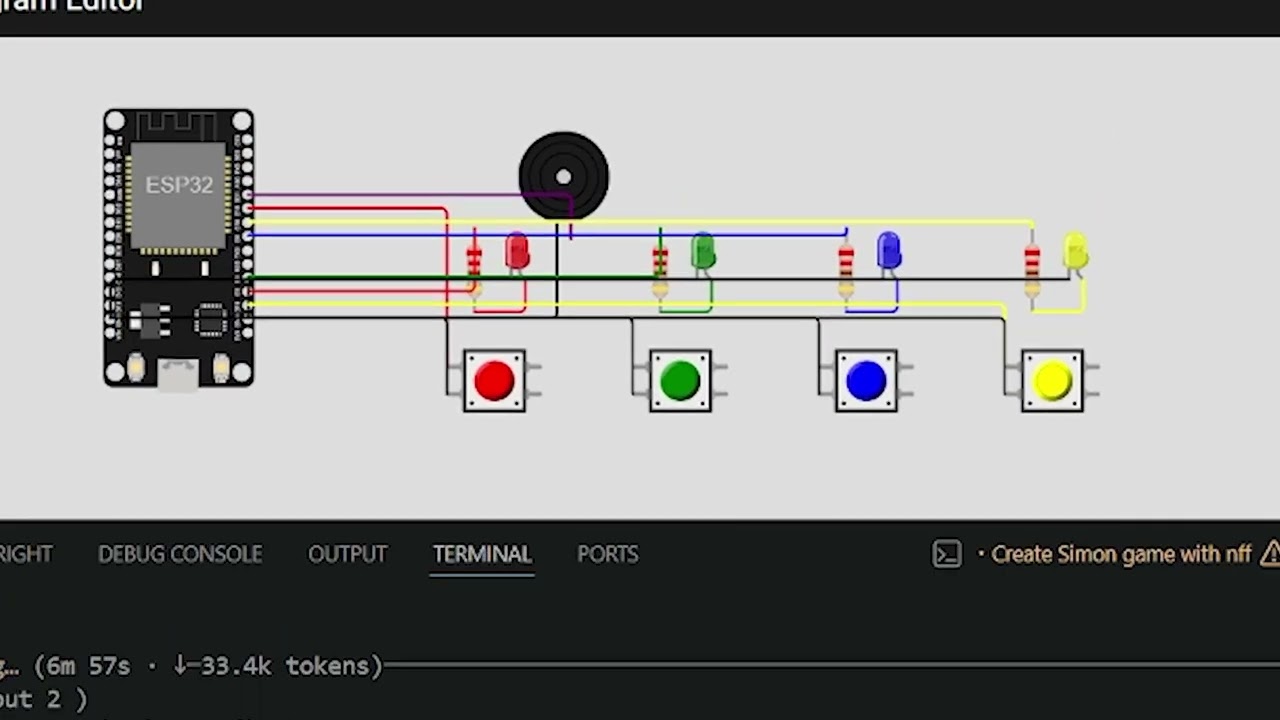
Simulation via Wokwi also supported — useful for CI without a bench. See Wokwi simulation below.
Demo
Real Hardware
Wokwi Simulation
Quickstart
If you've ever lost a morning to manual flash-debug cycles, nff is for you. It doesn't add steps to your workflow — it removes them.
1. Install
pip install nff
esptool is bundled — no separate install needed.
2. Install external tools
# Board cores (install the ones you need)
arduino-cli core install esp32:esp32
arduino-cli core install arduino:avr
arduino-cli core install esp8266:esp8266
arduino-cli is auto-installed by
nff initif it is not already on your PATH. You can also install it manually from https://arduino.github.io/arduino-cli.
3. Plug in your board and run init
nff init
This single command does everything:
- Detects your board by USB vendor/product ID
- Writes
~/.nff/config.jsonand aCLAUDE.mdin the current directory - Registers the nff MCP server (
claude mcp add nff nff mcp) - Installs the
/nffand/wokwi-diagramClaude Code skills globally
  ✓ Found: ESP32 (CP210x) on COM10
  ✓ Config written to ~/.nff/config.json
  ✓ CLAUDE.md written to ./CLAUDE.md
  ✓ Claude skills installed: /nff, /wokwi-diagram
  ✓ Registered with Claude Code CLI (claude mcp add nff nff mcp)
  ✓ Claude Desktop config updated
4. Verify everything works
nff doctor
CLI Reference
Real hardware
| Command | Description |
|---|---|
nff init |
Detect board, write config, register MCP server |
nff flash <file> |
Compile and upload a sketch or sketch directory |
nff monitor |
Stream serial output (Ctrl+C to exit, or --timeout SECONDS) |
nff connect |
Attach to a connected device, continuously analyse its logs, and autonomously repair detected issues |
nff doctor |
Check all dependencies and configuration |
nff mcp |
Start the MCP server (called automatically by Claude Code) |
nff flash sketches/sensor_init
nff flash sketches/sensor_init --board esp32:esp32:esp32 --port COM3
nff flash sketches/sensor_init --manual-reset    # for boards with broken auto-reset
nff monitor --port COM10 --baud 115200
nff monitor --port COM10 --baud 115200 --timeout 15   # stop after 15 seconds
nff repair
nff repair --port COM10 --baud 115200
nff repair --port COM10 --sketch sketches/sensor_init   # re-flash after each fix
nff repair — Autonomous log analysis and repair
nff repair keeps a live serial connection to your device and hands each batch of log output to Claude for analysis. When Claude detects an error, a hang, unexpected output, or a recoverable fault, it rewrites the relevant sketch, recompiles, reflashes, and resumes monitoring — closing the debug loop without any manual intervention.
nff repair
  ↓ streams serial from device
  ↓ Claude analyses each log window
  ↓ fault detected → sketch rewritten → nff flash → device reset
  ↓ monitoring resumes automatically
Useful flags:
| Flag | Default | Description |
|---|---|---|
--port PORT |
auto-detect | Serial port to attach to |
--baud BAUD |
115200 | Baud rate |
--sketch DIR |
last flashed | Sketch directory to rewrite and reflash on a fix |
--window MS |
2000 | Log window passed to Claude per analysis cycle |
--max-cycles N |
unlimited | Stop after N repair attempts |
Wokwi simulation (CI without a bench)
| Command | Description |
|---|---|
nff wokwi init |
Scaffold wokwi.toml + diagram.json in current directory |
nff flash --sim <file> |
Compile sketch and run headless Wokwi simulation |
nff wokwi run |
Run simulation, stream serial output to terminal |
nff wokwi run --gui |
Open diagram.json in VS Code and auto-start visual simulation |
nff wokwi run --serial-log FILE |
Save serial output to file |
nff wokwi run --timeout MS |
Set simulation timeout (default 5000 ms) |
Supported Boards
| Board | Vendor ID | Product ID | FQBN |
|---|---|---|---|
| ESP32 (CP210x) | 10c4 | ea60 | esp32:esp32:esp32 |
| ESP32 (CH340) | 1a86 | 7523 | esp32:esp32:esp32 |
| ESP8266 (FTDI) | 0403 | 6001 | esp8266:esp8266:generic |
| Arduino Uno | 2341 | 0043 | arduino:avr:uno |
| Arduino Mega 2560 | 2341 | 0010 | arduino:avr:mega |
| Arduino Leonardo | 2341 | 0036 | arduino:avr:leonardo |
| Arduino Nano | 2341 | 0058 | arduino:avr:nano |
Board not listed? Open a PR — adding one is two lines of code.
Config File
~/.nff/config.json, written by nff init and nff wokwi init, editable by hand:
{
  "version": "1",
  "default_device": {
    "port": "COM10",
    "board": "ESP32 (CP210x)",
    "fqbn": "esp32:esp32:esp32",
    "baud": 115200
  },
  "wokwi": {
    "api_token": "YOUR_TOKEN",
    "default_timeout_ms": 5000,
    "diagram_path": null
  }
}
The Wokwi token can also be set via the WOKWI_CLI_TOKEN environment variable (takes precedence over config).
Claude Code Skills
nff ships two Claude Code skills that are automatically installed to ~/.claude/commands/ when you run nff init, making them available globally in every Claude Code session.
| Skill | When to use |
|---|---|
/nff |
Full pipeline reference — hardware and simulation workflows, sketch-first rules, servo calibration, debugging checklist |
/wokwi-diagram |
diagram.json authoring reference — component types, pin names, wiring patterns for LEDs, buttons, servos, sensors |
Type the skill name in any Claude Code prompt to load the reference into context:
/nff
/wokwi-diagram
The skill files are also available in the repository at .claude/commands/ for project-level use, and are bundled inside the nff package at nff/skills/ so they ship with every pip install nff.
Repository Structure
nff/
├── nff/
│   ├── cli.py              # Click entry point — routes subcommands
│   ├── mcp_server.py       # MCP server — registers all tools for Claude
│   ├── config.py           # Read/write ~/.nff/config.json
│   ├── commands/
│   │   ├── init.py         # nff init
│   │   ├── flash.py        # nff flash [--sim]
│   │   ├── monitor.py      # nff monitor
│   │   ├── doctor.py       # nff doctor
│   │   └── wokwi.py        # nff wokwi init / run [--gui]
│   └── tools/
│       ├── boards.py       # USB vendor ID detection
│       ├── serial.py       # pyserial read/write/stream
│       ├── toolchain.py    # arduino-cli subprocess wrappers
│       └── wokwi.py        # WokwiRunner, generate_diagram, write_wokwi_toml
├── sketches/
│   ├── blink_esp32/        # LED blink example
│   └── servo_button/       # Servo + button example (LEDC, no library)
├── diagram.json            # Wokwi circuit schematic
├── wokwi.toml              # Wokwi project config (points to compiled ELF)
├── .claude/
│   └── commands/
│       └── nff.md          # /nff Claude Code skill
├── tests/
├── pyproject.toml
└── CONTRIBUTING.md
Linux: Serial Port Permissions
sudo usermod -aG dialout $USER
# then log out and back in
nff doctor detects this and prints the fix if your port is inaccessible.
Wokwi Simulation
Simulation is available for CI runs where no bench hardware is present. Get a free CI token at https://wokwi.com/dashboard/ci, then:
nff wokwi init --board esp32:esp32:esp32 --token YOUR_TOKEN
nff flash --sim sketches/my_sketch --board esp32:esp32:esp32
nff wokwi run              # headless, serial output only
nff wokwi run --gui        # visual simulation in VS Code
Install the Wokwi VS Code extension for the animated circuit view. nff wokwi run --gui opens diagram.json as a new tab and automatically triggers Wokwi: Start Simulator after 3 seconds.
Wokwi MCP Tools
| Tool | What it does |
|---|---|
wokwi_flash(code, board?, timeout_ms?) |
Compile and simulate a sketch via Wokwi |
wokwi_serial_read(code, board?, duration_ms?) |
Compile, simulate, return serial output |
wokwi_get_diagram(board) |
Return a minimal diagram.json stub to extend |
diagram.json — Circuit Schematic
The circuit lives in diagram.json next to wokwi.toml. nff wokwi init generates a minimal single-MCU stub; add components and wiring by hand or ask Claude.
Always include the serial monitor wires:
["esp:TX0", "$serialMonitor:RX", "", []],
["esp:RX0", "$serialMonitor:TX", "", []]
Common components:
{ "type": "wokwi-led",        "id": "led1", "attrs": { "color": "red" } }
{ "type": "wokwi-pushbutton", "id": "btn1", "attrs": { "color": "blue" } }
{ "type": "wokwi-servo",      "id": "srv1", "attrs": { "minAngle": "-90", "maxAngle": "90" } }
{ "type": "wokwi-resistor",   "id": "r1",   "attrs": { "value": "220" } }
ESP32 DevKit V1 pins: esp:D<gpio> · esp:GND.1 · esp:GND.2 · esp:3V3 · esp:VIN · esp:TX0 · esp:RX0
Pushbutton wiring: one side to GPIO (btn1:1.l), other side to GND (btn1:2.l). Use INPUT_PULLUP in the sketch.
ESP32 Servo — No Library Required
Use the built-in LEDC peripheral instead of ESP32Servo. Wokwi maps its full servo range to 500 µs – 2500 µs pulses.
With 50 Hz / 16-bit resolution (period = 20 000 µs):
| Angle | Pulse | Duty |
|---|---|---|
| −90° (min) | 500 µs | 1638 |
| 0° (center) | 1500 µs | 4915 |
| +90° (max) | 2500 µs | 8192 |
ledcAttach(SERVO_PIN, 50, 16);     // ESP32 Arduino core 3.x API
ledcWrite(SERVO_PIN, 4915);        // move to center
Set "minAngle": "-90", "maxAngle": "90" in diagram.json for correct visual mapping.
License
MIT — see LICENSE.
Copyright (c) 2026 Gauthier Lechevalier
Release history Release notifications | RSS feed


Download files
Download the file for your platform. If you're not sure which to choose, learn more about installing packages.
Source Distribution
Built Distribution
Filter files by name, interpreter, ABI, and platform.
If you're not sure about the file name format, learn more about wheel file names.
Copy a direct link to the current filters
File details
Details for the file nff-0.2.16.tar.gz.
File metadata
- Download URL: nff-0.2.16.tar.gz
- Upload date:
- Size: 95.1 kB
- Tags: Source
- Uploaded using Trusted Publishing? No
- Uploaded via: twine/6.2.0 CPython/3.12.13
File hashes
| Algorithm | Hash digest | |
|---|---|---|
| SHA256 |
7ac4a507c89f3f4985786a3292a12e503971345a4ba793991ee25c47aa437b0e
|
|
| MD5 |
dde038f1ec9183f64e72b7878904fcdf
|
|
| BLAKE2b-256 |
3a125918e94a082ec61bf92045db8ea49e393663f41a7b2fc7552456873349d2
|
File details
Details for the file nff-0.2.16-py3-none-any.whl.
File metadata
- Download URL: nff-0.2.16-py3-none-any.whl
- Upload date:
- Size: 93.3 kB
- Tags: Python 3
- Uploaded using Trusted Publishing? No
- Uploaded via: twine/6.2.0 CPython/3.12.13
File hashes
| Algorithm | Hash digest | |
|---|---|---|
| SHA256 |
d4bde92feb3896822d7506406730b1f093db6d53e9d14db997f840e6a1ac3a0f
|
|
| MD5 |
e7d508468ba67d364b68717b5fb34b16
|
|
| BLAKE2b-256 |
fc15d1fc2b0448ac9863801a502233f40cd9172f9304d69f9c1626ada9a5aabf
|


