



Website · Quick start · Verification · Documentation · Issues
Pentest-AI connects an AI client or model to a penetration-testing workflow. It investigates applications, records findings, and uses machine oracles to check whether an exploit can be reproduced. Verified findings carry evidence you can replay.
Use it through MCP, from the CLI, or in CI. The model helps drive the investigation; an oracle determines whether a finding earns a verified verdict.
Test only systems you own or have explicit authorization to assess. Read the acceptable-use policy and terms before running an engagement.
Quick start
Try the bundled demo
No API key or external target required.
pip install ptai
ptai demo
The demo tests a bundled vulnerable application, replays a finding from its proof capsule, and checks the hardened routes. Inspect the evidence workflow before configuring a real engagement.
Use your AI client
One setup command detects supported installed clients and offers to connect them:
ptai setup --mcp
Codex and Claude Code use the same Pentest-AI MCP tools. Install the client's CLI and make codex or claude available on your PATH before running setup. The wizard also detects Claude Desktop, Cursor and VS Code configuration directories. It preserves existing Pentest-AI registrations.
Restart your client, then use its Pentest-AI tools with an authorized target. Your client supplies the model; the MCP server does not require a separate model API key. Use ptai setup --mcp --dry-run to preview setup without writing settings.
Prefer to connect just one client? These direct commands also work with earlier Pentest-AI versions:
# Codex
codex mcp add pentest-ai -- ptai mcp

# Claude Code (available across your projects)
claude mcp add --scope user --transport stdio pentest-ai -- ptai mcp
Run the standalone CLI
Configure your model provider, then start an engagement:
export ANTHROPIC_API_KEY="your-api-key"
ptai start https://your-authorized-target.example
OpenAI and local Ollama models are also supported. See the installation guide for configuration and optional scanner dependencies. Keep real API keys out of source control.
Use a local model with Ollama
Ollama supplies the model to the standalone CLI; it is not itself an MCP client. With Ollama running and a tool-capable model already pulled, choose its exact installed name:
# Bash / zsh
PENTEST_AI_LLM_PROVIDER=ollama PENTEST_AI_MODEL="your-installed-model" ptai start https://your-authorized-target.example
# PowerShell
$env:PENTEST_AI_LLM_PROVIDER = "ollama"
$env:PENTEST_AI_MODEL = "your-installed-model"
ptai start https://your-authorized-target.example
Use ollama list to find installed model names. Tool calling and investigation quality depend on the model; small local models can struggle with the agent workflow. See AI client and local-model setup for requirements and troubleshooting.
How verification works
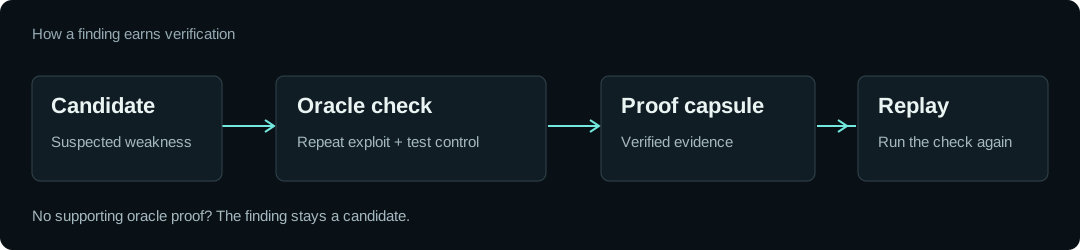
- Find a candidate. A probe or scanner identifies behaviour worth investigating.
- Reproduce it and check a control. A named oracle repeats the exploit and compares it with a control that should not demonstrate the weakness.
- Keep the evidence. A verified finding records the oracle and its results in a portable proof capsule. Use
ptai replayto check it again.
For example, a trusted-header bypass must return privileged content with the attack header and deny access without it. A server that answers every request with HTTP 200 is not sufficient evidence.
The model cannot award a verified verdict. Third-party scanner output remains unverified until an oracle independently proves it. Findings without a supported verification recipe remain candidates.
A verified verdict applies to the tested conditions. It does not mean the entire application is secure. Proof capsules are unsigned; rerunning the check is the trust mechanism.
What you can do
| Workflow | What Pentest-AI provides |
|---|---|
| Investigate web applications | Probes for injection, access control, request handling and other application weaknesses |
| Work through an AI client | MCP tools for engagements, investigation and verification |
| Reproduce a finding | Oracle results and replayable proof capsules |
| Check a fix | Rerun the recorded check against the updated target |
| Report to your team | Reports and SARIF output for existing engineering workflows |
| Keep engagement data local | Findings stored on your machine in SQLite |
Coverage varies by probe and oracle. Optional scanners need their own binaries, and some integrations provide raw output rather than structured findings. Consult the documentation and changelog for your version; main may contain unreleased work.
View the capability inventory checked by CI.
Put verified findings into CI
These steps assume ptai is installed and your model provider, target authorization and first-run consent are configured in CI:
- run: ptai start "${{ vars.STAGING_URL }}" --ci --fail-on verified --sarif pentest.sarif
- uses: github/codeql-action/upload-sarif@v3
  with:
    sarif_file: pentest.sarif
--fail-on verified gates the build on findings that passed verification, rather than every scanner candidate.
Evidence, benchmarks and limits
Benchmark findings, challenge completion and oracle-verified findings are different measurements. These reports record the versions, targets and methodology behind their results:
- Benchmark reports and artifacts
- Juice Shop methodology
- Vulnerable test harness
- Clean-application checks
Expect incomplete coverage. A scan with no verified findings is not a security assessment of everything an application does. Authentication, application state, unsupported bug classes and environmental changes affect what can be found and reproduced. Review results and keep a human involved in the engagement.
Data and network behaviour
Findings are stored locally. Anonymous usage counters are opt-in through ptai telemetry enable.
Local storage does not mean every operation stays on your machine: model-provider calls and installed scanners have their own network behaviour. Blind-vulnerability checks can use an external out-of-band collaborator; callback metadata is visible to that service.
Use your own collaborator where required, or disable callbacks:
ptai start https://your-authorized-target.example --oast-server https://your-collaborator.example
ptai start https://your-authorized-target.example --no-oast
Get involved
Use Issues for reproducible bugs and Discussions for questions and ideas. See the agent and contributor guide for build and test instructions.
The optional pentest-ai-agents repository contains Claude Code subagent files.
Pentest-AI is open source under the MIT license.
1 maintainer

Release files for ptai 1.4.1
For a detailed explanation of source distributions (sdists) and built distributions (wheels), please see the package formats documentation.
Source distribution (sdist)
| File | Size | Uploaded | |
|---|---|---|---|
| ptai-1.4.1.tar.gz | 976.7 kB | Details |
Built distribution (wheel)
| File | Interpreter | ABI | Platform | Reset |
|---|---|---|---|---|
| ptai-1.4.1-py3-none-any.whl | Python 3 | none | any | Details |
Total release size: 1.7 MB
Release files / ptai-1.4.1.tar.gz
| Download URL | ptai-1.4.1.tar.gz |
|---|---|
| Size | 976.7 kB |
| Tags | Source |
|
SHA-256 checksum How to use checksums |
905e62d53056e909f4b6e1cbee95d312bf6dc346617609c3395fe645527575e5
|
|
BLAKE2b-256 checksum How to use checksums |
5c80bd6e283303a3daace564082737858454047b024818ec2b7e347f0c95213c
|
| Upload date | |
|
Uploaded using Trusted Publishing? What is trusted publishing? |
Yes |
| Uploaded via |
twine/6.1.0 CPython/3.13.13
|
Provenance
Provenance describes where a file came from. On PyPI, provenance is shared via attestations, which provide a verifiable record of the build or publishing details. View details, limitations and caveats.


PyPI Publish Attestation
PyPI verified that this artifact, at this checksum, originated from the publisher listed below.
Signed by GitHub Actions, verified by PyPI on Sep 12, 2026.
Transparency logRelease files / ptai-1.4.1-py3-none-any.whl
| Download URL | ptai-1.4.1-py3-none-any.whl |
|---|---|
| Size | 688.5 kB |
| Tags | Python 3 |
|
SHA-256 checksum How to use checksums |
cd4df8666d0622d965ceef16d6cf6a903810d195135b7a139e3bb80cb3a7547b
|
|
BLAKE2b-256 checksum How to use checksums |
d1b61b2a032f6c508ff41ee39097e373ee0fe5a0307cb42e2c6bd84ba2f826b0
|
| Upload date | |
|
Uploaded using Trusted Publishing? What is trusted publishing? |
Yes |
| Uploaded via |
twine/6.1.0 CPython/3.13.13
|
Provenance
Provenance describes where a file came from. On PyPI, provenance is shared via attestations, which provide a verifiable record of the build or publishing details. View details, limitations and caveats.
PyPI Publish Attestation
PyPI verified that this artifact, at this checksum, originated from the publisher listed below.
Signed by GitHub Actions, verified by PyPI on Sep 12, 2026.
Transparency log













