
This release is a pre-release and may not be stable for production use.








The qBraid-SDK is a platform-agnostic quantum runtime framework designed for both quantum software and hardware providers.
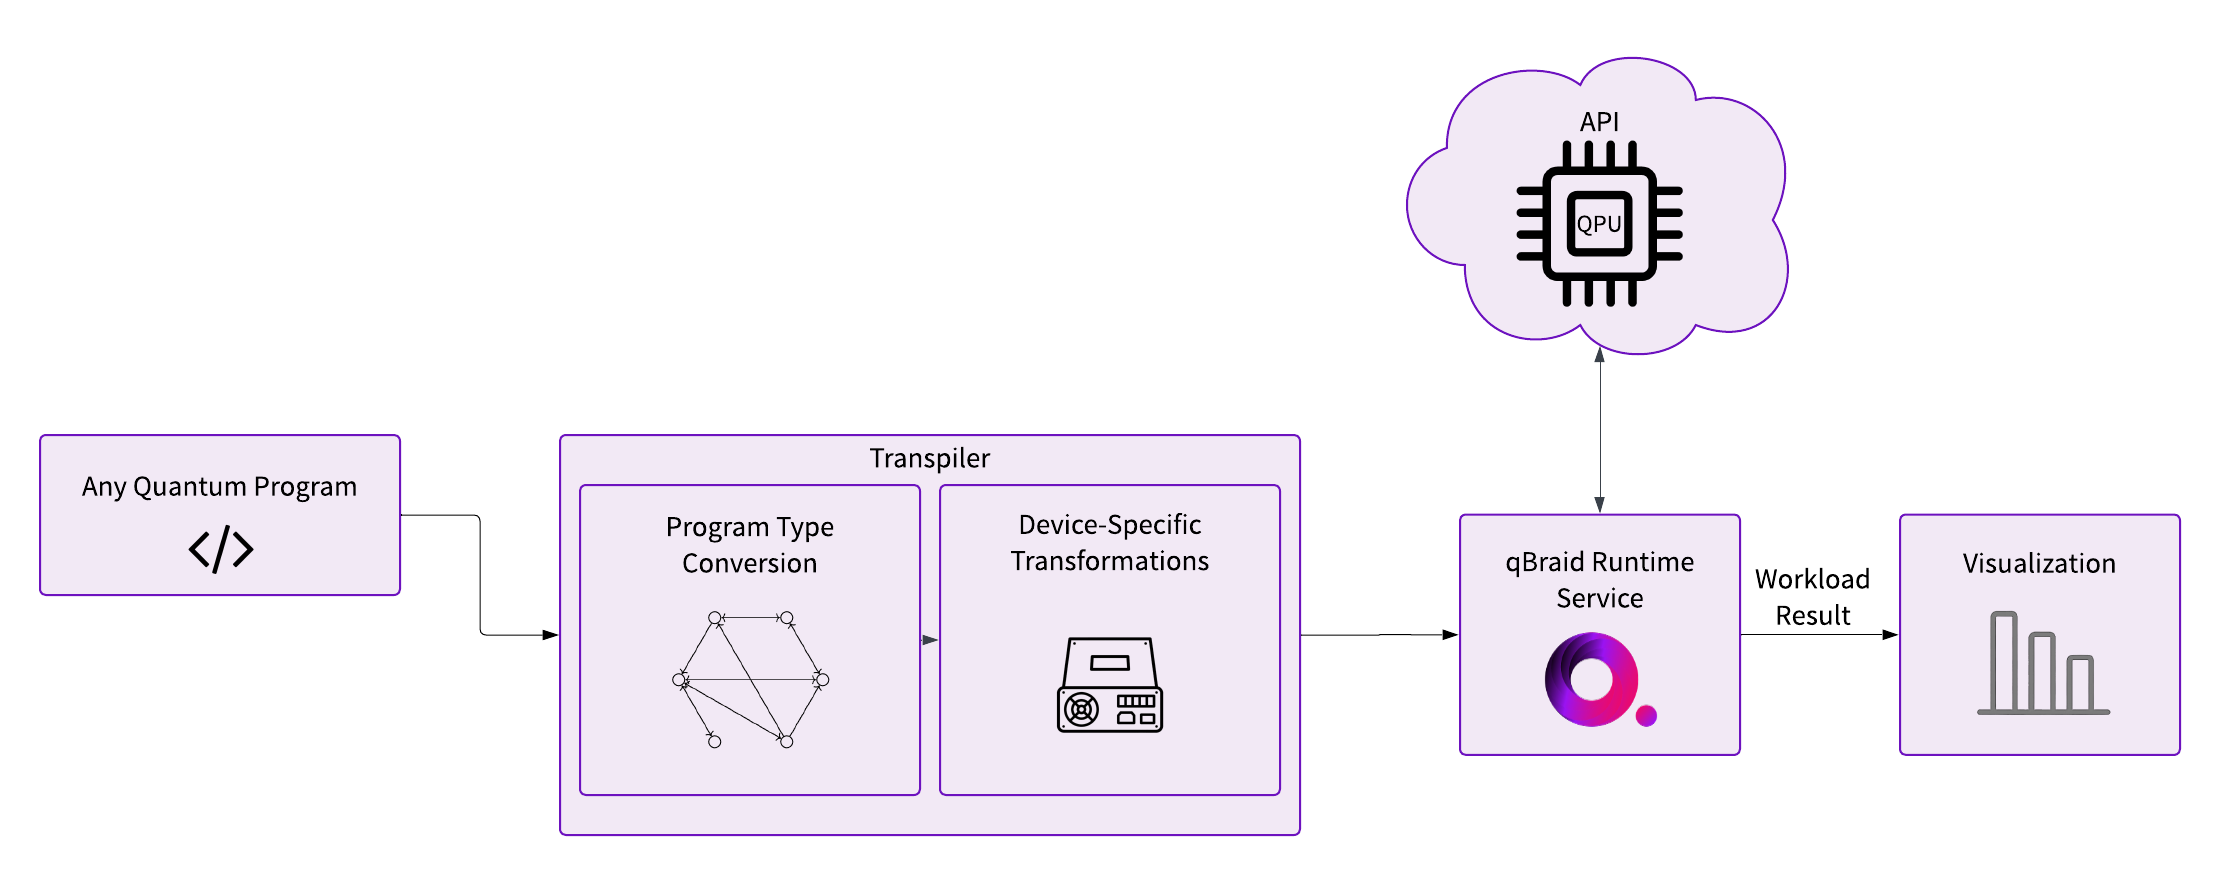
This Python-based tool streamlines the full lifecycle management of quantum jobs—from defining program specifications to job submission and through to the post-processing and visualization of results. Unlike existing runtime frameworks that focus their automation and abstractions on quantum components, qBraid adds an extra layer of abstractions that considers the ultimate IR needed to encode the quantum program and securely submit it to a remote API. Notably, the qBraid-SDK does not adhere to a fixed circuit-building library, or quantum program representation. Instead, it empowers providers to dynamically register any desired input program type as the target based on their specific needs. This flexibility is extended by the framework’s modular pipeline, which facilitates any number of additional program validation, transpilation, and compilation steps.
By addressing the full scope of client-side software requirements necessary for secure submission and management of quantum jobs, the qBraid-SDK vastly reduces the overhead and redundancy typically associated with the development of internal pipelines and cross-platform integrations in quantum computing.

Resources
Installation & Setup
For the best experience, install the qBraid-SDK environment on lab.qbraid.com. Login (or create an account) and follow the steps to install an environment. Using the SDK on qBraid Lab means direct, pre-configured access to QPUs from IonQ, Oxford Quantum Circuits, QuEra, Rigetti, and IQM, as well as on-demand simulators from qBraid and AWS. See qBraid Quantum Jobs for more.
Local install
The qBraid-SDK, and all of its dependencies, can be installed using pip:
pip install qbraid
You can also install from source by cloning this repository and running a pip install command in the root directory of the repository:
git clone https://github.com/qBraid/qBraid.git
cd qBraid
pip install .
Note: The qBraid-SDK requires Python 3.9 or greater.
To use qBraid Runtime locally, you must also install the necessary extras and configure your account credentials according to the device(s) that you are targeting. Follow the linked, provider-specific, instructions for the QbraidProvider, BraketProvider, QiskitRuntimeProvider, IonQProvider, and OQCProvider, as applicable.
Quickstart
Check version
You can view the version of the qBraid-SDK you have installed and get detailed information about the installation within Python using the following commands:
In [1]: import qbraid

In [2]: qbraid.__version__

In [3]: qbraid.about()
Transpiler
Graph-based approach to quantum program type conversions.
Below, QPROGRAM_REGISTRY maps shorthand identifiers for supported quantum programs, each corresponding to a type in the typed QPROGRAM Union. For example, 'qiskit' maps to qiskit.QuantumCircuit in QPROGRAM. Notably, 'qasm2' and 'qasm3' both represent raw OpenQASM strings. This arrangement simplifies targeting and transpiling between different quantum programming frameworks.
>>> from qbraid.programs import QPROGRAM_REGISTRY
>>> QPROGRAM_REGISTRY
{'cirq': cirq.circuits.circuit.Circuit,
 'qiskit': qiskit.circuit.quantumcircuit.QuantumCircuit,
 'pennylane': pennylane.tape.tape.QuantumTape,
 'pyquil': pyquil.quil.Program,
 'pytket': pytket._tket.circuit.Circuit,
 'braket': braket.circuits.circuit.Circuit,
 'openqasm3': openqasm3.ast.Program,
 'pyqir': pyqir.Module,
 'qasm2': str,
 'qasm3': str}
Pass any registered quantum program along with a target package from
QPROGRAM_REGISTRY to "transpile" your circuit to a new program type:
>>> from qbraid.interface import random_circuit
>>> from qbraid.transpiler import transpile
>>> qiskit_circuit = random_circuit("qiskit")
>>> cirq_circuit = transpile(qiskit_circuit, "cirq")
>>> print(qiskit_circuit)
          ┌────────────┐
q_0: ──■──┤ Rx(3.0353) ├
     ┌─┴─┐└───┬────┬───┘
q_1: ┤ H ├────┤ √X ├────
     └───┘    └────┘
>>> print(cirq_circuit)
0: ───@───Rx(0.966π)───
      │
1: ───H───X^0.5────────
Behind the scenes, the qBraid-SDK uses rustworkx to create a directional graph that maps all possible conversions between supported program types:
from qbraid.transpiler import ConversionGraph

# Loads native conversions from QPROGRAM_REGISTRY
graph = ConversionGraph()

graph.plot(legend=True)
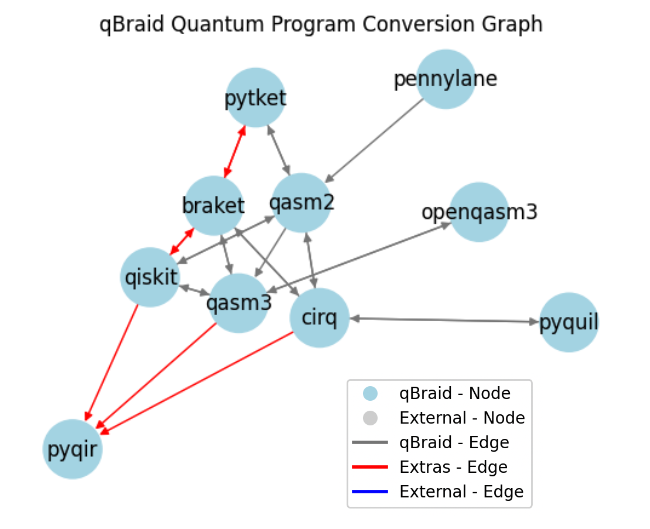
You can use the native conversions supported by qBraid, or define your own. For example:
from unittest.mock import Mock

from qbraid.programs import register_program_type
from qbraid.transpiler import Conversion

# replace with any program type
register_program_type(Mock, alias="mock")

# replace with your custom conversion function
example_qasm3_to_mock_func = lambda x: x

conversion = Conversion("qasm3", "mock", example_qasm3_to_mock_func)

graph.add_conversion(conversion)

# using a seed is helpful to ensure reproducibility
graph.plot(seed=20, k=3, legend=True)
QbraidProvider
Run experiements using on-demand simulators provided by qBraid. Retrieve a list of available devices:
from qbraid.runtime import QbraidProvider

provider = QbraidProvider()
devices = provider.get_devices()
Or, instantiate a known device by ID and submit quantum jobs from any supported program type:
device = provider.get_device("qbraid_qir_simulator")
jobs = device.run([qiskit_circuit, braket_circuit, cirq_circuit, qasm3_str], shots=1000)

results = [job.result() for job in jobs]
batch_counts = [result.data.get_counts() for result in results]

print(batch_counts[0])
# {'00': 483, '01': 14, '10': 486, '11': 17}
And visualize the results:
from qbraid.visualization import plot_distribution, plot_histogram

plot_distribution(batch_counts)

plot_histogram(batch_counts)
Get Involved




- Interested in contributing code, or making a PR? See CONTRIBUTING.md
- For feature requests and bug reports: Submit an issue
- For discussions, and specific questions about the qBraid-SDK join our discord community
- For questions that are more suited for a forum, post to QCSE with the
qbraidtag.
Launch on qBraid
The "Launch on qBraid" button (top) can be added to any public GitHub
repository. Clicking on it automaically opens qBraid Lab, and performs a
git clone of the project repo into your account's home directory. Copy the
code below, and replace YOUR-USERNAME and YOUR-REPOSITORY with your GitHub
info.
Use the badge in your project's README.md:
[<img src="https://qbraid-static.s3.amazonaws.com/logos/Launch_on_qBraid_white.png" width="150">](https://account.qbraid.com?gitHubUrl=https://github.com/YOUR-USERNAME/YOUR-REPOSITORY.git)
Use the badge in your project's README.rst:
.. image:: https://qbraid-static.s3.amazonaws.com/logos/Launch_on_qBraid_white.png
    :target: https://account.qbraid.com?gitHubUrl=https://github.com/YOUR-USERNAME/YOUR-REPOSITORY.git
    :width: 150px
License


Release files for qbraid 0.8.0.dev20240923215620
For a detailed explanation of source distributions (sdists) and built distributions (wheels), please see the package formats documentation.
Source distribution (sdist)
| File | Size | Uploaded | |
|---|---|---|---|
| qbraid-0.8.0.dev20240923215620.tar.gz | 334.3 kB | Details |
Built distribution (wheel)
| File | Interpreter | ABI | Platform | Reset |
|---|---|---|---|---|
| qbraid-0.8.0.dev20240923215620-py3-none-any.whl | Python 3 | none | any | Details |
Total release size: 584.9 kB
Release files / qbraid-0.8.0.dev20240923215620.tar.gz
| Download URL | qbraid-0.8.0.dev20240923215620.tar.gz |
|---|---|
| Size | 334.3 kB |
| Tags | Source |
|
SHA-256 checksum How to use checksums |
8b9f950fe84543e478fd797548f968991159d225402bcb6668a24204de5429b1
|
|
BLAKE2b-256 checksum How to use checksums |
b1e6f9f3272b240adaacc296624fc2bb0e8ac859827b40d76a0567a596f55c22
|
| Upload date | |
|
Uploaded using Trusted Publishing? What is trusted publishing? |
No |
| Uploaded via |
twine/5.1.1 CPython/3.12.6
|
Release files / qbraid-0.8.0.dev20240923215620-py3-none-any.whl
| Download URL | qbraid-0.8.0.dev20240923215620-py3-none-any.whl |
|---|---|
| Size | 250.6 kB |
| Tags | Python 3 |
|
SHA-256 checksum How to use checksums |
4dfb5801d92a8e7e0ac589249b34466cad0e0b7407cc6ee5ffc8cdd60717fe4a
|
|
BLAKE2b-256 checksum How to use checksums |
538eb125d370aa9f4a4494167f713da5a6b03ef992dea446224f8496d599f251
|
| Upload date | |
|
Uploaded using Trusted Publishing? What is trusted publishing? |
No |
| Uploaded via |
twine/5.1.1 CPython/3.12.6
|














