
segfix

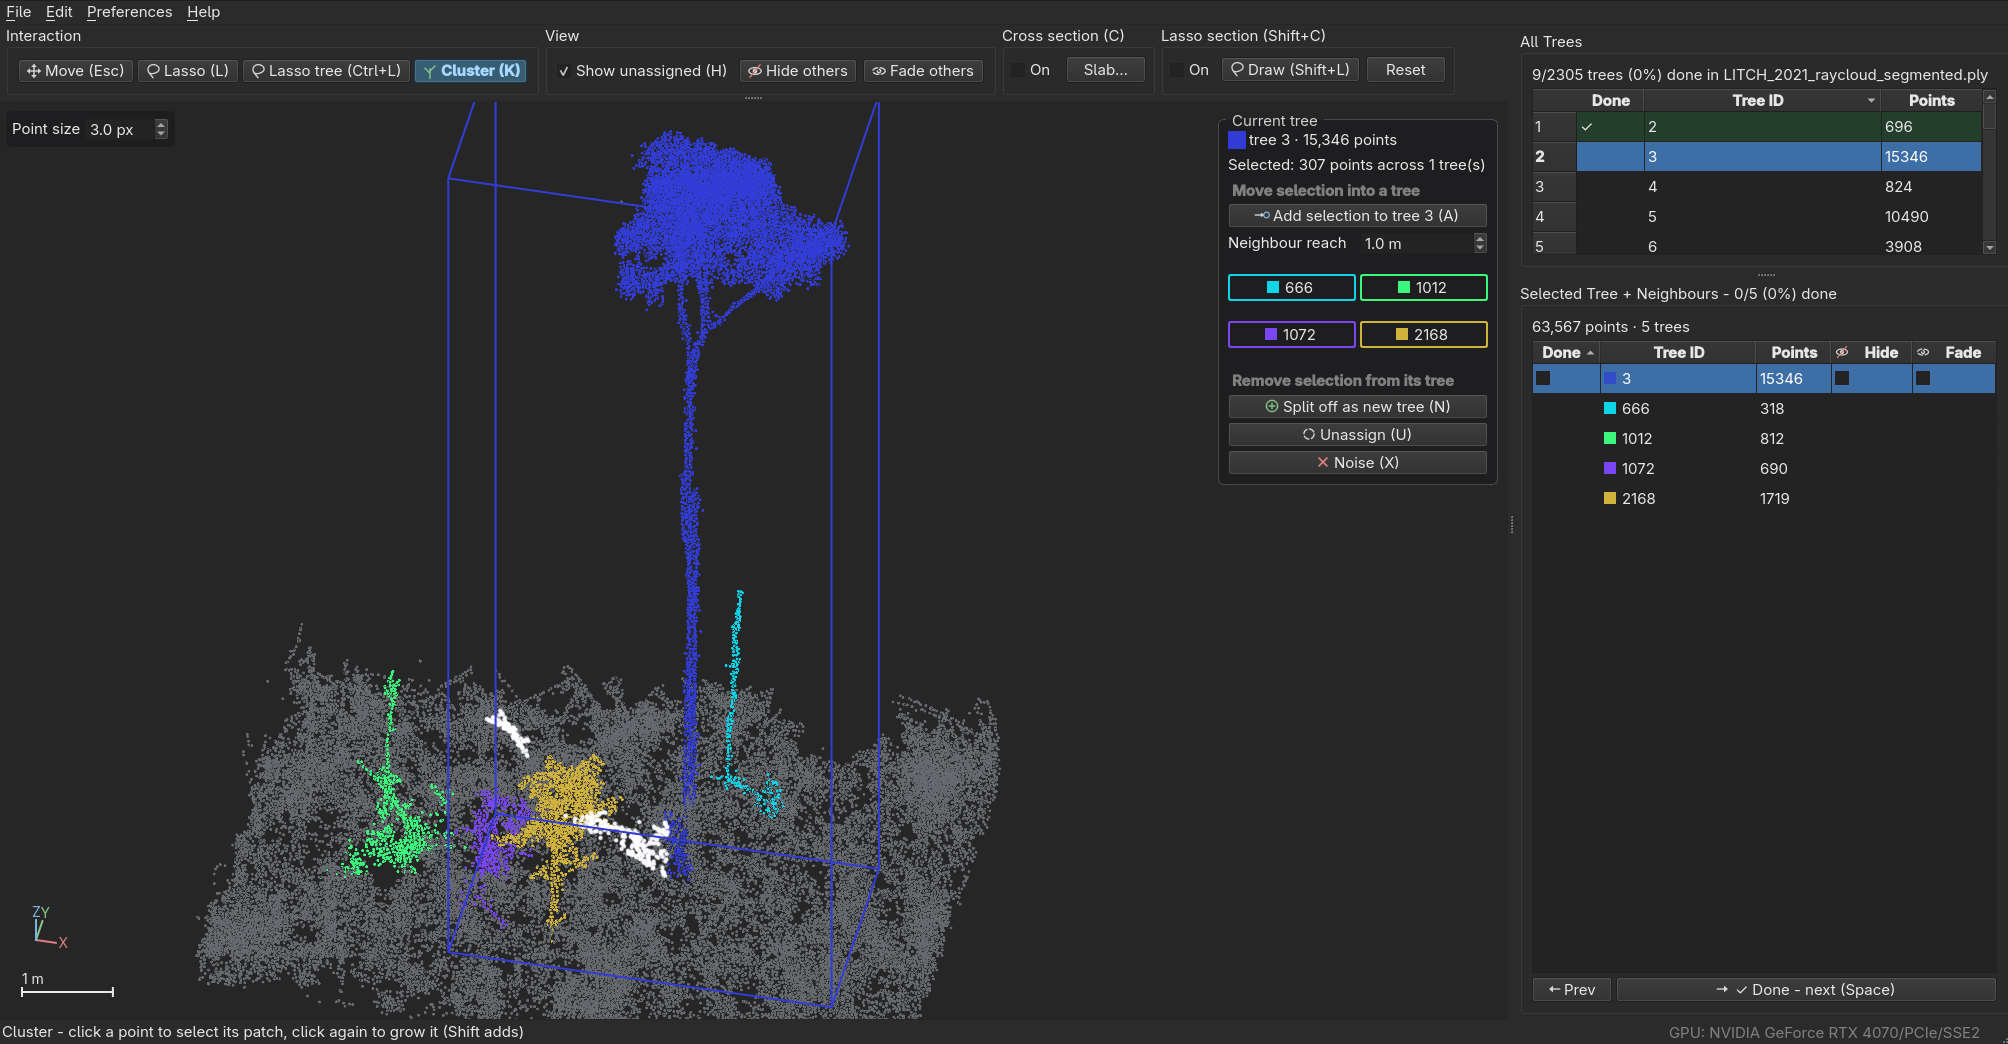
A GUI tool to fix the instance segmentation of tree point clouds. Load a segmented LiDAR cloud, see each tree in its own colour, and correct mistakes by lassoing points and reassigning, splitting off, or dismissing them, then save back to a corrected version of the input, retaining all fields.
Beta note: This software is in beta. Testing is done on Fedora Linux 44 and Windows 11, MacOS should work but has not been tested.
Contributing
Feedback, issues, and PRs all welcome. For issues please use GitHub issues (not a personal message) so the community can benefit.
Install
Requires Python 3.10–3.12. The package is on PyPI: pypi.org/project/segfix.
pip install segfix
The startup dialog tells you when a newer release is on PyPI, and its
Update… button runs pip install --upgrade for you (restart segfix
afterwards). Running from a clone instead, it tracks new commits on the branch
you're on and updates with git pull + pip install -e ., so a development
checkout stays a checkout.
Using a dedicated environment:
conda create -n segfix python=3.11
conda activate segfix
pip install segfix
From source
For development, or to get scripts/make_sample.py:
git clone https://github.com/tim-devereux/segfix.git
cd segfix
pip install -e .
Run
segfix
segfix will open a startup dialog. Double-click
a recent project to reopen it, or click New Project… to import a point cloud
file. Importing copies the file into a new project folder (created inside the
directory you pick, named after the source file) and opens that copy, edits are
always saved to the copy, never the original source file.
Every project opened this way is recorded in ~/.config/segfix/registry.json
(a plain JSON file) so it shows up in the "Recent projects"
list next time, most-recently-opened at the top and preselected, each row
showing how long ago it was last opened.
The per-point tree ID field is auto-detected (treeID, PredInstance,
label, …); override with --label-field NAME if needed. Labels that can't
be a real tree ID, negatives (other than the noise marker) and values that
overflow a signed 32-bit int, both of which some pipelines use as a "no tree"
sentinel, are folded into unassigned on load, so they don't show up as
spurious trees.
Accepted formats
Binary PLY, RGB-segmented (raycloudtools) or with a label field, and
LAS. Both store their points as fixed-size records at a known offset, which
is what lets treecatalog.py memory-map a whole plot, read back just the points
of one tree, and on save patch only the label bytes that changed.
raycloudtools output
raycloudtools' rayextract trees writes <plot>_segmented.ply, a binary PLY with no label column, each
point instead coloured by tree (x y z time nx ny nz red green blue alpha,
double xyz). segfix detects the RGB encoding, maps each distinct colour to a
tree, and treats pure black (0, 0, 0) as unsegmented. Import the .ply
directly; Save patches the colour bytes of points whose tree changed, in
place, so the file stays in exactly the format rayextract produced.
One caveat: noise (X) and unassigned points are both written back as black,
so once such a file is reloaded the two are indistinguishable (segfix's
.segfix.json sidecar still remembers which were noise for the current
project). New trees created during editing (N, splits) get a deterministic
colour derived from their id.
arbor output
arbor's pipeline (arbor segment …) writes
<plot>_output/<plot>_segmented.laz, a point cloud with a per-point treeID
Extra-Bytes column (0 = unassigned). Import that .laz directly: segfix
decompresses it to a .las working copy in the project folder (the original
.laz is never touched), you fix the treeIDs with the workflow below, and
Save patches the .las in place and re-compresses a fresh .laz beside
it for arbor to re-read.
One caveat: if a cloud's treeID column is an unsigned type, points you
dismiss as noise (X) are written back as 0 (unassigned), segfix's own
.segfix.json sidecar still remembers they were noise, but a reader of the LAS
alone cannot tell noise from unassigned. (arbor writes a signed treeID, so
this does not apply to its output.)
Dense clouds
On load segfix measures the cloud's typical point spacing. If points are closer than 2 cm it offers to downsample for the session, one point per voxel (2 cm by default, editable in the prompt), which is plenty to see and re-label a tree but a fraction of the points to draw and lasso. Choose Keep Full Resolution and nothing changes.
Downsampling is a working-set choice, not a destructive one. Nothing is written until you save, and on Save the labels you edited are interpolated back onto every original point: each full-resolution point follows the nearest kept point that was the same tree as it, and only where that kept point is one you actually re-labelled, so untouched parts of the cloud keep their original labels byte for byte. The saved file has all of its points and all of its fields, in the format it came in.
The one thing to know is that a voxel is the resolution limit while you work: where two trees' points share a voxel, one label represents it, and unassigned points that fall inside a tree's voxels aren't separately selectable until you reload at full resolution. Pick a voxel smaller than the detail you need to separate.
Editing workflow
The menu bar carries the session-level actions: File ▸ Open Project…
(Ctrl+O, reopens the startup dialog and switches project without a manual
restart) and Save Project (Ctrl+S); Edit ▸ Undo / Redo (Ctrl+Z /
Ctrl+Shift+Z); Preferences ▸ Theme ▸ Light / Dark, applied immediately
and remembered (via QSettings) for next launch; and Help ▸ About segfix
for the version, links, and full MIT licence.
Navigation matches CloudCompare: clouds open Z-up, left-drag rotates, right-drag pans, wheel zooms. Double-click a point while navigating to recentre the orbit on it. A metric scale bar and an X/Y/Z orientation tripod sit in the bottom-left of the view; the point size spinner floats in the top-left.
The right-hand panel holds two tables. All Trees (top) lists every tree in the
file, a Done column (✓ when reviewed), tree ID and point count, with a
running N/M trees (X %) done line above it, double-click a row to load
that
tree plus its spatial neighbours into the 3D view. Selected Tree +
Neighbours (below) is the review queue for what's currently loaded: a Done
checkbox per tree, a 👁 column to hide one from the view, a Fade column to
ghost one (still shown, still selectable), and the Prev / Done buttons. Both
read the same <cloud>.segfix.json sidecar, written next to the working copy,
so a half-finished plot resumes where you left off. Finished rows in either
table get a green tint. The Current tree actions (Add selection,
send-to-neighbour, Split / Unassign / Noise) float as a fixed column pinned
to the right edge of the 3D view, next to the points they act on.
-
Double-click a tree in All Trees. The camera flies to it and a wireframe box marks it. To declutter a crowded view, use the 👁 (hide) or Fade column in the lower table on specific trees, or Hide others / Fade others in the top-bar View group to do it to every loaded tree except the one under review. Fading keeps a tree visible as faint context and still lets the lasso grab its points; hiding removes it from both.
-
Inspect it. If it's correct, press Space, the tree is marked done, progress is saved, and the next unfinished tree in the loaded set becomes current. That's the loop.
-
If it needs fixing, select points with the lasso: press L, drag a freehand loop (Shift adds), Esc to go back to navigating. The tree under review is always the implicit target.
Key Operation SpaceMark current tree done, jump to next unfinished ←/→Previous / next tree (without marking done) LLasso select Ctrl+LLasso, but only points already in the current tree, grabs a clean patch out of an overlapping crown KCluster select: click a point to take the connected patch of its tree; click the same spot again to loosen the gap and grow it [/]Tighten / loosen the cluster gap one step EscBack to camera / navigation AAdd selection to the current tree (missing branches, unassigned canopy) NSplit selection off as a new tree (it joins the queue unreviewed) UUnassign selection, or the whole current tree if nothing is selected XMark selection as noise, or the whole current tree if nothing is selected (dismiss a bush/wall in one key) Delete/BackspaceSame as X(mark noise)HShow/hide the unassigned + noise points CCross section on/off Shift+LDraw a lasso-section outline Shift+CLasso section on/off Ctrl+Z/Ctrl+Shift+ZUndo / Redo (also on the Edit menu) Ctrl+SSave Project (also on the File menu) Ctrl+OOpen another project Cluster (
K) is the other way to select: click a point and it takes the patch of that point's tree that is physically connected to it. How wide a hole still counts as connected is the gap, in multiples of the cloud's point spacing. It starts at 1×, deliberately tight, so a first click is a small seed; click the same spot again to loosen it a step and grow the patch (1× → 1.5× → 2× … up to 16×), or use[/], or the ▾ beside the Cluster button for a slider. Changing the gap re-runs your last click, so the patch grows or shrinks on screen as you go. The gap goes back to 1× when you switch Cluster off, or when the selection is cleared (afterA/N/U/X, a click on empty space, or moving to another tree).To move stray points to a neighbour instead, lasso them and click one of the → id buttons in the Current tree panel, one per tree within "reach" metres of this one. Clicking that neighbour's table row to make it current and pressing
Adoes the same thing.To merge an over-segmented fragment back in, lasso the whole fragment and press
A; there is no separate merge key. -
For a crowded canopy, two tools in the top bar cut the view down. Both fold into the same visibility as the 👁 column, so hidden points are also unselectable and the lasso can't grab through them:
- Cross section (
C), a slab along X, Y or Z, set with two sliders. - Lasso section (
Shift+C), same idea, but the kept region is an outline you draw (Shift+L, then drag). It's frozen into a point mask as you release, so the camera moves freely afterwards.
Both reset when a new tree is loaded.
- Cross section (
-
Leftover unassigned points may hide missed trees: they're loaded alongside every tree you open, so lasso one and press
Nto promote it to a tree of its own (it joins the queue unreviewed). -
Save (
Ctrl+S) writes to the project copy, never the original import. It patches only the points whose label changed, in place, so the header and every other column are untouched byte for byte.
Layout
| File | Responsibility |
|---|---|
model.py |
PointCloud data + undo/redo (diff-based) |
io.py |
whole-cloud load/save (binary PLY, LAS/LAZ), label-field and RGB-segmentation detection |
operations.py |
pure, UI-agnostic label edits (reassign/split/unassign/noise) |
analysis.py |
which trees touch which, by sampled point distance (KD-tree) |
density.py |
point-spacing measurement, voxel decimation, and the save-time interpolation back to full resolution |
lasso.py |
3D screen-space lasso (camera projection + polygon test) and the click-to-grow cluster tool |
cloudview.py |
the vispy 3D canvas: camera, points, selection halo, tree box |
viewer.py |
label→colour mapping and visibility masks |
overlays.py |
scale bar + orientation axes painted over the canvas |
theme.py |
light/dark palette, remembered in QSettings |
widgets.py |
Qt dock panel wiring selection → operations |
icons.py |
inline SVG icons for the panel buttons and window |
treecatalog.py |
default mode: memory-mapped tree-label grouping, neighbour load + write-back (TreeCatalog = PLY, LasCatalog = LAS, open_catalog picks) |
scene_ui.py |
tree table + scene controller for the default mode |
shift_ui.py |
load-time "large coordinates" (global shift) prompt |
density_ui.py |
load-time "dense cloud" (downsample) prompt |
progress_ui.py |
progress window for the two slow operations, opening and saving |
registry.py |
on-disk list of recently opened files/projects |
workspace.py |
project folders: copy (or decompress .laz→.las) an imported file, never touch the source |
startup_ui.py |
startup dialog: pick a recent entry or start a new project |
update.py |
update check: a newer PyPI release for an installed copy, new commits for a git checkout |
app.py |
segfix CLI entry point |
Tests
pytest # core model, operations, and IO round-trip (no GUI needed)
1 maintainer

Metadata
1 maintainer
Release files for segfix 0.7.0
For a detailed explanation of source distributions (sdists) and built distributions (wheels), please see the package formats documentation.
Source distribution (sdist)
| File | Size | Uploaded | |
|---|---|---|---|
| segfix-0.7.0.tar.gz | 126.1 kB | Details |
Built distribution (wheel)
| File | Interpreter | ABI | Platform | Reset |
|---|---|---|---|---|
| segfix-0.7.0-py3-none-any.whl | Python 3 | none | any | Details |
Total release size: 231.6 kB
Release files / segfix-0.7.0.tar.gz
| Download URL | segfix-0.7.0.tar.gz |
|---|---|
| Size | 126.1 kB |
| Tags | Source |
|
SHA-256 checksum How to use checksums |
65b5b17fa278a6d56a98356c91a04f6836dd7fcf8748ecfc170ee993e7616230
|
|
BLAKE2b-256 checksum How to use checksums |
36457b815af579ea96a3b0b15f9bc2c34577837efdc14aafb61b6068e29df22e
|
| Upload date | |
|
Uploaded using Trusted Publishing? What is trusted publishing? |
Yes |
| Uploaded via |
twine/7.0.0 CPython/3.13.14
|
Provenance
Provenance describes where a file came from. On PyPI, provenance is shared via attestations, which provide a verifiable record of the build or publishing details. View details, limitations and caveats.


PyPI Publish Attestation
PyPI verified that this artifact, at this checksum, originated from the publisher listed below.
Signed by GitHub Actions, verified by PyPI on Sep 12, 2026.
Transparency logRelease files / segfix-0.7.0-py3-none-any.whl
| Download URL | segfix-0.7.0-py3-none-any.whl |
|---|---|
| Size | 105.5 kB |
| Tags | Python 3 |
|
SHA-256 checksum How to use checksums |
6651aebd2ad1aefccb56b43ffad6a155110a1dcd37a10b80cd484a5f6f4eef16
|
|
BLAKE2b-256 checksum How to use checksums |
08121d521ced23d4086d209156dd8767027bc5b85d5d8de3edeeb072dd8d81e9
|
| Upload date | |
|
Uploaded using Trusted Publishing? What is trusted publishing? |
Yes |
| Uploaded via |
twine/7.0.0 CPython/3.13.14
|
Provenance
Provenance describes where a file came from. On PyPI, provenance is shared via attestations, which provide a verifiable record of the build or publishing details. View details, limitations and caveats.
PyPI Publish Attestation
PyPI verified that this artifact, at this checksum, originated from the publisher listed below.
Signed by GitHub Actions, verified by PyPI on Sep 12, 2026.
Transparency log













