
sliveshow

A JupyterLab extension that turns Jupyter notebooks into live, animated Reveal.js slideshows — with scrollable slides, SVG and math (MathJax 4) animations that also play in the normal notebook view, and MyST directive support for Jupyter Book 2.
Install:
pip install sliveshow
PyPI: https://pypi.org/project/sliveshow/
Demo: https://alyanaamirahmedani.github.io/sliveshow/lab/index.html?path=sliveshow_demo.ipynb
(Run all cells before starting the slideshow to display animations correctly.)
Requirements
- JupyterLab >= 4.0.0
Install
pip install sliveshow
Uninstall
pip uninstall sliveshow
Usage
Slideshow
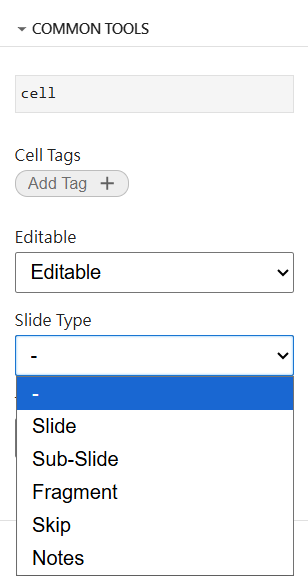
The slideshow uses the Reveal.js framework. Set the slide type of each cell via COMMON TOOLS > Slide Type. Available types: Slide, Sub-Slide, Fragment, Skip.
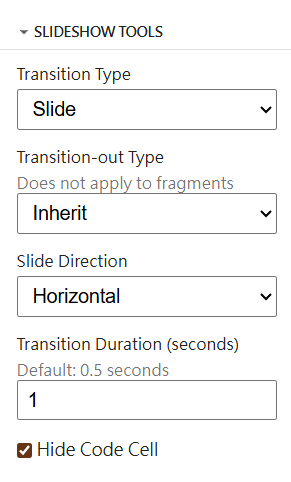
Transition type and duration are set per-cell in SLIDESHOW TOOLS. Available types: Slide, Fade, Zoom. The default can be changed in Settings.
For Slide transitions, direction is Horizontal (Slides) or Vertical (Sub-Slides) by default.
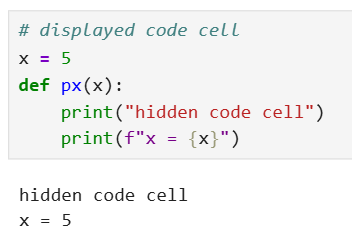
Code cell input can be hidden via Hide Code Cell, showing only the output.
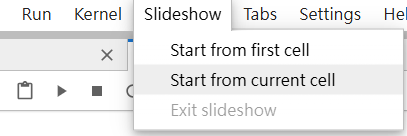
To start a slideshow, use the Sliveshow menu → Start from first cell (full screen) or Start from current cell (full screen). To exit, press Escape or use Exit slideshow.
Code cells keep their prompt on the slides, as in the notebook: [*] while a
cell is running, [3] once it has run. In full screen the keys belong to the
slideshow once you click a slide, so B, X, D D and the other notebook shortcuts
no longer insert, cut or delete cells behind it. Typing into a code cell,
Shift+Enter to run it and I, I to interrupt it still work.
Slides beside the notebook
Sliveshow → Open beside notebook puts the slides in a panel next to the notebook instead of taking over the screen, so you can keep working on the notebook while the deck is up:
| Type in a cell | the slide shows it as you type |
| Run a cell | the output appears on the slide |
| Select a cell | the deck jumps to it — see "Following a cell" below |
| Add or delete a cell | the deck rebuilds itself, keeping your place |
Nothing is exported and there is no preview to reload, because the panel is a second view of the same notebook: one document, one model, one kernel. Both views show the same live cells, so a change on one side is already on the other.
Sliveshow → Open beside notebook from current cell does the same but opens on the slide holding the selected cell, and Rebuild slides rebuilds the deck by hand if you ever need it.
Close the panel, or use Exit slideshow, to stop. The notebook itself is never modified: the panel is the copy, so closing it leaves your notebook exactly as it was.
While the slides panel is open it is in slide mode: JupyterLab's notebook
shortcuts are out of play there, cells are not editable and not highlighted, so
C, B, Esc and the arrow keys belong to the slideshow and its plugins. The
keyboard follows your last click — click the slides to drive them, click the
notebook to go back to editing. When the panel opens, the notebook keeps the
focus, so you can carry on typing straight away. The deck's tab is marked with
a ▶ so you can tell the two views apart.
Esc shows Reveal's slide overview in either mode; press it again to go back.
Following a cell
Clicking a cell in the notebook does three things, not one: the deck goes to
that cell's slide, steps the slide's fragments open as far as that cell, and
scrolls the slide so the cell is on screen. Without the last two, a cell marked
fragment would leave the slide looking blank — Reveal keeps fragments hidden
until they are stepped — and a cell near the bottom of a long slide would put
you at the top of it with nothing appearing to have happened.
Slides longer than the panel
A slide with a large figure, or a cell with a lot of output, is often taller than the panel it is in. Down scrolls such a slide to its end before it moves to the next one, and up scrolls back and lands on the bottom of the slide above, so reading in either direction is continuous. The on-screen arrows follow the same rule. Left and right still change slide immediately. A fragment that opens below the fold is scrolled to as it appears.
Styling the slides of one folder: sliveshow.css
Save a stylesheet called sliveshow.css next to a notebook and it styles that
notebook's slides, and nothing else. Its rules apply inside the deck only, and
only while the deck is showing: the notebook beside it, the rest of JupyterLab
and decks from other folders are untouched, and the styles go when the show
ends. Use it for a lecture's logo, colours or fonts, rather than a <style>
injected from a cell, which restyles every notebook on the page.
/* sliveshow.css, in the same folder as the notebook */
:root {
  --accent: #b5179e;
}

h1,
h2 {
  color: var(--accent);
}

/* a logo in the corner of every slide, next to this file */
.reveal {
  background-image: url(logo.png);
  background-repeat: no-repeat;
  background-position: right 24px top 16px;
  background-size: 96px;
}

/* slides without the [ ] prompts */
.jp-InputPrompt,
.jp-OutputPrompt {
  display: none;
}
- Selectors are looked for inside the deck, so
h1means the slides' headings. A selector that starts with.revealmeans this deck, so CSS written against sliveshow's own classes keeps working;:root,htmlandbodymean the whole deck. - Relative
url()s are read from the stylesheet's folder, so images and fonts can sit next to it. - Save the file and the open slides restyle in place. With the slides beside
the notebook and
sliveshow.cssopen in an editor, styling is live. - sliveshow's own layout rules (slide padding, the width of the content
column) are
!important; to change those, mark yours!importanttoo. @importis not supported: keep the rules in the one file.- The file name is a setting, Settings → Sliveshow → Slide stylesheet. Leave it empty to ignore such files.
Animating part of a formula or drawing
Reveal hides anything classed fragment until its step, and on an SVG that CSS
beats the attributes the animation writes — so an element that is both a
fragment and animated would never appear. sliveshow adds Reveal's own .custom
opt-out to fragments inside a data-animate block, which hands their opacity to
the animation. Put the "before" state in the config's setup section rather
than relying on Reveal to hide it:
<div data-animate>
  <svg
    class="fragment"
    xmlns="http://www.w3.org/2000/svg"
    width="400"
    height="200"
  >
    <circle id="c" cx="200" cy="100" r="40" style="fill:steelblue" />
  </svg>
  <!--
{
  "setup":     [{ "element": "#c", "modifier": "attr", "parameters": [{ "opacity": 0 }] }],
  "animation": [[{ "element": "#c", "modifier": "attr", "parameters": [{ "opacity": 1, "r": 70 }], "duration": 600 }]]
}
--></div>
A markdown cell that holds an animation keeps everything else in it — headings, prose, other blocks all stay on the slide alongside the animation.
SVG Animation
SVG animations use the Reveal.js Animate plugin by Asvin Goel. Animations load after the slideshow starts.
Method A — Raw HTML in a markdown cell
Add a <div data-animate> block containing your SVG and a JSON config comment directly in a markdown cell:
<div data-animate>
<svg xmlns="http://www.w3.org/2000/svg" width="300" height="300">
  <circle id="c1" cx="150" cy="150" r="60" style="fill:steelblue"/>
</svg>
<!--
{
  "setup": [{
    "element": "#c1",
    "modifier": "attr",
    "parameters": [{ "r": 100 }],
    "duration": 1500,
    "begin": 0
  }]
}
-->
</div>
Method B — {svg-animate} MyST directive (recommended)
Use the {svg-animate} directive in a markdown cell. The same cell works in both the live Reveal.js slideshow and a static Jupyter Book 2 / mystmd export:
:::{svg-animate} Circle animation
:height: 320px
:background: white
<svg xmlns='http://www.w3.org/2000/svg' width='300' height='300'>
  <circle id='c1' cx='150' cy='150' r='60' style='fill:steelblue'/>
</svg>
<!--
{
  "setup": [{ "element": "#c1", "modifier": "attr", "parameters": [{ "r": 100 }], "duration": 1500, "begin": 0 }]
}
-->
:::
Note for hubs with
jupyterlab-mystinstalled (e.g. DIVE): jupyterlab-myst parses:::blocks itself and shows “svg-animate — Unknown Directive” for directives it doesn’t know. sliveshow replaces that error block with the animation, so the cell still animates — but if you only care about the notebook and the slideshow, Method A (<div data-animate>) is the simpler choice. Method B exists so the same cell also renders in a static Jupyter Book 2 build.
To enable {svg-animate} in a mystmd/Jupyter Book 2 build, add the plugin to your myst.yml:
project:
  plugins:
    - svg-animate.mjs
The svg-animate.mjs plugin file is included in the Demo/ folder.
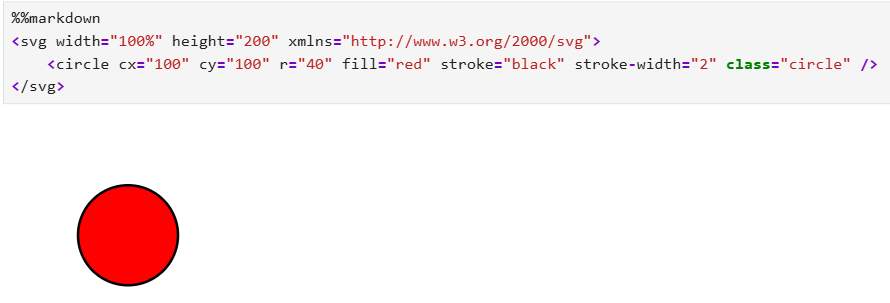
The JSON config controls the animation. setup runs on load; animation runs per fragment. See the Animate plugin README for full options.
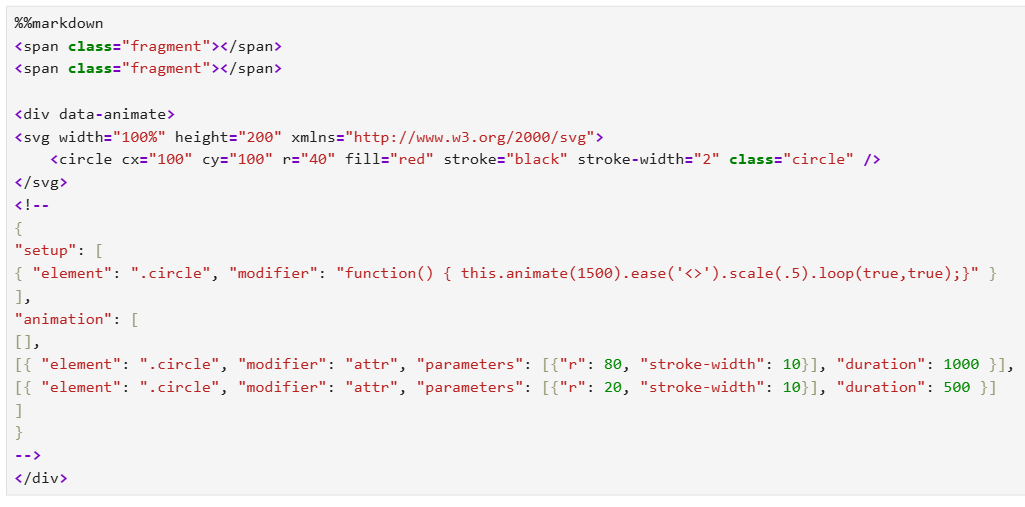
Animations in the notebook view
Since 0.1.8, the same data-animate / {svg-animate} cells also animate in the normal notebook view — no slideshow required. One source, works in both.
- Animations autoplay when the cell scrolls into view, and double-click replays them.
"loop": truein the config makes the animation cycle continuously (notebook and slideshow).- In the notebook, Reveal fragments don't exist, so all
animationstages play back-to-back on one timeline. - Tip: keep one animation block per markdown cell. Text before/after the block in the same cell is preserved.
Reveal.js plugins (chalkboard, ...)
sliveshow can load any Reveal.js plugin at runtime — no rebuild required. Add entries under Settings → Settings Editor → Sliveshow → Reveal.js plugins:
[
  {
    "name": "RevealChalkboard",
    "script": "https://cdn.jsdelivr.net/npm/reveal.js-plugins@latest/chalkboard/plugin.js",
    "css": [
      "https://cdn.jsdelivr.net/npm/reveal.js-plugins@latest/chalkboard/style.css"
    ],
    "config": { "chalkboard": { "theme": "whiteboard" } },
    "enabled": true
  }
]
name— the global the plugin registers (e.g.RevealChalkboard)script/css— where to fetch it from (a CDN, or a file served by Jupyter)config— merged into Reveal's configurationenabled— setfalseto keep an entry without loading it
A plugin that fails to load is reported in the browser console and skipped, so an unreachable CDN can never stop a lecture from starting.
Chalkboard is preconfigured (disabled by default): enable it and press C to annotate the current slide or B for a full chalkboard — ideal for working through an example live. Drag to draw, right-drag to erase, DEL to clear.
Narration and self-advancing slides
With rajgoel's audio-slideshow plugin enabled in reveal_plugins, a deck
can play a recording for each slide and move itself on when the audio ends —
useful for a talk that runs unattended at a booth, or for a lecture a student
watches later.
Per cell, in SLIDESHOW TOOLS:
| Field | What it does |
|---|---|
| Audio file | plays this file on that slide or fragment (data-audio-src) |
| Narration | spoken by the text-to-speech service instead (data-audio-text) |
| Advance after (ms) | how long to wait before moving on; negative to stay |
And there is a shortcut that needs no metadata at all: a cell whose slide
type is Notes becomes that slide's speaker notes rather than appearing on it,
and with defaultNotes: true the plugin narrates those notes. So writing the
narration is just writing a notes cell under each slide.
Text-to-speech needs a textToSpeechURL in the plugin's config; without one,
slides with no audio file simply hold for defaultDuration seconds and then
advance.
Leave
defaultAudiosset totrue. It looks like the setting to turn off when a deck has no recordings, but in the plugin the silent-placeholder fallback is only reachable from that branch — switch it off and slides without an audio file get no audio source at all, so nothing ever ends and the deck never advances. With it on, the plugin probes foraudio/0.0.webm, gets a 404, and falls back to silence ofdefaultDuration, which is what makes the show move. Expect one 404 (or 405 from a Jupyter server) per slide in the browser console because of that probe — it is how the plugin decides there is no recording, not a fault. Configure it in the JSON Settings Editor, not the form editor:
"reveal_plugins": [
  {
    "name": "RevealAudioSlideshow",
    "script": "https://cdn.jsdelivr.net/npm/reveal.js-plugins@latest/audio-slideshow/plugin.js",
    "config": { "audio": { "defaultAudios": true, "defaultNotes": true, "advance": 0 } },
    "enabled": true
  }
]
Speaker notes are hidden during the show in both modes.
autoplay governs the first slide only: leave it false and the audio
player waits for one click, after which every following slide plays and
advances by itself. That is deliberate — browsers block sound that starts
without a user gesture anyway, so a deck that must run unattended needs both
"autoplay": true and a kiosk-mode browser started with
--autoplay-policy=no-user-gesture-required.
Animating math (MathJax 4)
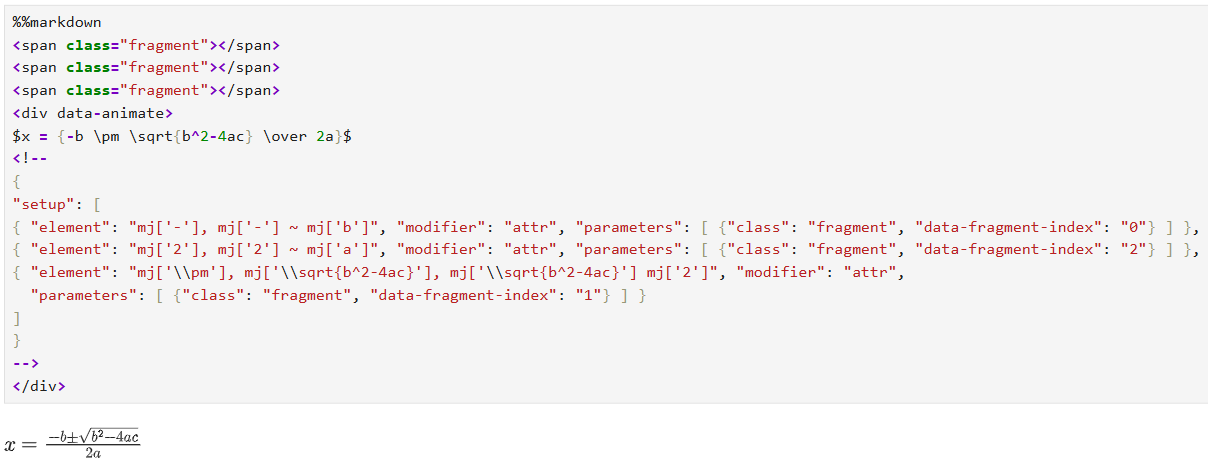
sliveshow replaces JupyterLab's default math renderer with MathJax 4 SVG output, so every formula in a markdown cell is an SVG that can be animated like any other — in the slideshow and in the notebook view.
Select formula parts either by their TeX source via g[data-latex='x'] (shortened to mj['x']), or tag them explicitly with \class{name}{...} / \cssId{id}{...} and select with .name / #id:
## The Gaussian integral

<div data-animate>

$$\class{lhs}{\int_{0}^{\infty} e^{-x^2}\,dx} = \class{rhs}{\frac{\sqrt{\pi}}{2}}$$

<!--
{
  "animation": [
    { "element": ".lhs", "modifier": "opacity", "parameters": [0.15], "duration": 600 },
    { "element": ".lhs", "modifier": "opacity", "parameters": [1], "duration": 600 },
    { "element": ".rhs", "modifier": "opacity", "parameters": [0.15], "duration": 600 },
    { "element": ".rhs", "modifier": "opacity", "parameters": [1], "duration": 600 }
  ],
  "loop": true
}
-->
</div>
Math inside a data-animate block is typeset by MathJax 4 when the block is injected (both in the notebook and when the slideshow starts).
Note: sliveshow disables the built-in
@jupyterlab/mathjax-extension(MathJax 3) while installed, so its MathJax 4 SVG typesetter is the one JupyterLab uses. Uninstalling sliveshow restores the default renderer.
Contributing
Development install
You will need Node.js (20.19 or newer, or 22.12 or newer), JupyterLab, and
jupyter-builder, which builds the extension. JupyterLab 4.6 and later
include it; with an older JupyterLab, run pip install jupyter-builder.
# Clone the repo
git clone https://github.com/AlyanAamirAhmedani/sliveshow
cd sliveshow

# Install in development mode
pip install -e "."

# Link with JupyterLab
jupyter labextension develop . --overwrite

# Build TypeScript
jlpm build
Watch mode (auto-rebuild on save):
# Terminal 1
jlpm watch

# Terminal 2
jupyter lab
Development uninstall
pip uninstall sliveshow
Remove the symlink created by jupyter labextension develop:
jupyter labextension list  # find labextensions folder
# remove the sliveshow symlink from that folder
Packaging
See RELEASE.
1 maintainer

Metadata
1 maintainer
Release files for sliveshow 0.2.5
For a detailed explanation of source distributions (sdists) and built distributions (wheels), please see the package formats documentation.
Source distribution (sdist)
| File | Size | Uploaded | |
|---|---|---|---|
| sliveshow-0.2.5.tar.gz | 1.0 MB | Details |
Built distribution (wheel)
| File | Interpreter | ABI | Platform | Reset |
|---|---|---|---|---|
| sliveshow-0.2.5-py3-none-any.whl | Python 3 | none | any | Details |
Total release size: 2.2 MB
Release files / sliveshow-0.2.5.tar.gz
| Download URL | sliveshow-0.2.5.tar.gz |
|---|---|
| Size | 1.0 MB |
| Tags | Source |
|
SHA-256 checksum How to use checksums |
7cf5bb210c29ec46ef607a37040408c12de7433bb242da4d2d300b07cee7eff9
|
|
BLAKE2b-256 checksum How to use checksums |
38730cbc7d38a66e005c1e3ae27492e5d960d91f47935c0bbdaaaa3b1a7ab42d
|
| Upload date | |
|
Uploaded using Trusted Publishing? What is trusted publishing? |
No |
| Uploaded via |
twine/7.0.0 CPython/3.13.7
|
Release files / sliveshow-0.2.5-py3-none-any.whl
| Download URL | sliveshow-0.2.5-py3-none-any.whl |
|---|---|
| Size | 1.2 MB |
| Tags | Python 3 |
|
SHA-256 checksum How to use checksums |
7611d3903a1abf7cb06a10ba6237443b0be7c89b59d66e260b8d21c6c4d75c2a
|
|
BLAKE2b-256 checksum How to use checksums |
04620ecd44ed40383e8a4e3d08f26e58452140b423a457c2deb57329488a0b35
|
| Upload date | |
|
Uploaded using Trusted Publishing? What is trusted publishing? |
No |
| Uploaded via |
twine/7.0.0 CPython/3.13.7
|














