
Swiss Weather MCP Server




A Model Context Protocol (MCP) server that exposes Swiss weather forecast data as callable tools. It fetches data from the official MeteoSwiss meteodata-lab, caches it locally, and serves predictions such as rainfall, sunshine, temperature, etc. The prediction data is from the ICON-CH2-EPS forecast system that produces data for up to 5 days ahead.
Additionally there is also an MCP client that can be run to test the server using the stdio transport.
Note: This project is not an official MeteoSwiss product. All forecast data are from the MeteoSwiss Open Data portal. Source: MeteoSwiss
Table of Contents
- Project Structure
- Quick Start
- Installation
- Configuration
- Usage
- Available Tools
- Example Usage with LMStudio
- Tests
- Releasing
- Resources
- License
Project Structure
swiss-weather-mcp/
├── src/swiss_weather_mcp/
│   ├── server.py           # MCP server
│   ├── predictions.py      # Data fetching logic
│   └── client.py           # MCP client (optional)
├── tests/swiss_weather_mcp/  # Pytest suite
├── .github/workflows/      # CI and release pipelines
├── docs/                   # Documentation
├── pyproject.toml          # Project metadata and dependencies
├── uv.lock                 # Pinned, reproducible dependency set
├── .env                    # NOMINATIM_USER_AGENT (not committed)
└── Dockerfile
Caches live outside the project, under your OS's standard cache directory (see Installation).
Quick Start
1. Installation
Install the server globally to run it anywhere on your system:
uv tool install swiss-weather-mcp
2. Configuration
Create a .env file with your Nominatim user agent (see Configuration):
echo 'NOMINATIM_USER_AGENT="YourWeatherMCPServer/1.0 (yourname@example.com)"' > .env
3. Execution
Run the server from the directory containing your .env file:
swiss-weather-mcp-server
Installation
As a Global CLI Tool
uv tool install swiss-weather-mcp
As a Library Dependency
# Using uv
uv add swiss-weather-mcp

# Using pip
pip install swiss-weather-mcp
Note: Add the
clientextra (swiss-weather-mcp[client]) if you also want the optional MCP client, which pulls in the Ollama SDK.
From Source
git clone https://github.com/cuolm/swiss-weather-mcp.git
cd swiss-weather-mcp

# Using uv (Recommended)
uv sync --extra client

# Using pip
python3 -m venv .venv
source .venv/bin/activate  # On Windows: .venv\Scripts\activate
pip install -e ".[client]"
Note:
uv syncon its own installs the server only. The--extra clientflag is what pulls in the Ollama SDK needed byswiss-weather-mcp-client.
Note:
- Ollama is optional – only needed if you want to use the MCP client (
swiss-weather-mcp-client, installed via theclientextra). - The server reads its
.envfile relative to the current working directory — run it from the directory that holds your.envfile. ExportingNOMINATIM_USER_AGENTin your shell works when you start the server yourself, but not withswiss-weather-mcp-client: the MCP stdio transport only forwards a fixed list of environment variables to the server it starts, so the client needs the.envfile. - Caches are stored under your OS's standard cache directory (via platformdirs, e.g.
~/Library/Caches/swiss-weather-mcpon macOS,~/.cache/swiss-weather-mcpon Linux) — independent of where the server is launched from, so downloaded forecasts and geocoded locations are reused across runs.EarthKitCache/avoids re‑downloading weather data. Delete it to clear.nominatim_geocode_cache.jsoncaches lat/lon lookups. Delete it to clear.
Configuration
Create a .env file in the directory you'll run the server from, specifying an environment variable that tells Nominatim (the geocoding service) who is making the call.
echo 'NOMINATIM_USER_AGENT="YourWeatherMCPServer/1.0 (yourname@example.com)"' > .env
Note: Replace the application name and address with your own. The Nominatim usage policy requires a user agent identifying a real application and contact address, and blocks requests that do not provide one. Keep lookups to at most one per second; results are cached, so only locations that have not been requested before reach the service.
Usage
Running the Server
If installed via uv tool install or pip:
# stdio (default)
swiss-weather-mcp-server

# streamable-http
swiss-weather-mcp-server --transport=streamable-http --host=localhost --port=8050
If running within the source repository cloned from GitHub:
# Using uv (Recommended)
uv run swiss-weather-mcp-server

# Using pip, with the virtual environment activated
swiss-weather-mcp-server
Optional flags: --help
Running the Server with Docker
Images are built and published automatically by GitHub Actions to the project's GitHub Container Registry, tagged :latest (newest release) and by version.
- Create a
.envfile containing your Nominatim user agent environment variable (replace"YourWeatherMCPServer/1.0 (yourname@example.com)"):
echo 'NOMINATIM_USER_AGENT="YourWeatherMCPServer/1.0 (yourname@example.com)"' > .env
- Run the published image, passing the
.envfile and mapping port 8050:
docker run --env-file .env -p 8050:8050 ghcr.io/cuolm/swiss-weather-mcp:latest
- Access the server at:
http://localhost:8050/mcp/
Manual Build
docker build -t swiss-weather-mcp .
docker run --env-file .env -p 8050:8050 swiss-weather-mcp
Running the MCP Client using Stdio Transport
The bundled MCP client can be used to test the server over the stdio transport. It requires the client extra (see Installation).
Make sure Ollama is installed on your system. You can download it here or install via Homebrew on macOS: brew install ollama
# Pull a local Ollama LLM model (e.g. qwen3:4b)
ollama pull qwen3:4b

# Run the MCP client (it automatically starts the server as a subprocess)
swiss-weather-mcp-client --model=qwen3:4b

# From a source checkout, using uv
uv run --extra client swiss-weather-mcp-client --model=qwen3:4b
Available Tools
| Tool | Purpose | Example Call |
|---|---|---|
current_date_and_time() |
Current date and time (weekday day.month.year hour:minute:second) in Swiss local time | current_date_and_time() |
total_rainfall(location, lead_time_start_swiss, lead_time_end_swiss) |
Total rainfall (mm) for a period | total_rainfall("Zurich", 24, 48) |
sunshine_hours(location, lead_time_start_swiss, lead_time_end_swiss) |
Sunshine hours for a period | sunshine_hours("Zurich", 24, 48) |
temperature(location, lead_time_swiss) |
Max temperature (°C) at a specific lead time | temperature("Zurich", 36) |
wind_speed(location, lead_time_swiss) |
Wind speed (m/s) at a specific lead time | wind_speed("Zurich", 36) |
pressure_msl(location, lead_time_swiss) |
Sea‑level pressure (Pa) at a specific lead time | pressure_msl("Zurich", 36) |
total_cloud_cover(location, lead_time_swiss) |
Cloud cover (%) at a specific lead time | total_cloud_cover("Zurich", 36) |
snow_depth(location, lead_time_swiss) |
Snow depth (m) at a specific lead time | snow_depth("Zurich", 36) |
precipitation_rate(location, lead_time_swiss) |
Precipitation rate (mm/s) at a specific lead time | precipitation_rate("Zurich", 36) |
Lead Time
- Lead time is the number of hours counted from Swiss local time 00:00, internally converted to UTC (the ICON-CH2-EPS forecast system uses UTC).
- Example: A lead time of 36 hours returns the forecast for 12:00 Swiss local time tomorrow.
- Minimum lead time: 2 hours; maximum lead time: 121 hours.
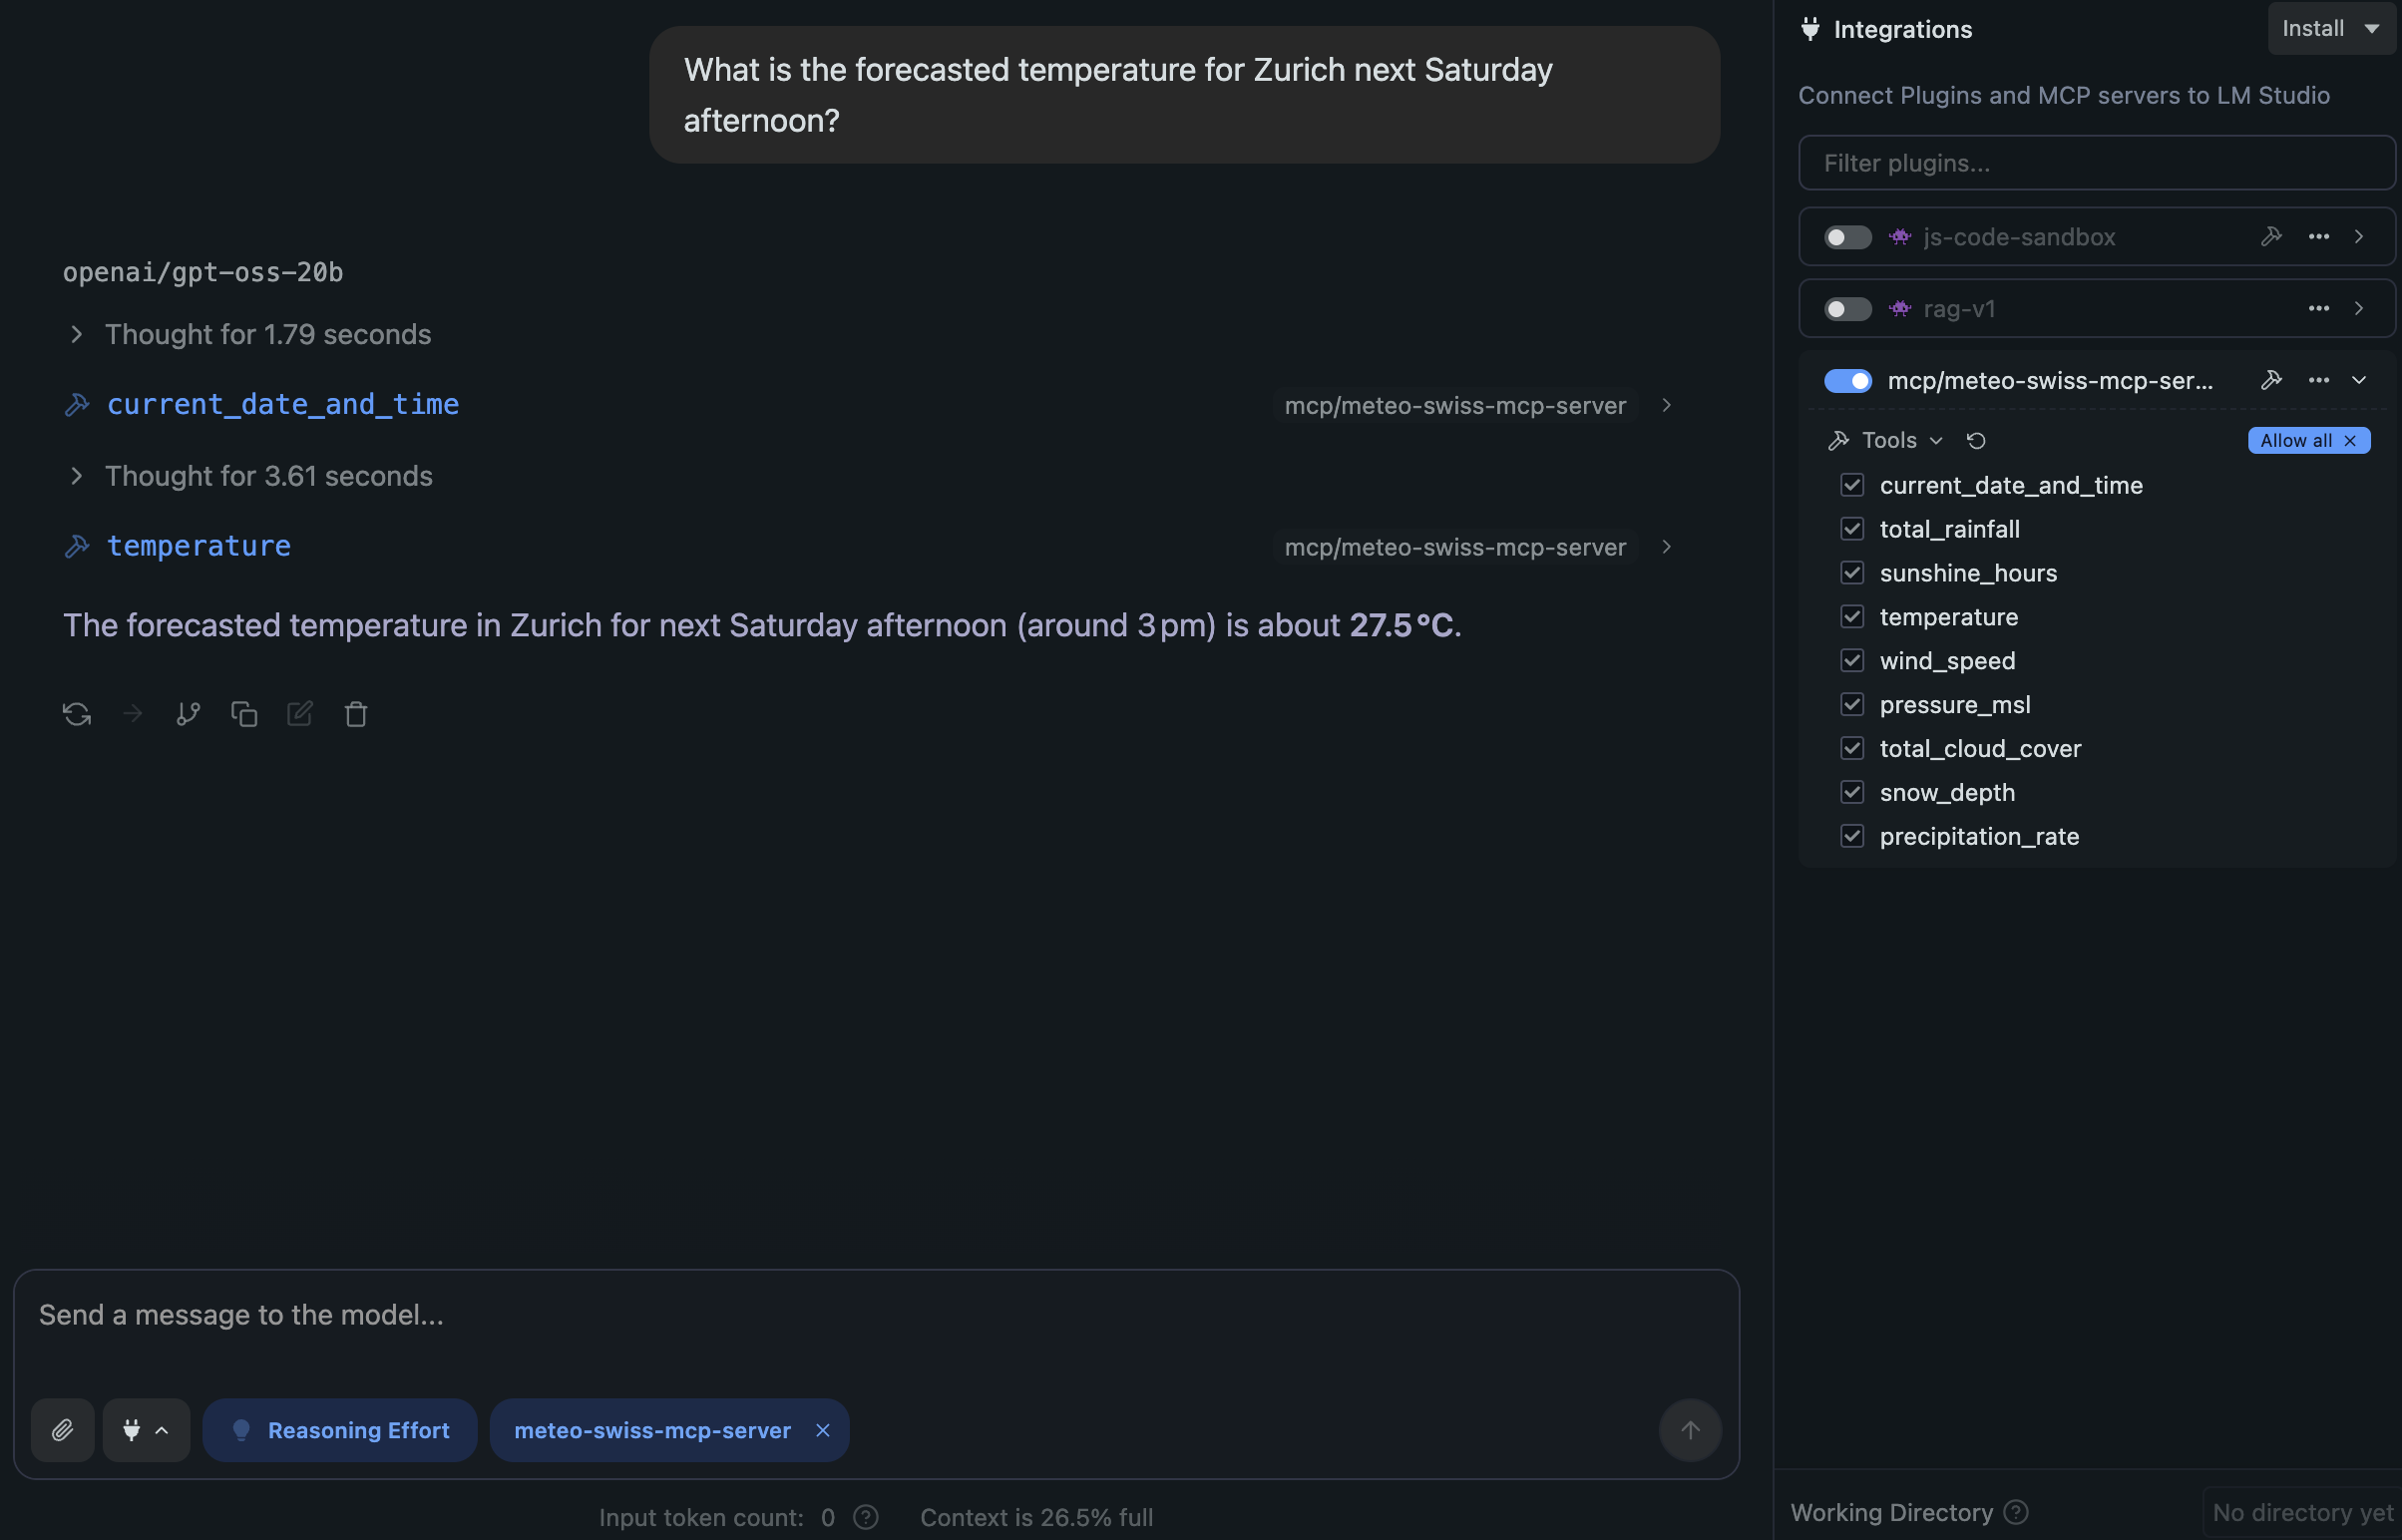
Example Usage with LMStudio
Using the streamable-http transport layer
Configure the mcp.json file in LMStudio:
{
  "mcpServers": {
    "swiss_weather_mcp_server": {
      "url": "http://localhost:8050/mcp/"
    }
  }
}
Run the MCP server with the streamable-http transport layer:
uv run swiss-weather-mcp-server --transport=streamable-http --host=localhost --port=8050
Using the stdio transport layer
Configure the mcp.json file in LMStudio. Replace <path-to-the-project> with your actual local path:
{
  "mcpServers": {
    "swiss_weather_mcp_server": {
      "command": "<path-to-the-project>/.venv/bin/swiss-weather-mcp-server"
    }
  }
}
Tests
Run the test suite from the project root with:
uv run pytest

# Or, with an activated virtual environment
pytest
Every push and pull request runs the suite plus a Docker build check via the Tests workflow.
Releasing
Versions are derived from Git tags by hatch-vcs — there is no version string to bump by hand.
- Pushing a pre-release tag (e.g.
0.2.0rc1) triggersrelease_test.yaml: tests, publish to TestPyPI, push a versioned image to GHCR, and create a prerelease GitHub Release. - Pushing a final tag (e.g.
0.2.0) triggersrelease.yaml: tests, publish to PyPI, push:<version>and:latestimages to GHCR, and create a GitHub Release.
Both publish jobs use PyPI trusted publishing via the pypi / testpypi GitHub environments — no API tokens are stored in the repository.
Resources
License
Licensed under the Apache License 2.0.
1 maintainer

Release files for swiss-weather-mcp 0.1.0
For a detailed explanation of source distributions (sdists) and built distributions (wheels), please see the package formats documentation.
Source distribution (sdist)
| File | Size | Uploaded | |
|---|---|---|---|
| swiss_weather_mcp-0.1.0.tar.gz | 361.2 kB | Details |
Built distribution (wheel)
| File | Interpreter | ABI | Platform | Reset |
|---|---|---|---|---|
| swiss_weather_mcp-0.1.0-py3-none-any.whl | Python 3 | none | any | Details |
Total release size: 382.6 kB
Release files / swiss_weather_mcp-0.1.0.tar.gz
| Download URL | swiss_weather_mcp-0.1.0.tar.gz |
|---|---|
| Size | 361.2 kB |
| Tags | Source |
|
SHA-256 checksum How to use checksums |
8d2e5d35f1b754699ab6867d90219595fb94d4e6773f00b8f7fb2292ea36ab35
|
|
BLAKE2b-256 checksum How to use checksums |
f261c65dde67e38050f7b65c9ea16f146a70fc674627b895eb57c7fc5042e7b5
|
| Upload date | |
|
Uploaded using Trusted Publishing? What is trusted publishing? |
Yes |
| Uploaded via |
twine/7.0.0 CPython/3.13.14
|
Provenance
Provenance describes where a file came from. On PyPI, provenance is shared via attestations, which provide a verifiable record of the build or publishing details. View details, limitations and caveats.


PyPI Publish Attestation
PyPI verified that this artifact, at this checksum, originated from the publisher listed below.
Signed by GitHub Actions, verified by PyPI on Sep 21, 2026.
Transparency logRelease files / swiss_weather_mcp-0.1.0-py3-none-any.whl
| Download URL | swiss_weather_mcp-0.1.0-py3-none-any.whl |
|---|---|
| Size | 21.4 kB |
| Tags | Python 3 |
|
SHA-256 checksum How to use checksums |
319a88ffe1ab93b2c13b8fe4a00eef22e3dc3ada67de486877c729d2dc9486d5
|
|
BLAKE2b-256 checksum How to use checksums |
8123bf06722ce73602373fbd7554d445b192f2159346cdcd4cdde24ad5f93d9f
|
| Upload date | |
|
Uploaded using Trusted Publishing? What is trusted publishing? |
Yes |
| Uploaded via |
twine/7.0.0 CPython/3.13.14
|
Provenance
Provenance describes where a file came from. On PyPI, provenance is shared via attestations, which provide a verifiable record of the build or publishing details. View details, limitations and caveats.
PyPI Publish Attestation
PyPI verified that this artifact, at this checksum, originated from the publisher listed below.
Signed by GitHub Actions, verified by PyPI on Sep 21, 2026.
Transparency log













