
terrahour

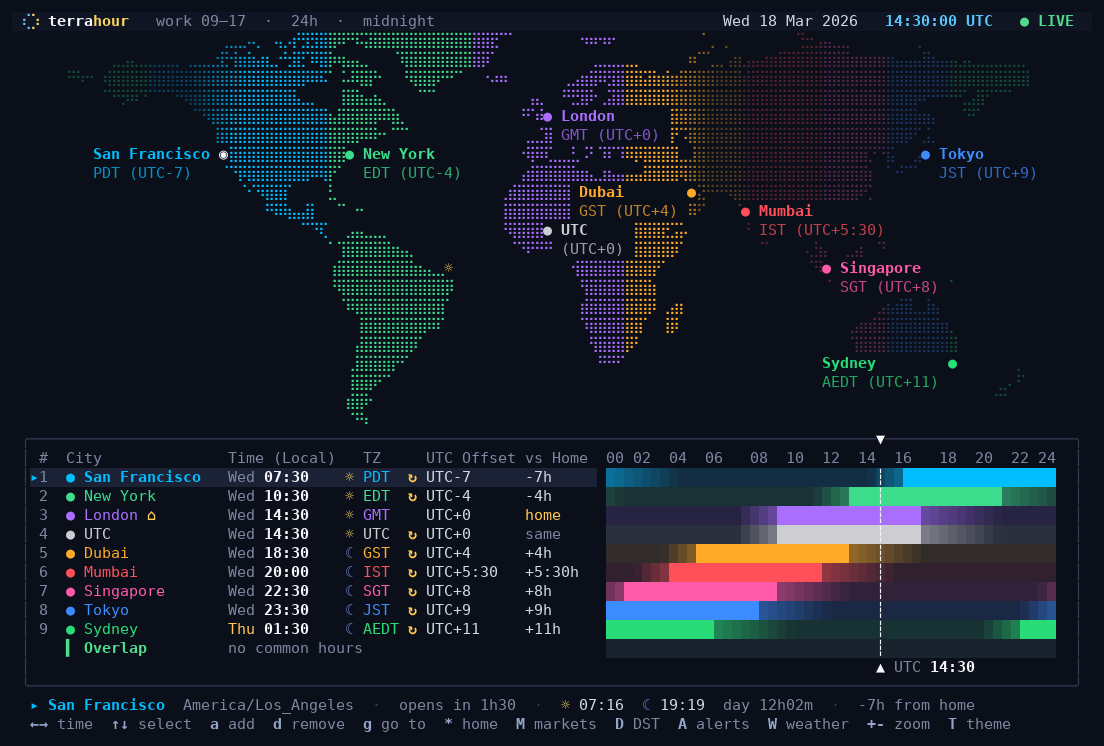
A world clock for the terminal, with a map that shows where it is daytime and a 24-hour timeline that shows when your cities are at work.
| Main view: the day and night map above a timeline per city |
|---|
 |
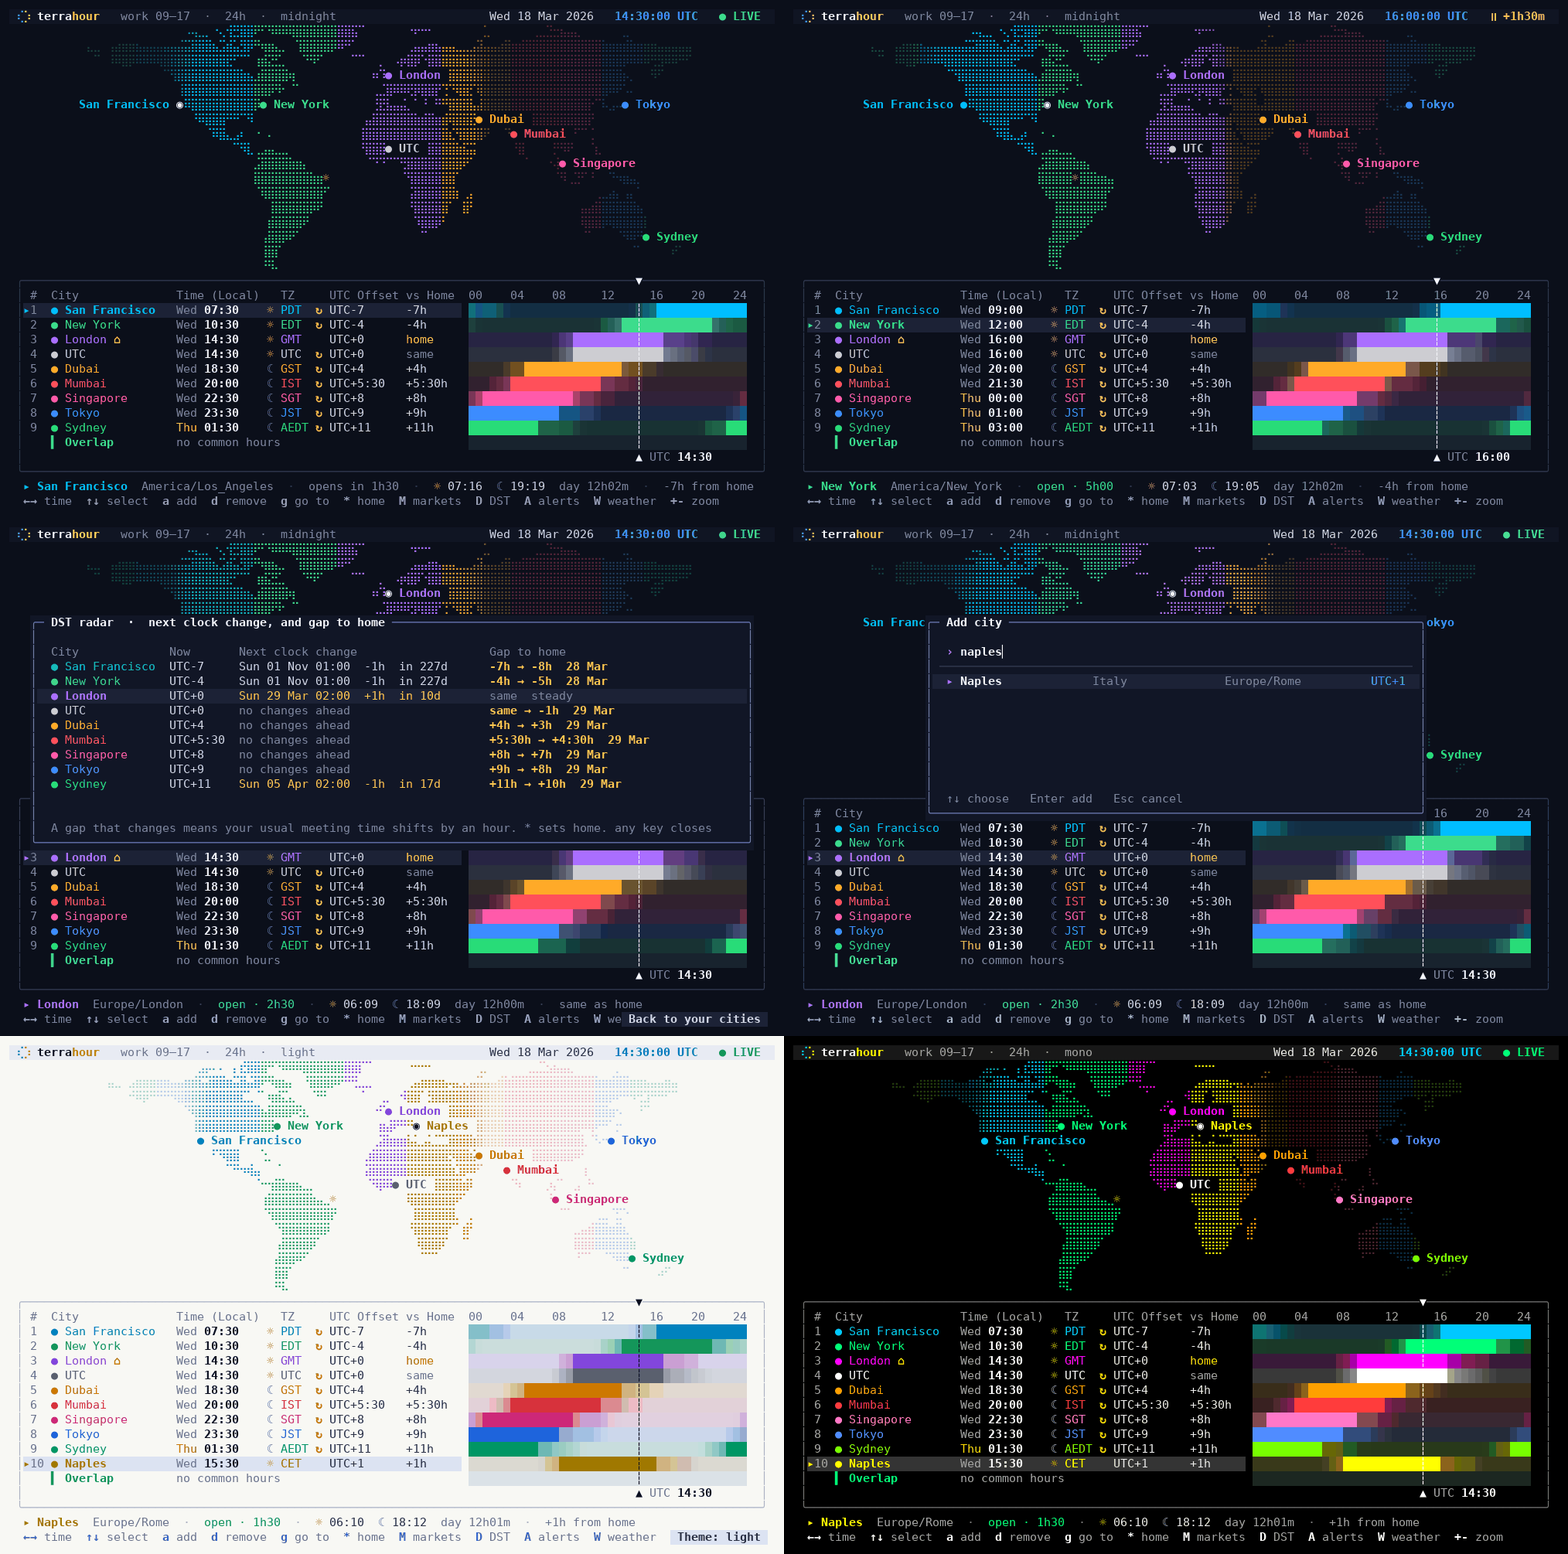
| A quick tour: scrubbing time, exchanges, DST radar, ambient view |
|---|
 |
What it does
- Map with day and night. The world is drawn in braille dots, shaded by sunlight, and
coloured by time zone.
Nadds a shade over the night side of the map, in four strengths. Every city you track gets a marker. Zoom with+-or the mouse wheel, drag to pan. - A timeline per city. Each row is a 24-hour bar with the working hours lit up. The overlap row at the bottom shows the window when everybody is at their desk.
- Scrub through time. Arrow keys move in 15-minute steps,
gjumps to any time ("15:30", "3pm", "+2h", "2026-10-05 09:00"),rsnaps back to live. - DST radar.
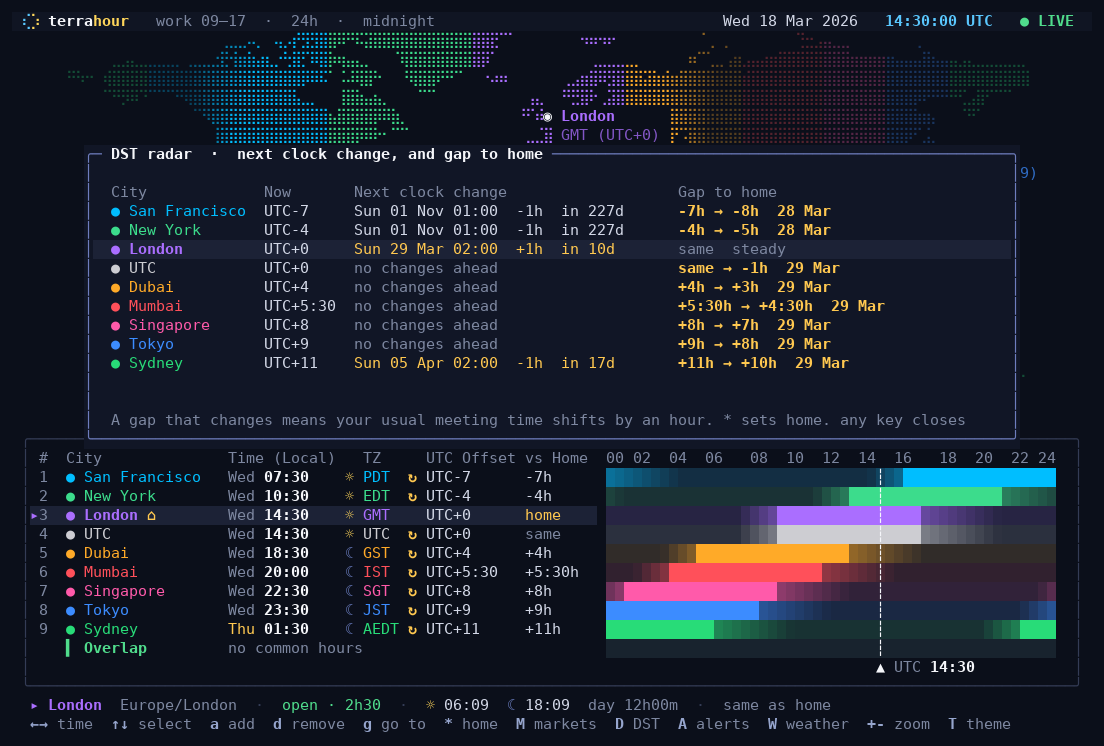
Dlists the next clock change for every city and, more usefully, whether the gap between you and them is about to shift by an hour. - Stock exchanges.
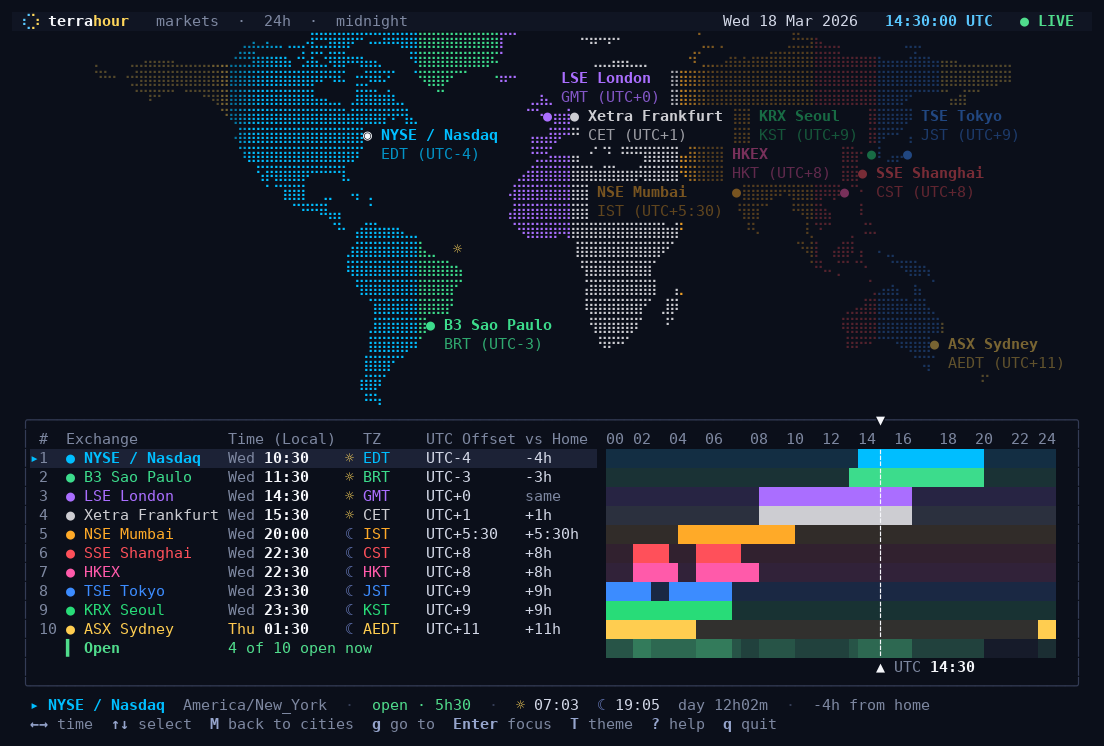
Mswaps the city list for the ten biggest exchanges with their real trading sessions, lunch breaks included. - Alerts.
Asets a daily reminder in another city's time, a ping when an office or exchange opens or closes, or a plain timer. They ring the bell and send a desktop notification while the app is open. - Weather, if you want it.
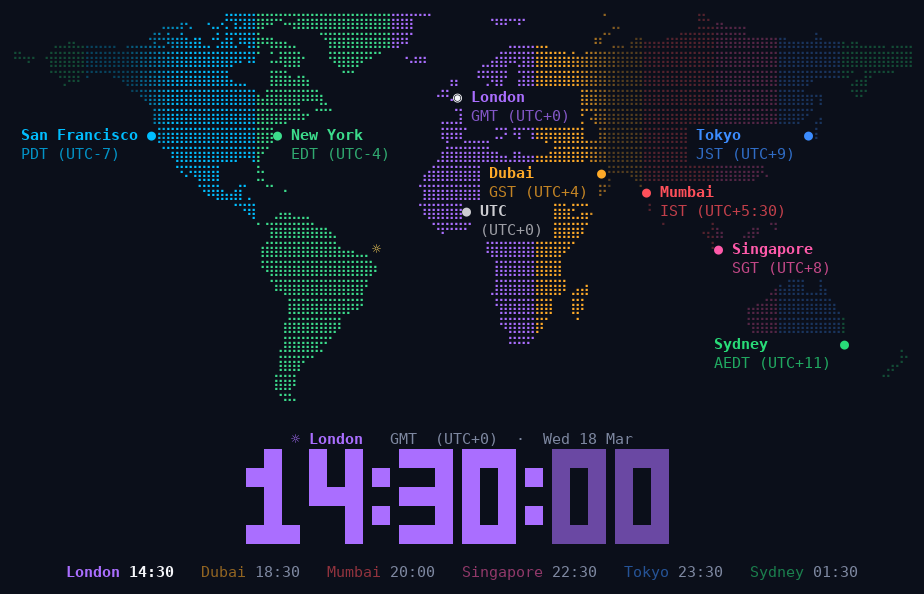
Wshows the current temperature next to each city (Open-Meteo, needs network, off by default). - Ambient view.
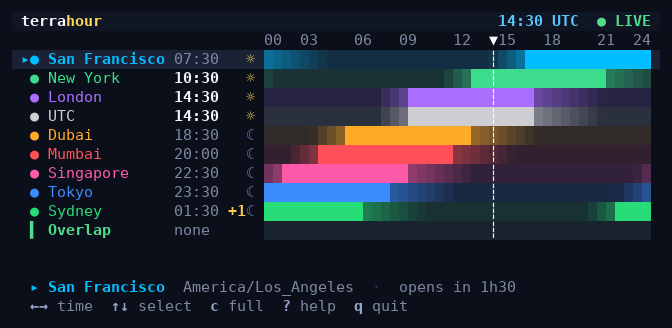
Vturns the whole terminal into a big clock over the map that cycles through your cities. Nice on a spare monitor. - Fits anywhere. Below about 76 columns it switches to a compact layout that works in a
tmux split.
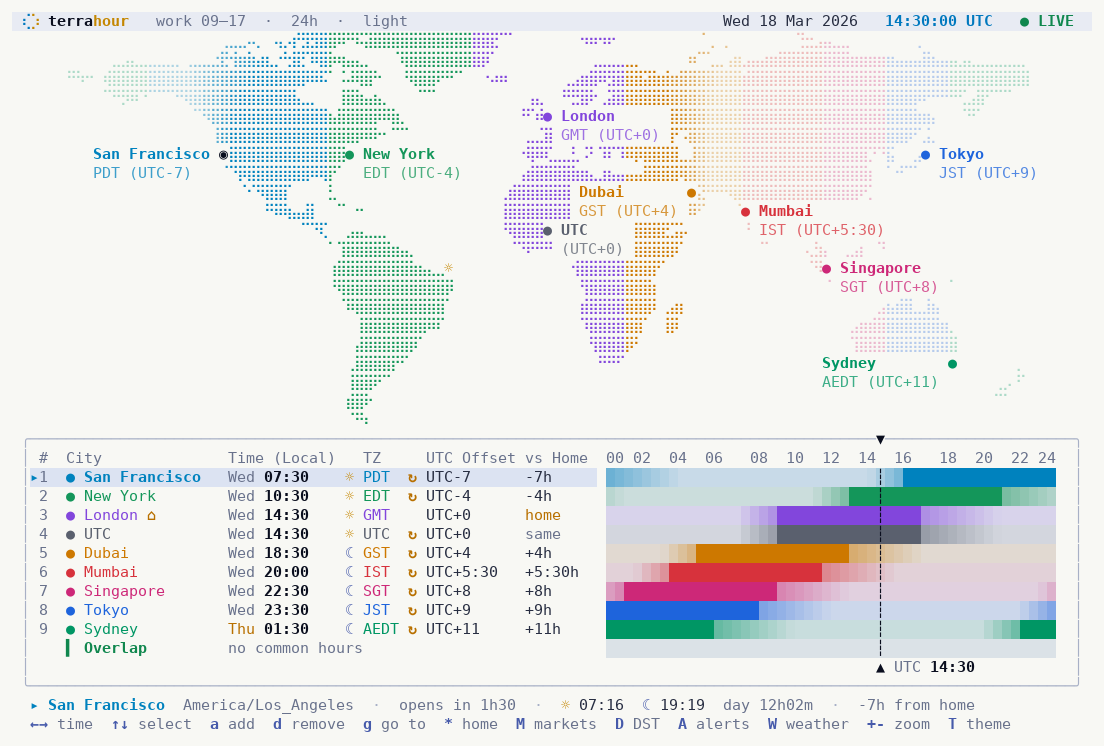
--lineprints a one-liner for a status bar. - Fourteen themes (midnight, nord, dracula, light, gruvbox, gruvbox-light, mono, green, amber, grey, paper, vaporwave, synthwave, colorblind), 12 or 24 hour clock, mouse support, and about 12,000 cities built in with online lookup for the rest.
| Exchanges | Compact layout for a tmux split |
|---|---|
 |
 |
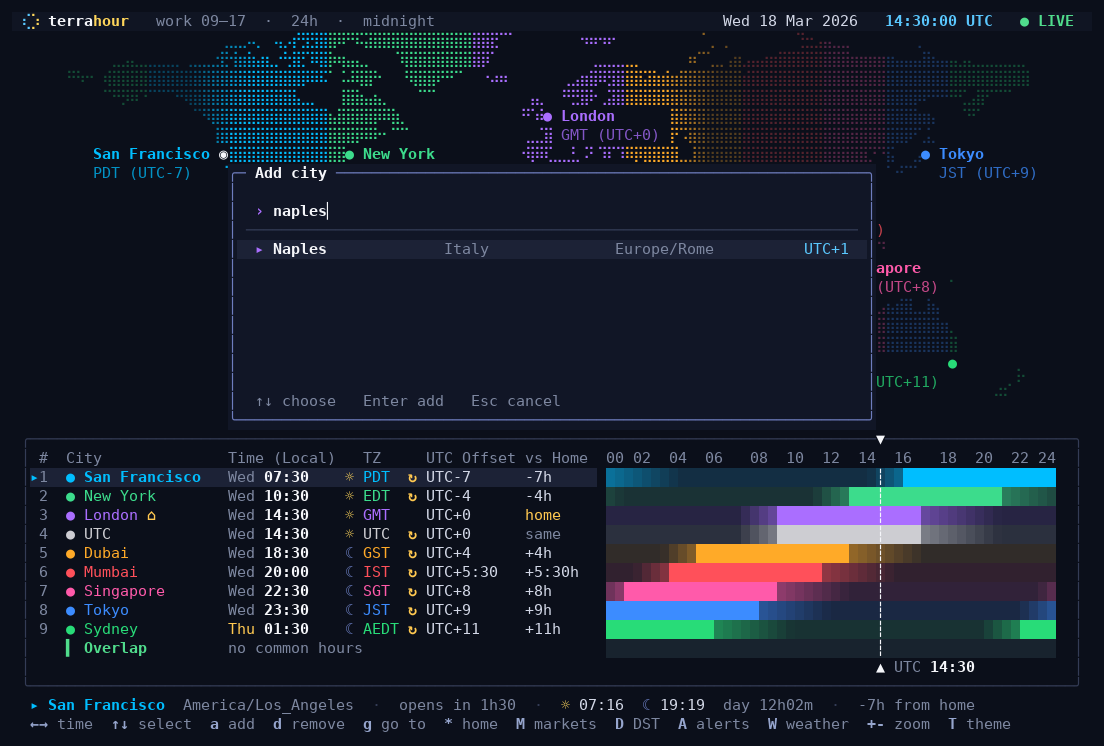
| DST radar | Adding a city |
|---|---|
 |
 |
| Ambient view | Light theme |
|---|---|
 |
 |
Install
You need Python 3.9 or newer, a terminal with truecolor support (almost all of them these days) and a UTF-8 locale. Developed on Linux. macOS is covered by the automated tests, but I have not tried it by hand. On Windows use WSL, the app relies on a Unix terminal.
The simplest way is pipx, which installs the terrahour command for
your user:
pipx install terrahour
terrahour
If you do not have pipx, get it with sudo apt install pipx on Debian and Ubuntu or
brew install pipx on macOS. If your shell cannot find terrahour afterwards, run
pipx ensurepath once and open a new terminal.
To try it without installing anything: pipx run terrahour or uvx terrahour.
With pip, in a virtual environment. Recent Debian and Ubuntu refuse a plain pip install
outside one. The command is then available whenever that environment is active:
python3 -m venv .venv && . .venv/bin/activate
pip install terrahour
terrahour
From a clone. There is nothing to build, so you can run it in place:
git clone https://github.com/ACoci86/terrahour
cd terrahour
python3 -m terrahour
Updating
pipx upgrade terrahour
If you installed with pip, run pip install --upgrade terrahour in the same environment. In
a clone, git pull. terrahour --version tells you which version you have.
Usage
Run terrahour. The first time it starts with a default set of cities: press a to add your
own, d to remove one, * to mark the selected city as home, ? for every key and q to
quit.
terrahour                                  # your saved cities (a sensible default set the first time)
terrahour Europe/Berlin "Home=America/Chicago" Naples   # a one-off set of zones or city names, not saved
terrahour --markets                        # start in the exchange view
terrahour --at 2026-10-05T09:00Z           # start frozen at a given time
terrahour --theme nord --12h
terrahour --night-shade 0.5                # shade the night side of the map (0 to 1)
terrahour --ambient                        # straight into the screensaver view
terrahour --reset                          # forget saved cities and settings
Press ? inside the app for the full list of keys. The ones you will use most:
| Key | Action |
|---|---|
← → |
scrub 15 minutes (Shift: 1 hour, PgUp/PgDn: 1 day) |
g |
go to a time, r back to live |
↑ ↓ j k |
select a city, Shift moves it up or down the list |
a d |
add or remove a city |
* |
mark the selected city as home (offsets are then relative to it) |
Enter |
focus the selected city, dims the others |
M D A W |
exchanges, DST radar, alerts, weather |
+ - [ ] 0 |
zoom the map, zoom the timeline, reset |
T t c V N |
theme, 12/24h, compact layout, ambient view, night shade |
q |
quit |
Everything you change in the app (cities, theme, home, working hours, alerts) is saved to
~/.config/terrahour/config.json. Zones given on the command line are session-only and
leave that file alone.
Window size
What you see depends on the size of your terminal window:
| Your window | What you see |
|---|---|
| At least 76 columns wide and 21 rows tall | Everything: the map on top and the city table under it |
| Wide enough, but only 16 to 20 rows tall | The city table on its own, because the map would not fit |
| Narrower than 76 columns, or shorter than 16 rows | The compact layout: one line per city with a small timeline, no map |
On a small map only the selected city is named, so the dots stay readable. Press c if you
want to force the compact layout, or to go back.
Status bars and scripts
$ terrahour --line
SF 07:30 · NY 10:30 · LON 14:30 · UTC 14:30 · DUB 18:30 · MUM 20:00 · SIN 22:30 · TOK 23:30 · SYD 01:30+1

$ terrahour --watch            # the same line, updating in place (good in a small tmux pane)
$ terrahour --tmux             # with tmux colour codes, for your status-right
$ terrahour --json --at 2026-03-18T14:30Z | jq '.cities[] | select(.open)'
The JSON includes local time, UTC offset, whether the city is inside working hours, minutes
until that changes, and the next clock change. --once --size 120x40 prints a single frame of
the full UI, which is how the screenshots above were made.
Network
Two features talk to the internet, and both are optional:
- While you type in the "add city" box, names that are not in the built-in list are looked up through the Open-Meteo geocoding API.
- Weather, when you turn it on with
W, comes from the Open-Meteo forecast API.
Set TERRAHOUR_OFFLINE=1 to switch both off. Nothing else leaves your machine.
How it is put together
It is a single Python package with no third-party dependencies. The pieces:
| Module | What it does |
|---|---|
cli.py |
argument parsing and the non-interactive modes |
app.py |
the terminal loop: raw mode, input tokens, redraw only the lines that changed |
keys.py |
every key and mouse event ends up here |
compose.py, draw.py, overlays.py, ambient.py |
turn the state into a frame |
canvas.py |
a character grid with colours that renders to ANSI escapes |
clock.py |
offsets, formatting, open/closed status, DST transitions, overlap |
astro.py |
sun position, sunrise and sunset |
worldmap.py |
the land mask, braille rasterisation, zoom and pan |
places.py, geocode.py |
the city database, search, and the online lookup |
state.py |
the State object and the config file |
alerts.py, weather.py |
what the names say |
themes.py |
colours; every module reads them through the active theme object C |
data/ |
the city list, the land mask and the exchange list, with their own README |
The map is a 0.25 degree land mask folded into a summed-area table, so any zoom level can ask "how much of this box is land?" in constant time, and the braille cells come straight out of that. Sun position uses the usual NOAA approximation, good to a few minutes.
Development
python3 -m venv .venv && . .venv/bin/activate
pip install -e ".[dev]"
pytest
The tests do not need a terminal or the network: they compose frames in memory and drive the
app through the same key handler the terminal loop uses. tools/screenshots.py regenerates
everything in docs/ (it needs Pillow and the DejaVu fonts).
Data and credits
- City list derived from GeoNames (CC BY 4.0).
- Land mask rasterised from Natural Earth (public domain).
- Geocoding and weather from Open-Meteo (CC BY 4.0).
- Time zone rules come from your operating system's tz database through Python's
zoneinfo.
License
MIT. See LICENSE.
1 maintainer

Metadata
1 maintainer
Release files for terrahour 1.0.5
For a detailed explanation of source distributions (sdists) and built distributions (wheels), please see the package formats documentation.
Source distribution (sdist)
| File | Size | Uploaded | |
|---|---|---|---|
| terrahour-1.0.5.tar.gz | 415.9 kB | Details |
Built distribution (wheel)
| File | Interpreter | ABI | Platform | Reset |
|---|---|---|---|---|
| terrahour-1.0.5-py3-none-any.whl | Python 3 | none | any | Details |
Total release size: 819.2 kB
Release files / terrahour-1.0.5.tar.gz
| Download URL | terrahour-1.0.5.tar.gz |
|---|---|
| Size | 415.9 kB |
| Tags | Source |
|
SHA-256 checksum How to use checksums |
26a506697ce25be7b65996699e55665a55a70d3f3e7107cdca52566173a8b7b2
|
|
BLAKE2b-256 checksum How to use checksums |
880efc74c20e82e5493574d995772d70d0fc42c915ded80618561ab511db81c2
|
| Upload date | |
|
Uploaded using Trusted Publishing? What is trusted publishing? |
Yes |
| Uploaded via |
twine/7.0.0 CPython/3.13.14
|
Provenance
Provenance describes where a file came from. On PyPI, provenance is shared via attestations, which provide a verifiable record of the build or publishing details. View details, limitations and caveats.


PyPI Publish Attestation
PyPI verified that this artifact, at this checksum, originated from the publisher listed below.
Signed by GitHub Actions, verified by PyPI on Oct 3, 2026.
Transparency logRelease files / terrahour-1.0.5-py3-none-any.whl
| Download URL | terrahour-1.0.5-py3-none-any.whl |
|---|---|
| Size | 403.2 kB |
| Tags | Python 3 |
|
SHA-256 checksum How to use checksums |
7d0af84076a297db466b4a40173eda6eef31eb62f00db6edcaf1359659f05bed
|
|
BLAKE2b-256 checksum How to use checksums |
59fc000ab811e8cfb8300077f725361ab3a048aa0ffe1d1b177c7fc0561448c7
|
| Upload date | |
|
Uploaded using Trusted Publishing? What is trusted publishing? |
Yes |
| Uploaded via |
twine/7.0.0 CPython/3.13.14
|
Provenance
Provenance describes where a file came from. On PyPI, provenance is shared via attestations, which provide a verifiable record of the build or publishing details. View details, limitations and caveats.
PyPI Publish Attestation
PyPI verified that this artifact, at this checksum, originated from the publisher listed below.
Signed by GitHub Actions, verified by PyPI on Oct 3, 2026.
Transparency log













