Agentic orchestration framework for task automation

Project description
Overview


Agentic orchestration framework to deploy agent network and handle complex task automation.
Visit:
- PyPI
- Github (LLM orchestration framework)
- Use case / Quick demo
- Documentation *Some components are under review.
Table of Content
- Key Features
- Quick Start
- Technologies Used
- Project Structure
- Setup
- Contributing
- Trouble Shooting
- Frequently Asked Questions (FAQ)
Key Features
Generate multi-agent systems based on the task complexity, execute tasks, and evaluate output based on the given criteria.
Agents are model-agnostic, and can handle and share RAG tools, knowledge, memory, and callbacks among other agents. (self-learn)
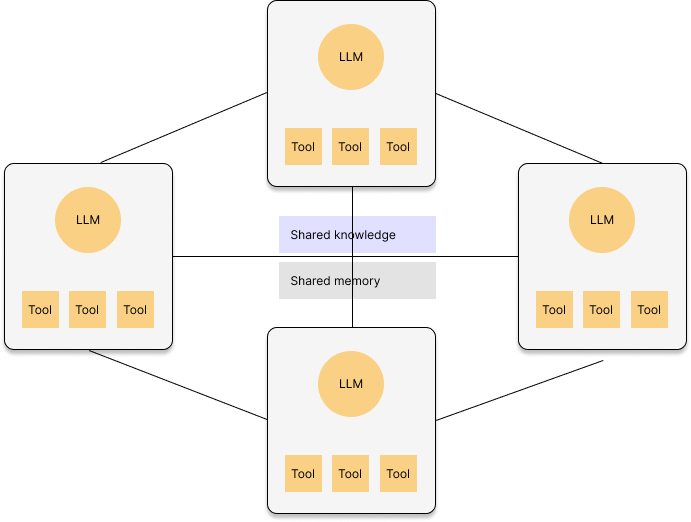
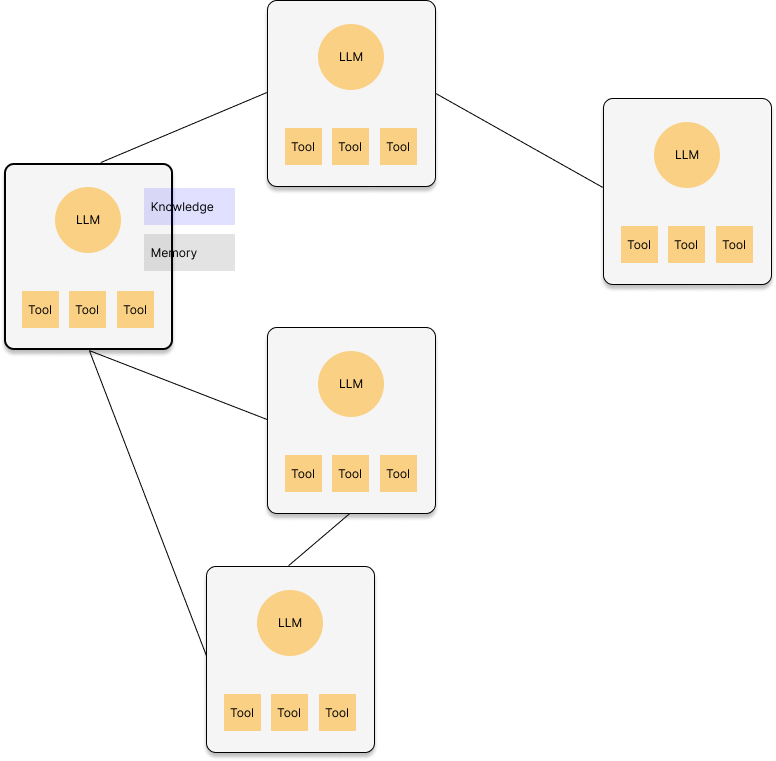
Agent formation
Agents adapt their formation based on task complexity.
You can specify a desired formation or allow the agents to determine it autonomously (default).
| Solo Agent | Supervising | Network | Random | |
|---|---|---|---|---|
| Formation | 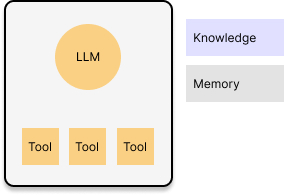 |
 |
 |
 |
| Usage |
|
|
|
|
| Use case | An email agent drafts promo message for the given audience. | The leader agent strategizes an outbound campaign plan and assigns components such as media mix or message creation to subordinate agents. | An email agent and social media agent share the product knowledge and deploy multi-channel outbound campaign. | 1. An email agent drafts promo message for the given audience, asking insights on tones from other email agents which oversee other clusters. 2. An agent calls the external agent to deploy the campaign. |
Quick Start
Install versionhq package:
pip install versionhq
(Python 3.11 or higher)
Case 1. Solo Agent:
Return a structured output with a summary in string.
from pydantic import BaseModel
from versionhq import Agent, Task

class CustomOutput(BaseModel):
   test1: str
   test2: list[str]

def dummy_func(message: str, test1: str, test2: list[str]) -> str:
   return f"{message}: {test1}, {", ".join(test2)}"


agent = Agent(role="demo", goal="amazing project goal")

task = Task(
   description="Amazing task",
   pydantic_output=CustomOutput,
   callback=dummy_func,
   callback_kwargs=dict(message="Hi! Here is the result: ")
)

res = task.execute_sync(agent=agent, context="amazing context to consider.")
print(res)
This will return TaskOutput instance that stores a response in plane text, JSON serializable dict, and Pydantic model: CustomOutput formats with a callback result, tool output (if given), and evaluation results (if given).
res == TaskOutput(
   task_id=UUID('<TASK UUID>')
   raw='{\"test1\":\"random str\", \"test2\":[\"str item 1\", \"str item 2\", \"str item 3\"]}',
   json_dict={'test1': 'random str', 'test2': ['str item 1', 'str item 2', 'str item 3']},
   pydantic=<class '__main__.CustomOutput'>
   tool_output=None,
   callback_output='Hi! Here is the result: random str, str item 1, str item 2, str item 3',
   evaluation=None
)
Case 2. Supervising:
from versionhq import Agent, Task, ResponseField, Team, TeamMember

agent_a = Agent(role="agent a", goal="My amazing goals", llm="llm-of-your-choice")
agent_b = Agent(role="agent b", goal="My amazing goals", llm="llm-of-your-choice")

task_1 = Task(
   description="Analyze the client's business model.",
   response_fields=[ResponseField(title="test1", data_type=str, required=True),],
   allow_delegation=True
)

 task_2 = Task(
   description="Define the cohort.",
   response_fields=[ResponseField(title="test1", data_type=int, required=True),],
   allow_delegation=False
)

team = Team(
   members=[
      TeamMember(agent=agent_a, is_manager=False, task=task_1),
      TeamMember(agent=agent_b, is_manager=True, task=task_2),
   ],
)
res = team.kickoff()
This will return a list with dictionaries with keys defined in the ResponseField of each task.
Tasks can be delegated to a team manager, peers in the team, or completely new agent.
Technologies Used
Schema, Data Validation
- Pydantic: Data validation and serialization library for Python.
- Upstage: Document processer for ML tasks. (Use
Document Parser APIto extract data from documents) - Docling: Document parsing
Storage
- mem0ai: Agents' memory storage and management.
- Chroma DB: Vector database for storing and querying usage data.
- SQLite: C-language library to implements a small SQL database engine.
LLM-curation
- LiteLLM: Curation platform to access LLMs
Tools
- Composio: Conect RAG agents with external tools, Apps, and APIs to perform actions and receive triggers. We use tools and RAG tools from Composio toolset.
Deployment
- Python: Primary programming language. v3.13 is recommended.
- uv: Python package installer and resolver
- pre-commit: Manage and maintain pre-commit hooks
- setuptools: Build python modules
Project Structure
.
.github
└── workflows/                # Github actions
│
src/
└── versionhq/                # Orchestration frameworks
│     ├── agent/              # Components
│     └── llm/
│     └── task/
│     └── team/
│     └── tool/
│     └── cli/
│     └── ...
│     │
│     ├── db/                 # Storage
│     ├── chroma.sqlite3
│     └── ...
│
└──tests/                     # Pytest
│     └── agent/
│     └── llm/
│     └── ...
│
└── uploads/                  # Local repo to store the uploaded files
Setup
-
Install
uvpackage manager:For MacOS:
brew install uvFor Ubuntu/Debian:
sudo apt-get install uv -
Install dependencies:
uv venv
source .venv/bin/activate
uv lock --upgrade
uv sync --all-extras
- In case of AssertionError/module mismatch, run Python version control using
.pyenvpyenv install 3.12.8 pyenv global 3.12.8 (optional: `pyenv global system` to get back to the system default ver.) uv python pin 3.12.8 echo 3.12.8 > .python-version
- Set up environment variables:
Create a
.envfile in the project root and add the following:OPENAI_API_KEY=your-openai-api-key LITELLM_API_KEY=your-litellm-api-key UPSTAGE_API_KEY=your-upstage-api-key COMPOSIO_API_KEY=your-composio-api-key COMPOSIO_CLI_KEY=your-composio-cli-key
Contributing
-
Create your feature branch (
git checkout -b feature/your-amazing-feature) -
Create amazing features
-
Test the features using the
testsdirectory.- Add a test function to respective components in the
testsdirectory. - Add your
LITELLM_API_KEY,OPENAI_API_KEY,COMPOSIO_API_KEY,DEFAULT_USER_IDto the Githubrepository secretslocated at settings > secrets & variables > Actions. - Run a test.
uv run pytest tests -vv --cache-clear
pytest
- When adding a new file to
tests, name the file ended with_test.py. - When adding a new feature to the file, name the feature started with
test_.
- Add a test function to respective components in the
-
Pull the latest version of source code from the main branch (
git pull origin main) *Address conflicts if any. -
Commit your changes (
git add ./git commit -m 'Add your-amazing-feature') -
Push to the branch (
git push origin feature/your-amazing-feature) -
Open a pull request
Optional
-
Flag with
#! REFINEMEfor any improvements needed and#! FIXMEfor any errors. -
Run a React demo app: React demo app to check it on the client endpoint.
npm i
npm start
The frontend will be available at
http://localhost:3000. -
productionuse case is available athttps://versi0n.io. Currently, we are running alpha test.
Customizing AI Agents
To add an agent, use sample directory to add new project. You can define an agent with a specific role, goal, and set of tools.
Your new agent needs to follow the Agent model defined in the verionhq.agent.model.py.
You can also add any fields and functions to the Agent model universally by modifying verionhq.agent.model.py.
Modifying RAG Functionality
The RAG system uses Chroma DB to store and query past campaign dataset. To update the knowledge base:
- Add new files to the
uploads/directory. (This will not be pushed to Github.) - Modify the
tools.pyfile to update the ingestion process if necessary. - Run the ingestion process to update the Chroma DB.
Package Management with uv
- Add a package:
uv add <package> - Remove a package:
uv remove <package> - Run a command in the virtual environment:
uv run <command>
- After updating dependencies, update
requirements.txtaccordingly or runuv pip freeze > requirements.txt
Pre-Commit Hooks
-
Install pre-commit hooks:
uv run pre-commit install -
Run pre-commit checks manually:
uv run pre-commit run --all-files
Pre-commit hooks help maintain code quality by running checks for formatting, linting, and other issues before each commit.
- To skip pre-commit hooks (NOT RECOMMENDED)
git commit --no-verify -m "your-commit-message"
Trouble Shooting
Common issues and solutions:
- API key errors: Ensure all API keys in the
.envfile are correct and up to date. Make sure to addload_dotenv()on the top of the python file to apply the latest environment values. - Database connection issues: Check if the Chroma DB is properly initialized and accessible.
- Memory errors: If processing large contracts, you may need to increase the available memory for the Python process.
- Issues related to the Python version: Docling/Pytorch is not ready for Python 3.13 as of Jan 2025. Use Python 3.12.x as default by running
uv venv --python 3.12.8anduv python pin 3.12.8. - Issues related to dependencies:
rm -rf uv.lock,uv cache clean,uv venv, and runuv pip install -r requirements.txt -v. - Issues related to the AI agents or RAG system: Check the
output.logfile for detailed error messages and stack traces. - Issues related to
Python quit unexpectedly: Check this stackoverflow article. reportMissingImportserror from pyright after installing the package: This might occur when installing new libraries while VSCode is running. Open the command pallete (ctrl + shift + p) and run the Python: Restart language server task.
Frequently Asked Questions (FAQ)
Q. Where can I see if the agent is working?
A. You can find a frontend app here with real-world outbound use cases. You can also test features here using React app.
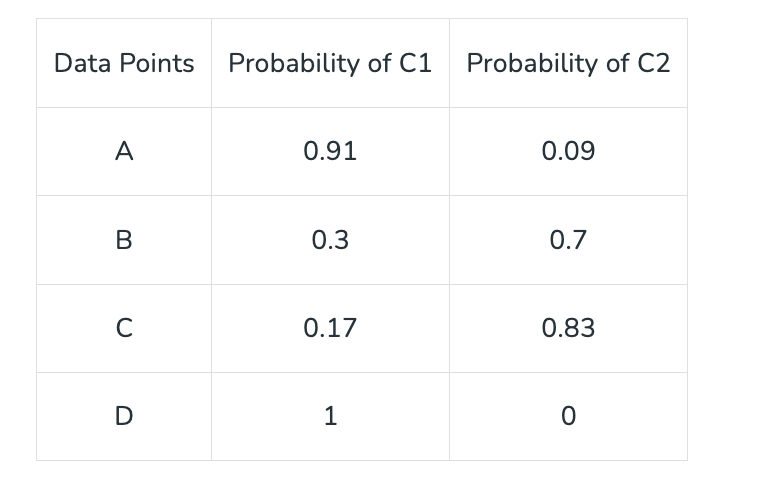
Q. How do you analyze the customer?
A. We employ soft clustering for each customer.
Q. When should I use a team vs an agent?
A. In essence, use a team for intricate, evolving projects, and agents for quick, straightforward tasks.
Use a team when:
Complex tasks: You need to complete multiple, interconnected tasks that require sequential or hierarchical processing.
Iterative refinement: You want to iteratively improve upon the output through multiple rounds of feedback and revision.
Use an agent when:
Simple tasks: You have a straightforward, one-off task that doesn't require significant complexity or iteration.
Human input: You need to provide initial input or guidance to the agent, or you expect to review and refine the output.
Release history Release notifications | RSS feed


Download files
Download the file for your platform. If you're not sure which to choose, learn more about installing packages.
Source Distribution
Built Distribution
Filter files by name, interpreter, ABI, and platform.
If you're not sure about the file name format, learn more about wheel file names.
Copy a direct link to the current filters
File details
Details for the file versionhq-1.1.12.2.tar.gz.
File metadata
- Download URL: versionhq-1.1.12.2.tar.gz
- Upload date:
- Size: 460.2 kB
- Tags: Source
- Uploaded using Trusted Publishing? No
- Uploaded via: twine/6.1.0 CPython/3.12.8
File hashes
| Algorithm | Hash digest | |
|---|---|---|
| SHA256 |
a60119134c18ab87aa73fb9aa452416e1103abcdf16ddf29f9f43c19068afc1c
|
|
| MD5 |
49ce9cc4c874f497773b244b03aa9174
|
|
| BLAKE2b-256 |
aa16d10f12d6556fa2f62bae2587f39b309b51ab5d2e2ba5507bd39868641304
|
File details
Details for the file versionhq-1.1.12.2-py3-none-any.whl.
File metadata
- Download URL: versionhq-1.1.12.2-py3-none-any.whl
- Upload date:
- Size: 85.1 kB
- Tags: Python 3
- Uploaded using Trusted Publishing? No
- Uploaded via: twine/6.1.0 CPython/3.12.8
File hashes
| Algorithm | Hash digest | |
|---|---|---|
| SHA256 |
6a157a1bef4f2c022d0389a46b840f3dcba617d30239dc5d912ad0a2d047100c
|
|
| MD5 |
61cfa1d1b5d8fba41e76e66185b768bd
|
|
| BLAKE2b-256 |
665836b77b209f8da9b4fd3551ff36642df8034a3bd6bcadbebe90c53a0f63d4
|


