XMind2TestCase基于Python实现,提供了一个高效测试用例设计的解决方案!

Project description
XMind2TestCase


📖 背景
软件测试过程中,最重要、最核心的工作就是测试用例的设计,也是测试团队日常投入最多时间的内容之一。
痛点分析
传统的测试用例设计过程存在诸多痛点:
| 方式 | 优点 | 缺点 |
|---|---|---|
| Excel 表格 | 成本低 | 版本管理麻烦、维护更新耗时、评审繁琐、统计困难 |
| TestLink/TestCenter | 管理、执行、统计方便 | 编写效率不高、思维不够发散、快速迭代中耗时 |
| 自研测试管理工具 | 高度定制 | 研发维护成本高、技术要求高 |
解决方案
越来越多的敏捷开发团队选择使用思维导图进行测试用例设计,因为:
- ✅ 发散性思维 - 思维导图的结构与测试用例设计思维高度吻合
- ✅ 图形化展示 - 直观清晰,便于评审和讨论
- ✅ 提升效率 - 大幅提高测试用例设计效率
但同时也带来了新的问题:
- ❌ 测试用例难以量化管理
- ❌ 执行情况难以统计
- ❌ 与 BUG 管理系统难以打通
- ❌ 团队成员风格各异,沟通成本高
XMind2TestCase 的价值
XMind2TestCase 将 XMind 设计测试用例的便利性 与 测试用例系统的高效管理 完美结合:
XMind 思维导图 → 通用模板解析 → 多格式输出 → TestLink/禅道/JSON
✨ 功能特性
- 🎨 可视化设计 - 使用 XMind 进行直观的测试用例设计
- 🔄 多格式转换 - 支持 TestLink XML、禅道 CSV、JSON 格式
- 🌐 Web 工具 - 提供便捷的 Web 转换界面
- 📊 执行统计 - 支持测试用例执行结果标识和统计
- 🤖 自动/手动 - 支持通过标签设置用例类型
- 🌍 中文支持 - 导出文件完全支持中文显示
- 🔧 API 集成 - 提供 Python API 便于集成到其他系统
- 🆕 多版本支持 - 同时支持 XMind 8 和 XMind 2026 文件格式
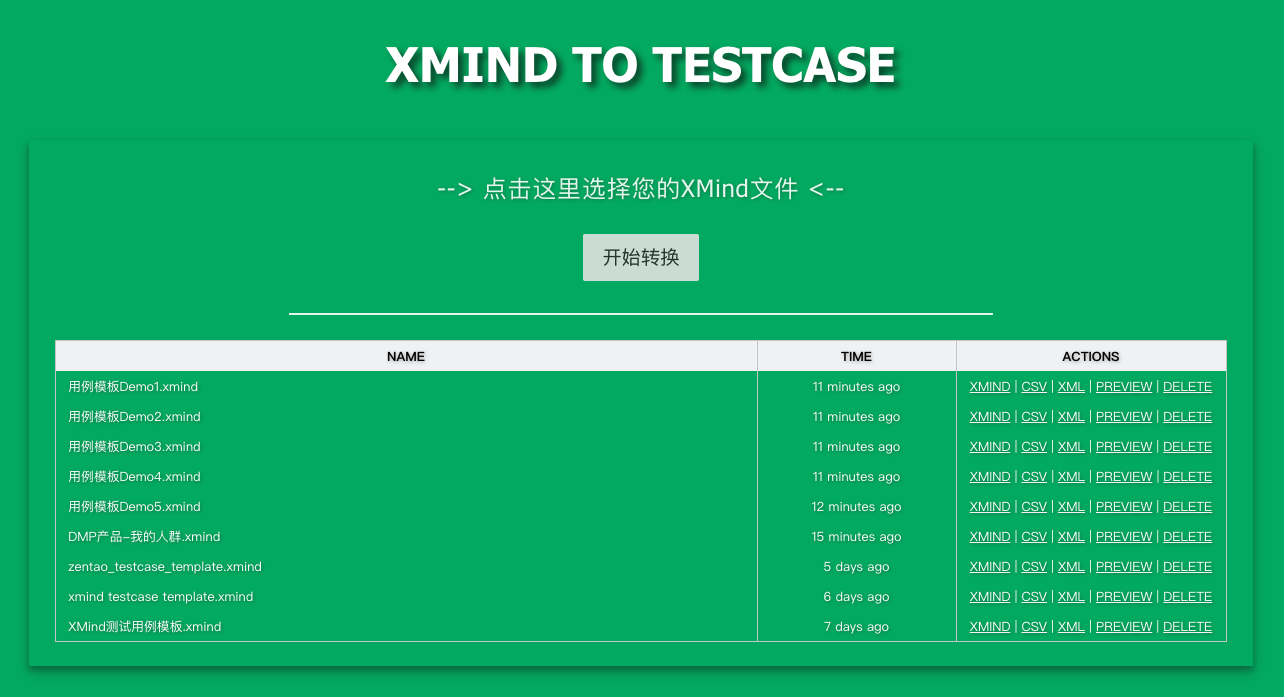
📸 使用示例
Web 工具界面
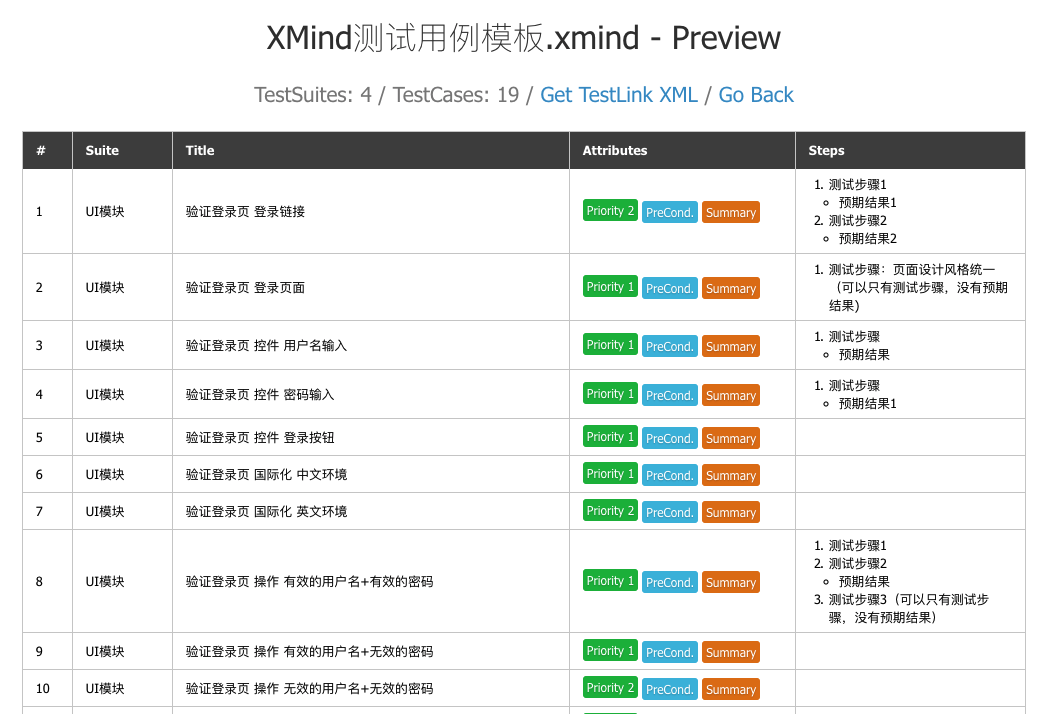
转换结果预览
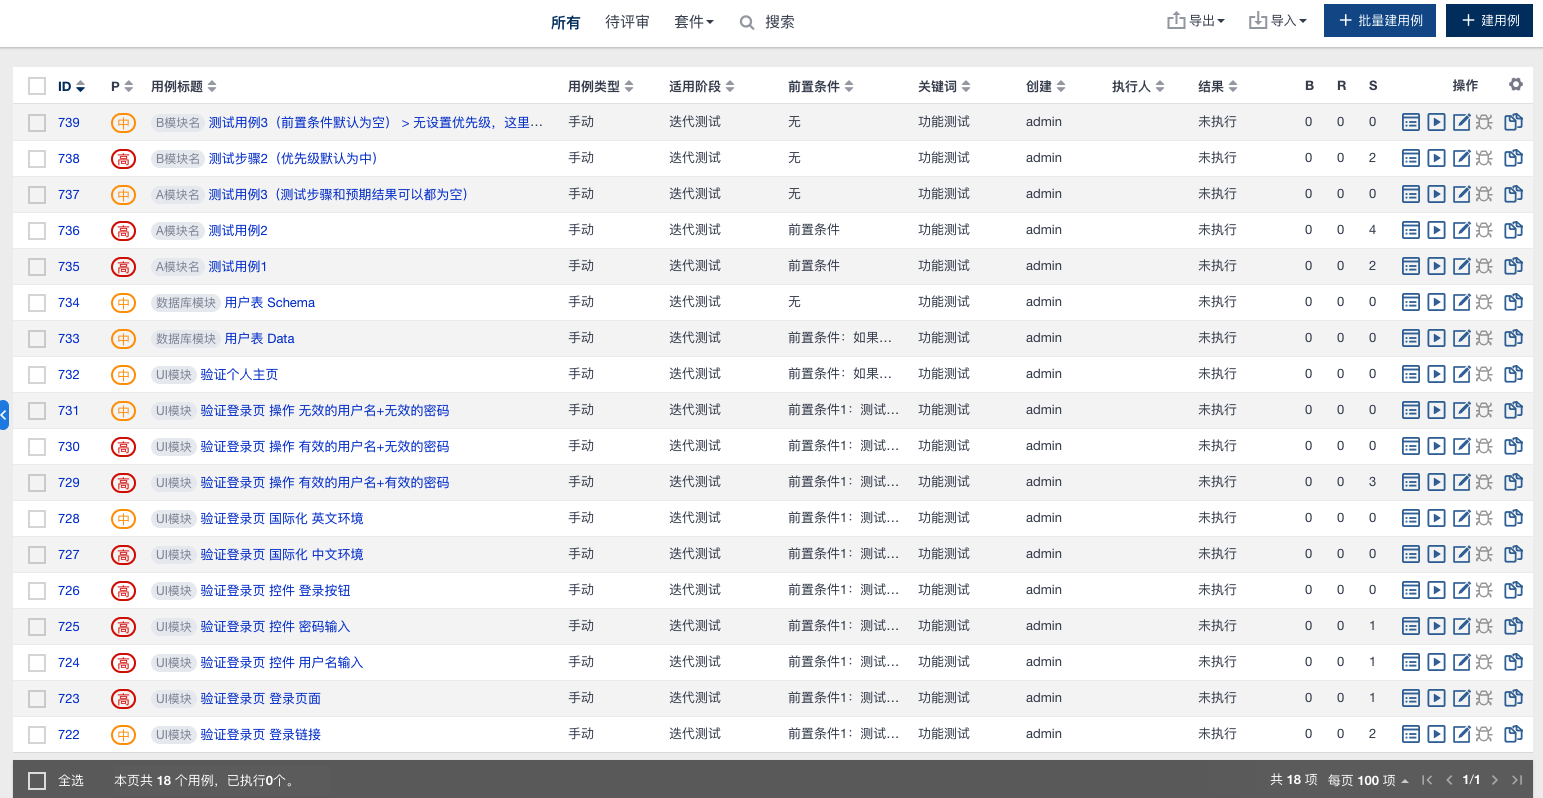
TestLink 导入结果

禅道导入结果
🚀 快速开始
安装
pip install xmind2testcase
升级后,项目使用 xmindparser 库,同时支持:
- ✅ XMind 8 及以前版本(XML 格式)
- ✅ XMind 2026 最新版本(JSON 格式)
升级
pip install -U xmind2testcase
🛠️ 本地开发
快速启动
# 1. 克隆仓库
git clone https://github.com/koco-co/xmind2testcase_v2.git
cd xmind2testcase_v2

# 2. 安装依赖
uv sync

# 3. 激活虚拟环境
source .venv/bin/activate

# 4. 启动 Web 工具(任选一种方式)
python webtool/application.py              # 方式 1:直接运行
python -m xmind2testcase.cli webtool       # 方式 2:命令行工具

# 5. 访问 http://127.0.0.1:5002
命令行使用
# 激活虚拟环境后
source .venv/bin/activate
# 转换为所有格式(CSV、XML、JSON)
python -m xmind2testcase.cli path/to/testcase.xmind
# 转换为特定格式
python -m xmind2testcase.cli path/to/testcase.xmind -csv # 禅道 CSV
python -m xmind2testcase.cli path/to/testcase.xmind -xml # TestLink XML
python -m xmind2testcase.cli path/to/testcase.xmind -json # JSON
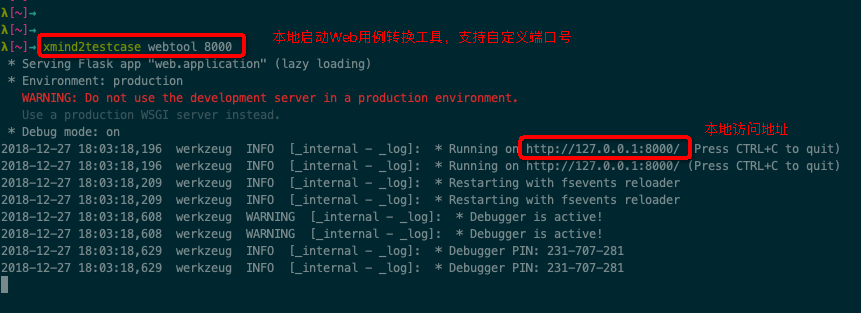
# 启动 Web 工具(自定义端口)
python -m xmind2testcase.cli webtool 8000
自定义端口启动
# 方式 1:修改 application.py 中的端口
# 方式 2:使用命令行工具
source .venv/bin/activate
python -m xmind2testcase.cli webtool 8000

# 方式 3:使用 launch 函数
python -c "from webtool.application import launch; launch(port=8000)"
💡 使用指南
1️⃣ 命令行调用
基本用法
# 转换为所有格式(CSV、XML、JSON)
xmind2testcase /path/to/testcase.xmind

# 只转换为 CSV 格式(禅道)
xmind2testcase /path/to/testcase.xmind -csv

# 只转换为 XML 格式(TestLink)
xmind2testcase /path/to/testcase.xmind -xml

# 只转换为 JSON 格式
xmind2testcase /path/to/testcase.xmind -json
输出文件
执行后会生成以下文件:
testcase.csv- 禅道导入格式testcase.xml- TestLink 导入格式testcase.json- 通用 JSON 格式
2️⃣ Web 界面
启动 Web 工具
# 默认端口 5001
xmind2testcase webtool

# 自定义端口
xmind2testcase webtool 8000
在浏览器中访问:http://127.0.0.1:5001
3️⃣ Python API
基本用法
import json
import xmind
from xmind2testcase.zentao import xmind_to_zentao_csv_file
from xmind2testcase.testlink import xmind_to_testlink_xml_file
from xmind2testcase.utils import (
    xmind_testcase_to_json_file,
    xmind_testsuite_to_json_file,
    get_xmind_testcase_list,
    get_xmind_testsuite_list
)


def main():
    xmind_file = 'docs/xmind_testcase_template.xmind'
    print(f'Start to convert XMind file: {xmind_file}')

    # 转换为禅道 CSV
    zentao_csv_file = xmind_to_zentao_csv_file(xmind_file)
    print(f'Zentao CSV: {zentao_csv_file}')

    # 转换为 TestLink XML
    testlink_xml_file = xmind_to_testlink_xml_file(xmind_file)
    print(f'TestLink XML: {testlink_xml_file}')

    # 转换为 JSON 文件
    testsuite_json_file = xmind_testsuite_to_json_file(xmind_file)
    print(f'TestSuite JSON: {testsuite_json_file}')

    testcase_json_file = xmind_testcase_to_json_file(xmind_file)
    print(f'TestCase JSON: {testcase_json_file}')

    # 获取测试集数据
    testsuites = get_xmind_testsuite_list(xmind_file)
    print(f'TestSuites:\n{json.dumps(testsuites, indent=2, ensure_ascii=False)}')

    # 获取测试用例数据
    testcases = get_xmind_testcase_list(xmind_file)
    print(f'TestCases:\n{json.dumps(testcases, indent=2, ensure_ascii=False)}')

    # 获取原始 XMind 数据
    workbook = xmind.load(xmind_file)
    print(f'XMind Data:\n{json.dumps(workbook.getData(), indent=2, ensure_ascii=False)}')

    print('Finished conversion!')


if __name__ == '__main__':
    main()
📚 API 文档
数据结构
TestCase JSON 格式
from xmind2testcase.utils import get_xmind_testcase_list

xmind_file = 'docs/xmind_testcase_demo.xmind'
testcases = get_xmind_testcase_list(xmind_file)
输出结构:
[
  {
    "name": "测试用例1",
    "version": 1,
    "summary": "测试用例1",
    "preconditions": "前置条件",
    "execution_type": 1,
    "importance": 1,
    "estimated_exec_duration": 3,
    "status": 7,
    "steps": [
      {
        "step_number": 1,
        "actions": "测试步骤1",
        "expectedresults": "预期结果1",
        "execution_type": 1
      }
    ],
    "product": "我是产品名",
    "suite": "我是模块名(测试集1)"
  }
]
字段说明:
| 字段 | 类型 | 说明 |
|---|---|---|
name |
string | 用例标题 |
version |
int | 用例版本 |
summary |
string | 用例摘要 |
preconditions |
string | 前置条件 |
execution_type |
int | 执行类型(1: 手动, 2: 自动) |
importance |
int | 优先级(1: 高, 2: 中, 3: 低) |
estimated_exec_duration |
int | 预计执行时间(分钟) |
status |
int | 状态(1: 草稿, 2: 待评审, ..., 7: 终稿) |
steps |
array | 测试步骤列表 |
product |
string | 产品名称 |
suite |
string | 测试集名称 |
执行结果字段:

详细使用指南请参考:使用指南
示例文件:testcase json
TestSuite JSON 格式
from xmind2testcase.utils import get_xmind_testsuite_list

xmind_file = 'docs/xmind_testcase_demo.xmind'
testsuites = get_xmind_testsuite_list(xmind_file)
输出结构:
[
  {
    "name": "我是产品名",
    "details": null,
    "testcase_list": [],
    "sub_suites": [
      {
        "name": "我是模块名(测试集1)",
        "details": null,
        "testcase_list": [
          {
            "name": "测试用例1",
            "version": 1,
            "summary": "测试用例1",
            "preconditions": "前置条件",
            "execution_type": 1,
            "importance": 1,
            "estimated_exec_duration": 3,
            "status": 7,
            "steps": [
              {
                "step_number": 1,
                "actions": "测试步骤1",
                "expectedresults": "预期结果1",
                "execution_type": 1
              }
            ]
          }
        ],
        "sub_suites": []
      }
    ]
  }
]
执行结果统计字段:

示例文件:testsuite json
原始 XMind JSON 格式
基于 XMind 库解析:
import xmind

xmind_file = 'docs/xmind_testcase_demo.xmind'
workbook = xmind.load(xmind_file)
data = workbook.getData()
输出结构:
[
  {
    "id": "7hmnj6ahp0lonp4k2hodfok24f",
    "title": "画布 1",
    "topic": {
      "id": "7c8av5gt8qfbac641lth4g1p67",
      "link": null,
      "title": "我是产品名",
      "note": null,
      "label": null,
      "comment": null,
      "markers": [],
      "topics": [
        {
          "id": "2rj4ek3nn4sk0lc4pje3gvgv9k",
          "title": "我是模块名(测试集1)",
          "topics": [
            {
              "id": "3hjj43s7rv66uncr1srl3qsboi",
              "title": "测试用例1",
              "note": "前置条件\n",
              "label": "手动(执行方式默认为手动)",
              "markers": ["priority-1"],
              "topics": [
                {
                  "id": "3djn37j1fdc6081de319slf035",
                  "title": "测试步骤1",
                  "topics": [
                    {
                      "id": "7v0f1152popou38ndaaamt49l5",
                      "title": "预期结果1"
                    }
                  ]
                }
              ]
            }
          ]
        }
      ]
    }
  }
]
📦 发布到 PyPI
使用 uv 进行构建和发布:
# 构建项目
uv build

# 发布到 PyPI
uv publish
📝 更新日志
v1.5.0 (最新)
- ✨ 支持通过标签设置用例类型(自动/手动)
- ✨ 支持导出文件中文显示
- ✨ 增加命令运行指引
- 🐛 修复服务器远程部署无法访问问题
- 🔧 取消测试用例关键字默认设置
v1.3.0
- ✨ XMind 中支持标识测试用例执行结果
- ✨ TestCase、TestSuite 中添加用例执行结果统计数据
- 📝 完善用户使用指南
v1.2.0
- ✨ 添加 Web 工具进行用例转换
- 📝 添加用户使用指南
v1.1.0
- ✨ XMind 用例文件转换为禅道用例文件
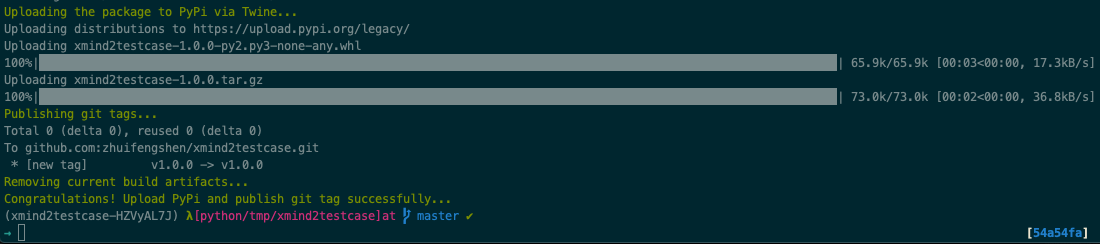
- ✨ 添加一键上传 PyPI 功能
v1.0.0
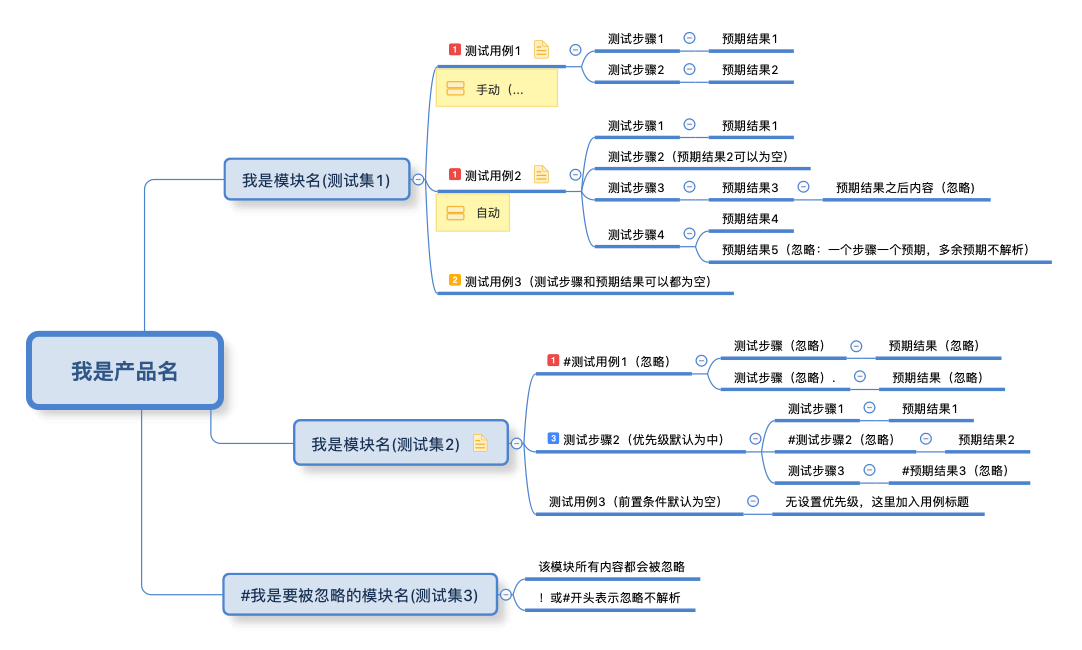
- 🎉 XMind 用例模板定义和解析
- 🎉 XMind 用例转换为 TestLink 用例文件
注意: XMind2TestCase 针对 XMind 经典系列版本,暂不支持 XMind Zen 版本!
🙏 致谢
XMind2TestCase 的诞生受益于以下开源项目:
- XMind - XMind 思维导图创建、解析、更新的一站式解决方案
- xmind2testlink - 践行了 XMind 通用测试用例模板设计思路
- TestLink - 提供了完整的测试用例管理流程和文档
- 禅道开源版 - 提供了完整的项目管理流程和文档
如果这个项目对你有帮助,欢迎 ⭐️ Star 支持!

📄 许可证
MIT License
Copyright (c) 2019 Poco https://github.com/koco-co
Made with ❤️ by Poco and contributors


Download files
Download the file for your platform. If you're not sure which to choose, learn more about installing packages.
Source Distribution
Built Distribution
Filter files by name, interpreter, ABI, and platform.
If you're not sure about the file name format, learn more about wheel file names.
Copy a direct link to the current filters
File details
Details for the file xmind2cases-1.6.0.tar.gz.
File metadata
- Download URL: xmind2cases-1.6.0.tar.gz
- Upload date:
- Size: 5.8 MB
- Tags: Source
- Uploaded using Trusted Publishing? No
- Uploaded via: uv/0.10.0 {"installer":{"name":"uv","version":"0.10.0","subcommand":["publish"]},"python":null,"implementation":{"name":null,"version":null},"distro":{"name":"macOS","version":null,"id":null,"libc":null},"system":{"name":null,"release":null},"cpu":null,"openssl_version":null,"setuptools_version":null,"rustc_version":null,"ci":null}
File hashes
| Algorithm | Hash digest | |
|---|---|---|
| SHA256 |
defbae2f250b16557f3655ff094266ee91c05f208e077816a4d1d4e8ba7c3ee0
|
|
| MD5 |
e26bb3dc068a0b44d859bda9d967e12f
|
|
| BLAKE2b-256 |
3b7324b5c55f1eac60c235fd60a7dc38d7a1aca016311cea23a77df39650be29
|
File details
Details for the file xmind2cases-1.6.0-py3-none-any.whl.
File metadata
- Download URL: xmind2cases-1.6.0-py3-none-any.whl
- Upload date:
- Size: 5.8 MB
- Tags: Python 3
- Uploaded using Trusted Publishing? No
- Uploaded via: uv/0.10.0 {"installer":{"name":"uv","version":"0.10.0","subcommand":["publish"]},"python":null,"implementation":{"name":null,"version":null},"distro":{"name":"macOS","version":null,"id":null,"libc":null},"system":{"name":null,"release":null},"cpu":null,"openssl_version":null,"setuptools_version":null,"rustc_version":null,"ci":null}
File hashes
| Algorithm | Hash digest | |
|---|---|---|
| SHA256 |
a55e8f1a411c5b7cdcbd26136285376f6d7b8a7e6c12edd3cb684f6d34cd115c
|
|
| MD5 |
c74dcbdbd1894bf7b5a265f102345bd9
|
|
| BLAKE2b-256 |
38d990b8f86b56cd7b486ae104853ff39f18e7a438e11fa4ae82bac9fda3a6ff
|


