
A Python agent harness with configurable tools and guardrails - one who yokes agents together

Project description
Yoker





A Python agent harness with configurable tools, guardrails, and Ollama backend integration.
Installation
pip install yoker
Quick Start
Run Yoker interactively (default):
python -m yoker
Or with an agent definition:
python -m yoker --agents-definition examples/agents/researcher.md
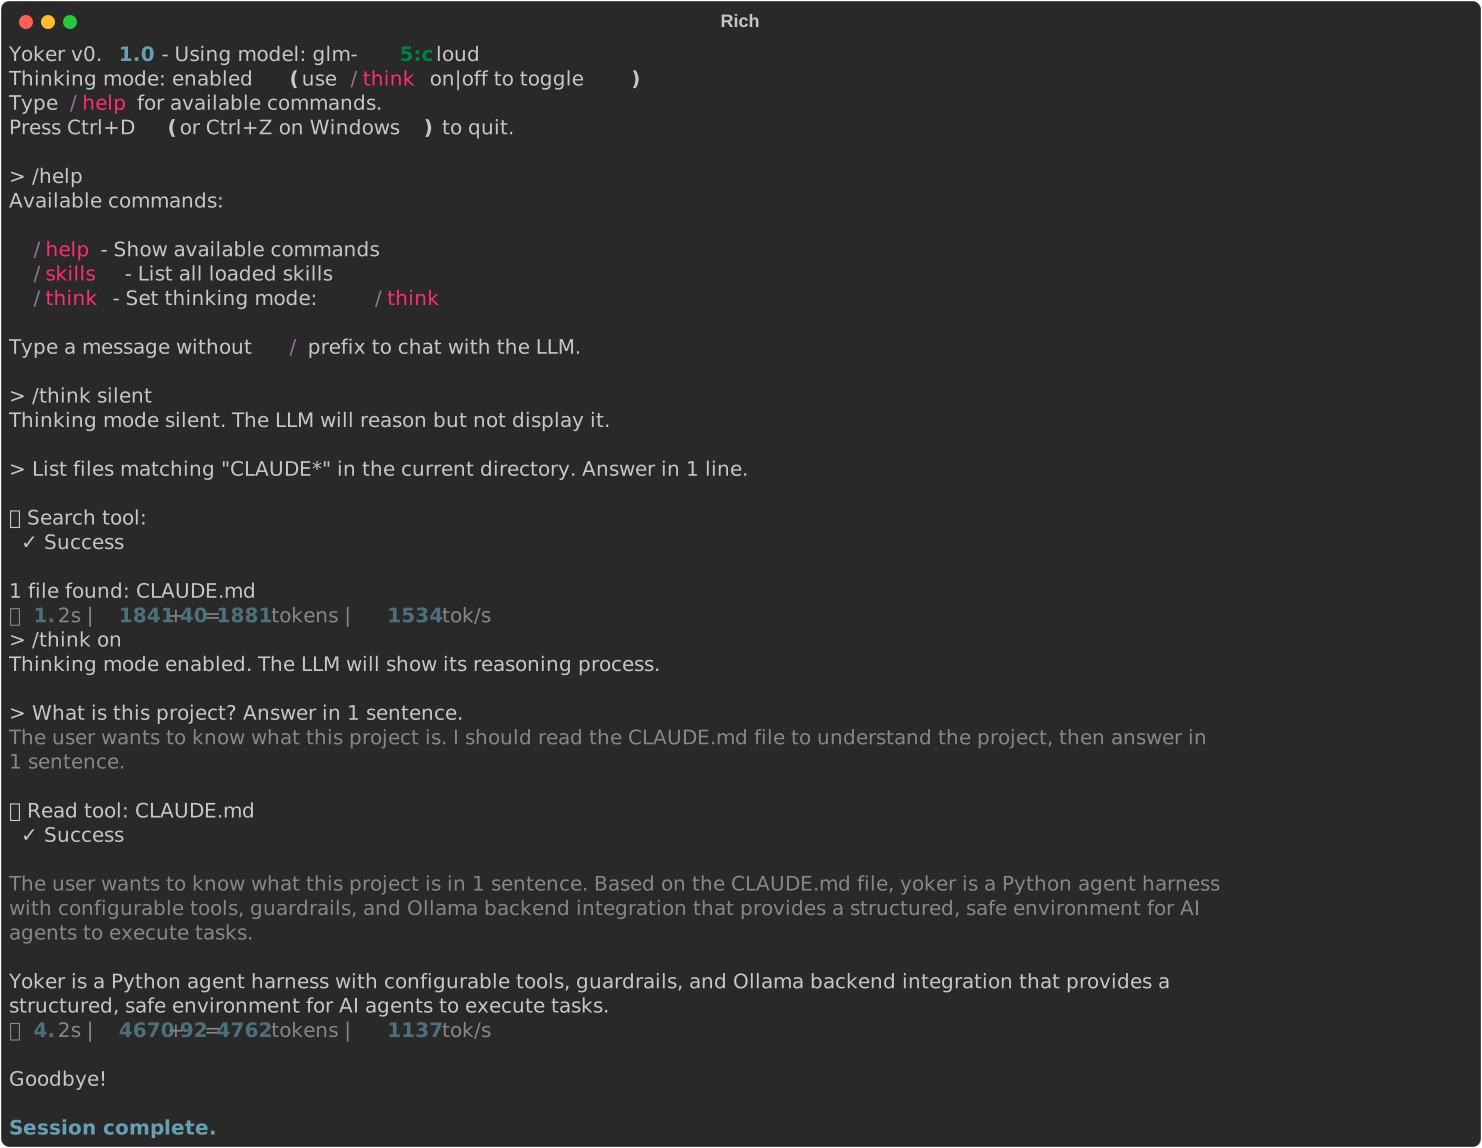
Example session:
Usage Modes
Yoker supports three ways to run: interactive CLI, batch/non-interactive, and as a library.
Interactive Mode
Interactive mode is the default. It provides a rich terminal UI with multiline input, command history, streaming output, and tool call display.
python -m yoker

# With an agent definition
python -m yoker --agents-definition examples/agents/researcher.md

# Hide tool calls and statistics
python -m yoker --ui-mode interactive
See Interactive Input and Slash Commands for the available keyboard shortcuts and commands.
Batch Mode
Batch mode reads input from stdin and writes response content to stdout. Thinking, tool calls, errors, and statistics are written to stderr. This makes Yoker usable in pipelines and scripts.
# Single prompt
python -m yoker --ui-mode batch
Hello, how can you help me?
^D

# Pipe input
printf "Hello\nWhat is 2+2?\n" | python -m yoker --ui-mode batch

# Show thinking and tool calls on stderr
printf "Hello\n" | python -m yoker --ui-mode batch --ui-show-thinking --ui-show-tool-calls
Batch mode options:
| Flag | Effect |
|---|---|
--ui-mode batch |
Enable batch mode |
--ui-show-thinking |
Print thinking/trace output to stderr |
--ui-show-tool-calls |
Print tool call information to stderr |
--ui-show-stats |
Print turn statistics to stderr |
Library Usage
Yoker is designed to be embedded as a library. The Agent class emits events; your application implements a UIHandler (or uses the built-in handlers) and wires events through UIBridge.
import asyncio
from yoker import Agent, __version__
from yoker.config import get_yoker_config
from yoker.ui import BatchUIHandler, UIBridge

async def main():
  config = get_yoker_config(cli=False)
  agent = Agent(config=config)

  ui = BatchUIHandler(show_thinking=True, show_tool_calls=True)
  bridge = UIBridge(ui)
  agent.add_event_handler(bridge)

  await ui.start(agent.model, __version__, {})
  try:
    response = await agent.process("Hello, how can you help me?")
    print(response)
  finally:
    await ui.shutdown("complete")

asyncio.run(main())
See the examples/ directory for more complete examples:
examples/batch_mode.py- Batch mode with predefined messagesexamples/library_usage.py- Using Yoker as a library without the CLIexamples/custom_handler.py- Implementing a customUIHandlerexamples/research_workflow.py- Running a researcher agent programmatically
Plugins
Yoker can load tools, skills, and agents from external Python packages via
the --with argument. Packages declare what they provide through a
__YOKER_MANIFEST__ object in their top-level __init__.py.
Install a plugin package (for example, the demo plugin in
examples/plugins/demo/):
uv pip install -e examples/plugins/demo
Run Yoker with one or more plugins:
# Load a single plugin
python -m yoker --with yoker_plugin_demo

# Load multiple plugins
python -m yoker --with yoker_plugin_demo --with another
When a plugin is loaded, its namespaced tools and skills become available to
the agent. For example, after loading yoker_plugin_demo you can invoke its
skill with a slash command:
python -m yoker --with yoker_plugin_demo
/greeting
Or you can ask the agent to use a plugin tool by name:
Use the echo tool to repeat "hello world"
See examples/plugins/demo/README.md for a complete walkthrough of creating
a plugin package, declaring __YOKER_MANIFEST__, and providing tools, skills,
and agent definitions.
Why Yoker?
Yoker fills a unique gap in the coding agent ecosystem: a library-first, transparent agent harness designed for developers who want full control, visibility, and simplicity.
Key Differentiators:
- Library-first - Embed in your applications, not locked into a CLI
- LLM-neutral - Choose your provider, your model, your cost model
- No hidden manipulation - All prompts visible, editable, configurable
- Static permissions - Deterministic boundaries, not runtime prompts
- Full transparency - Event-driven, everything inspectable
See docs/rationale.md for the full rationale and comparison with other solutions.
Features
Current Features:
- Chat loop - Interactive conversation with Ollama
- Tool calling - Structured tool execution with parameters
-
readtool - Read file contents with guardrails -
listtool - Directory listing with pattern filtering -
writetool - Write files with overwrite protection -
updatetool - Edit existing files with replace, insert, and delete operations -
searchtool - Search file contents with regex or filenames with glob -
existencetool - Check if files or folders exist with security hardening -
mkdirtool - Create directories with recursive parent creation and depth limits -
gittool - Git operations (status, log, diff, branch, show) with permission-controlled commit/push -
websearchtool - Web search with SSRF protection, domain filtering, and rate limiting -
webfetchtool - Fetch web content with SSRF protection, URL validation, and size limits -
agenttool - Spawn subagents with isolated context and recursion limits -
skilltool - Invoke skills dynamically by name with full content loading - Slash commands - Built-in commands:
/help,/think on|off,/skills,/context,/tools,/agents - Thinking mode - LLM reasoning trace with gray output
- Streaming - Real-time token streaming from Ollama
- Configuration - TOML-based configuration system via Clevis
- Agent definitions - Load agents from Markdown files with YAML frontmatter
- Package plugins - Load tools, skills, and agents from Python packages with
--with - Multiline input -
Esc+Enterfor newlines,Enterto submit - Rich output - Styled terminal output with Rich
- Event-driven architecture - Library-first design with event emission
- Context persistence - Session resumption with JSONL storage
- Event logging - Full session replay capability
- Demo scripts - Generate documentation screenshots from Markdown scripts
- Schema-driven guardrails - Tool parameters are annotated with
yoker.tools.annotationsmarkers (Path,Url,Query,Text); the harness strips the metadata before sending schemas to Ollama and dispatches the matching guardrail at execution time - Permissions - Static TOML-based access control
Planned Features:
- Multi-agent orchestration - Run coordinated agent teams
- Backend providers - OpenAI, Anthropic, custom backends
- Tool timing metrics - Performance tracking
- Token usage tracking - Cost monitoring
- Tool result caching - Reduce redundant calls
- Parallel tool execution - Concurrent read operations
Interactive Input
The interactive session supports:
- Multiline input: Press
Esc+Enterto add newlines,Enterto submit - Command history: Up/Down arrows navigate previous messages
- History search:
Ctrl+Rto search through history - Keyboard navigation: Arrow keys, Ctrl+A/E for cursor positioning
- Text selection: Click and drag to select output, copy with Ctrl+Shift+C or Cmd+C
Slash Commands
| Command | Description |
|---|---|
/help |
Show available commands |
/think on|off |
Enable/disable LLM thinking trace |
/skills |
List available skills |
/context |
Show current conversation context |
/tools |
List available tools and their availability |
/agents |
Show loaded and available agents |
Thinking Mode
When thinking is enabled, the LLM shows its reasoning process:
[Thinking]
Let me analyze this step by step...
First, I need to understand the file structure...

[Response]
Based on my analysis, here's what I found...
Demo Session Script
Generate terminal screenshots for documentation from Markdown script files:
# Run default demo script (demos/session.md)
python scripts/demo_session.py

# Run a specific demo script
python scripts/demo_session.py --script demos/list-tool.md

# Run all demo scripts in a directory
python scripts/demo_session.py --scripts-dir demos/

# Real LLM + log conversation for replay
python scripts/demo_session.py --script demos/session.md --log

# Replay from log (no LLM calls)
python scripts/demo_session.py --script demos/session.md --replay

# With an agent definition
python scripts/demo_session.py --script demos/session.md --agent examples/agents/markdown.md
Configuration
Yoker auto-discovers configuration files:
./yoker.toml(current directory)~/.yoker.toml(user home directory)- Built-in defaults
# Zero-configuration startup - uses auto-discovered config
python -m yoker
Or create a yoker.toml file for explicit configuration:
[harness]
name = "my-yoke"

[logging]
level = "INFO"

[backend]
provider = "ollama"

[backend.ollama]
base_url = "http://localhost:11434"
api_key = ""  # Optional API key for authenticated Ollama endpoints
model = "llama3.2:latest"

[agents]
definition = "./agents/researcher.md"  # Optional: agent definition file

[tools.read]
enabled = true
allowed_extensions = [".txt", ".md", ".py"]
See examples/yoker.toml for the full configuration reference.
Architecture
Yoker uses an event-driven architecture for library-first design. The Agent emits events; the UI layer receives them through UIBridge and decides how to present them.
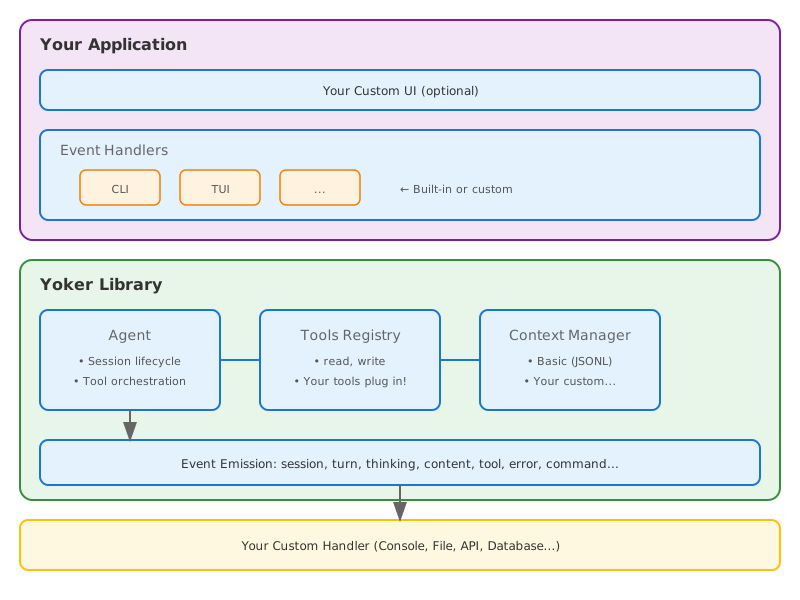
Agent layer (yoker.agent): Configuration, context management, tool execution, and event emission. It has no terminal or presentation logic.
UI layer (yoker.ui): Implements the UIHandler protocol. Built-in implementations:
InteractiveUIHandler- Rich terminal UI with streaming outputBatchUIHandler- stdin/stdout/stderr for scripts and pipelines
Bridge (yoker.ui.UIBridge): Converts agent events into UIHandler method calls so the agent stays independent of presentation details.
Event Types: Turn (start/end), Thinking (start/chunk/end), Content (start/chunk/end), Tool (call/result/content), Command
Documentation
- Full documentation
- Installation guide
- Quick start
- Why Yoker? - Project rationale and comparison
- Architecture
Development
git clone https://github.com/christophevg/yoker.git
cd yoker
make env-dev  # Create virtual environment and install dependencies

make test     # Run tests with coverage
make check    # Type checking + linting
make docs     # Build documentation
Requires Python 3.10+. Uses uv for dependency management. See CLAUDE.md for project conventions.
Contributing
Contributions welcome! Please read CLAUDE.md for project conventions and development guidelines.
Changelog
See GitHub Releases for version history.
License
MIT License - see LICENSE for details.
Name: "yoker" - One who yokes. The agent noun from "yoke" (PIE yeug- meaning "to join"). Pairs with "clitic" (both are joining tools). See docs/NAME.md for full etymology.
Release history Release notifications | RSS feed


Download files
Download the file for your platform. If you're not sure which to choose, learn more about installing packages.
Source Distribution
Built Distribution
Filter files by name, interpreter, ABI, and platform.
If you're not sure about the file name format, learn more about wheel file names.
Copy a direct link to the current filters
File details
Details for the file yoker-0.5.0.tar.gz.
File metadata
- Download URL: yoker-0.5.0.tar.gz
- Upload date:
- Size: 1.0 MB
- Tags: Source
- Uploaded using Trusted Publishing? No
- Uploaded via: twine/6.2.0 CPython/3.11.15
File hashes
| Algorithm | Hash digest | |
|---|---|---|
| SHA256 |
da643c312e9a8c7e58743d31a6ea35f45172a862757a2579327b2b7970e10ee4
|
|
| MD5 |
06134a0d76cc7de4418c74a67281a97c
|
|
| BLAKE2b-256 |
176b943d89344cd5e7abb8c88f4f007be831b8ef2eaace17e60e1905c47f8e7e
|
File details
Details for the file yoker-0.5.0-py3-none-any.whl.
File metadata
- Download URL: yoker-0.5.0-py3-none-any.whl
- Upload date:
- Size: 143.0 kB
- Tags: Python 3
- Uploaded using Trusted Publishing? No
- Uploaded via: twine/6.2.0 CPython/3.11.15
File hashes
| Algorithm | Hash digest | |
|---|---|---|
| SHA256 |
00b93eb17acf74b4abc074495b20207742a3cf827bad8692c6080133821fe213
|
|
| MD5 |
c9810c4a2cc8952062cc865f5a5d5320
|
|
| BLAKE2b-256 |
490d650b770c50690b50dd1ba7ba7ddd20891e61be9a5a11b3a30f4699247b79
|






