
DACLhound
DACLhound collects and analyzes Active Directory permissions over LDAP or native ADWS. Review DACLs and effective permission paths in an interactive graph, or triage saved data from the command line.
Unlike BloodHound CE's modeled graph edges, DACLhound preserves the collected DACL details and exposes individual Write-Property rights by attribute (for example, WriteLogonHours or WriteUAC). This helps inspect the specific property and ACE behind a relationship.
📚 Full Wiki & Documentation
Read the step-by-step DACLhound Wiki for the Viewer, graph navigation, pathfinding, queries, and optional SCCM/MECM inventory. The guide includes screenshots and explains what the collected relationships mean.
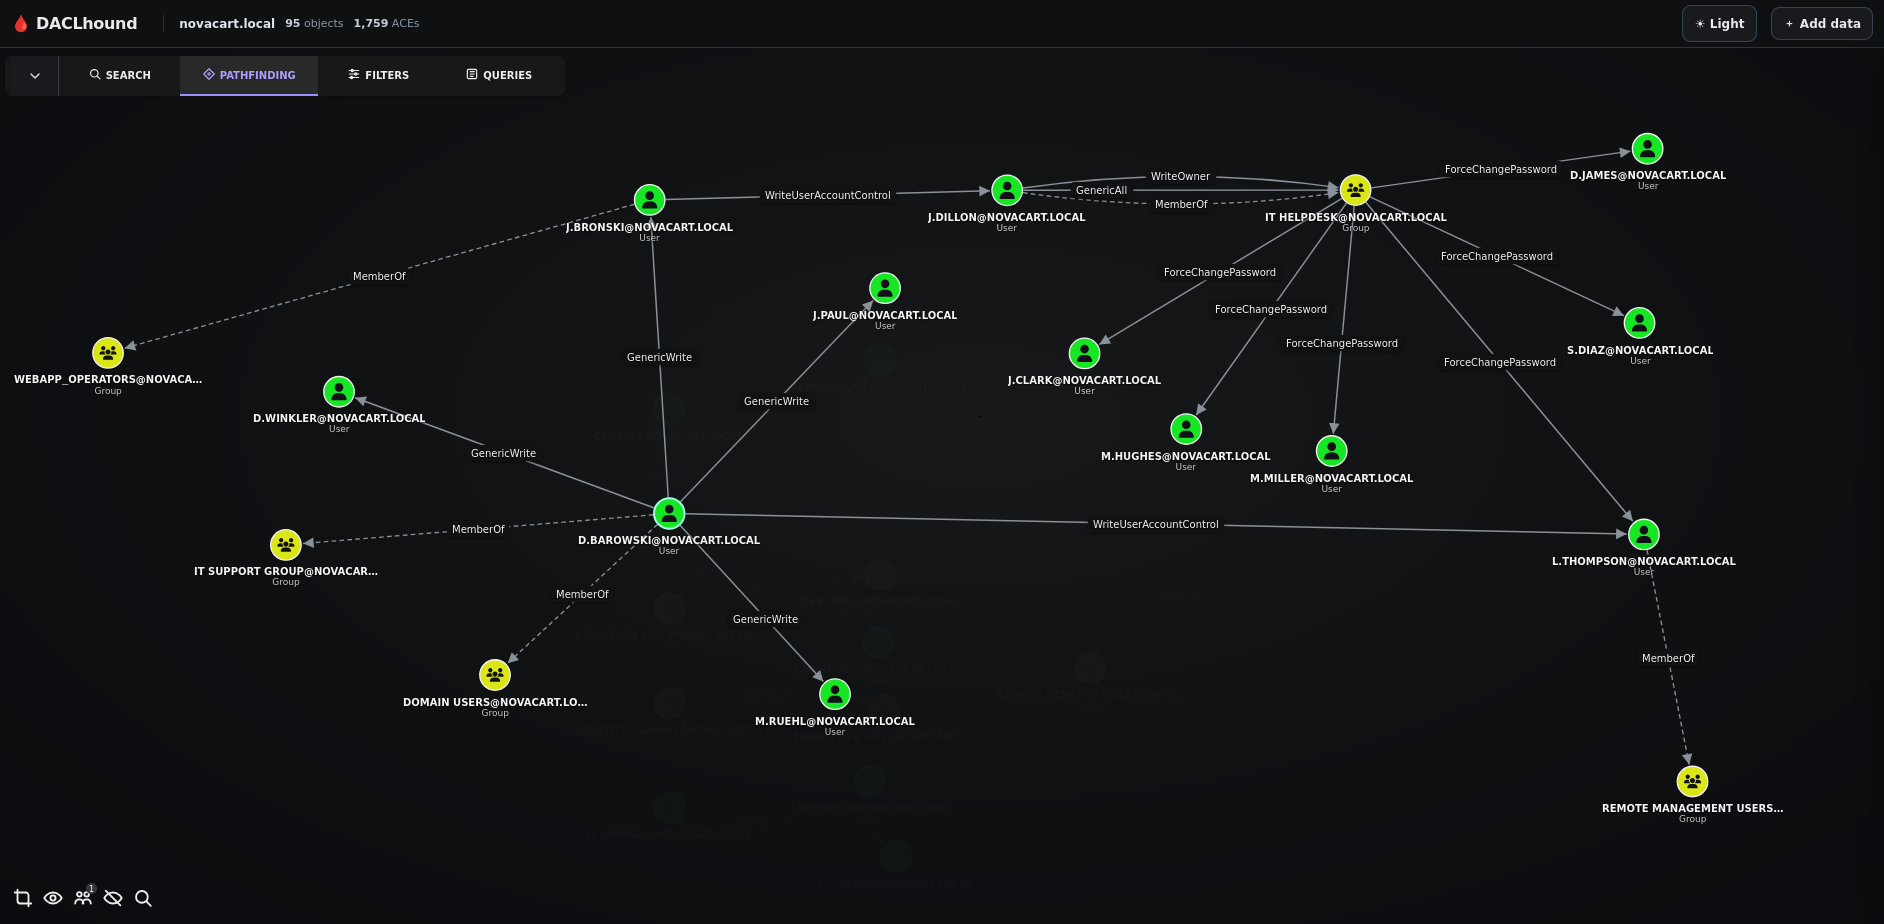
https://github.com/user-attachments/assets/d691098f-426c-4c34-ae8d-40e148de3154
Install
Python 3.10 or newer is required.
pipx install DACLhound
Upgrade with pipx upgrade DACLhound.
When a newer release is available, the CLI can offer to install it at startup. Choose Skip to dismiss the prompt for this run, or Skip until next version to hide it until a newer release is published. The update check runs only in an interactive terminal; set DACLHOUND_NO_UPDATE_CHECK=1 to disable it.
Collect
daclhound collect --host DC01.lab.local -d lab.local -u 'user' -p 'password' --dc-ip 192.168.2.1
By default, collection tries LDAP and falls back to ADWS if LDAP is unavailable. Choose --transport ldap or --transport adws to select one explicitly. ADWS uses TCP port 9389; --secure applies to LDAP only. Use the domain controller FQDN for Kerberos authentication.
The collector is read-only. It collects users, groups, computers, OUs, containers, GPOs, the domain, trusts, sites, Foreign Security Principals, and ADCS data. Limit directory object types with --types, or skip ADCS with --no-adcs:
daclhound collect --host DC01.lab.local -d lab.local -u 'user' -p 'password' --types users,groups --no-adcs
Output is saved as lab.local.json in the current directory; if that name exists, a numbered filename is chosen. Set a path with --output, replace an existing file with --overwrite, or retain raw collector entries with --raw-output.
Optional host checks
Add --host-checks to check SMB signing policy and whether the WebClient service's DAV RPC Service pipe is available over SMB on collected computers. On domain controllers, it also reads LDAP signing and channel-binding policy values from the registry over Remote Registry RPC. These checks require authentication to each computer; LDAP policy values can remain unknown if Remote Registry access is unavailable. The WebClient check does not perform HTTP/WebDAV requests. --host-check-timeout sets the per-computer timeout (default 15 seconds); --dns-server selects a DNS resolver.
daclhound collect --host DC01.lab.local -d lab.local -u 'user' -p 'password' --host-checks --host-check-timeout 5 --dns-server 192.168.2.1
Optional SCCM / MECM check
Add --sccm to query the System Management container, published sites and management points, potential PXE distribution points, SCCM/MECM-named principals, and computer objects. It then resolves computer FQDNs directly against --dns-server (or --dc-ip) and profiles SMB signing and share names on every discovered AD computer. It also checks TCP reachability for SQL (1433) and WSUS (8530/8531); an open port is only an indicator, not proof of that service. The same --host-check-timeout value applies to DNS, SMB, TCP, and --host-checks; its default is 15 seconds. The check is opt-in because it makes LDAP, SMB, and TCP requests to discovered computers and can take time in large domains; SMB role labels are based on observed shares and are not a complete SCCM configuration audit. DNS results are stored in the JSON and do not require /etc/hosts changes. --sccm requires LDAP and an IP address for the DNS server; it cannot be used with --from-raw or --transport adws.
daclhound collect --host DC01.lab.local -d lab.local -u 'user' -p 'password' --dc-ip 192.168.2.1 --sccm
The JSON includes an sccm section with LDAP findings and per-computer DNS/SMB evidence. When computer objects are included in the graph, selecting one also shows its SCCM indicators in Object Information.
The SCCM discovery workflow is inspired by SCCMHunter by Garrett Foster (@unsigned_sh0rt), licensed under GPL-3.0.
Analyze
Get a prioritized terminal overview of permissions, membership, Kerberos exposure, delegation, ADCS, trusts, and GPO links:
daclhound analyze lab.local.json
daclhound analyze lab.local.json other-domain.json --from-user 'alice@lab.local'
Multiple input files are combined, with duplicate objects and relationships merged. Use --color never to disable colored output.
Organize a graph JSON for manual inspection
Large unified graph JSON files can be split into one JSON per object type and a shared edges.json, then packaged into an optional ZIP archive:
daclhound json split --input northbridge.corp.json --zip northbridge.corp.zip
The archive contains files such as users_northbridge.corp.json, groups_northbridge.corp.json, computers_northbridge.corp.json, and edges.json. The edge file keeps relationships between objects and includes a node index that maps endpoint IDs to their object type and file. manifest.json lists the contents and counts.
This ZIP is only for organizing JSON for individual manual analysis. Do not upload it to the DACLhound viewer. The viewer and daclhound graph start --input use the original unified JSON file. This command leaves that source file unchanged.
Open the graph
Recommended: keep one background graph server running
Start the graph server once. You can preload your first collection:
daclhound graph start --input lab.local.json
Or start with an empty graph and import JSON files from Add data in the viewer:
daclhound graph start
Keep this single server running while you use DACLhound. You can run daclhound collect repeatedly, including with different accounts that may have different directory permissions. Each collection writes its own JSON file; add later files to the already-open viewer with Add data → Import JSON files. You do not need to stop and restart the graph server for each collection.
The background server continues running after the graph start command returns. Check it with daclhound graph status; stop it when you are finished with daclhound graph stop. Datasets uploaded in the browser are held in memory and are discarded when the server stops, so keep the original JSON files if you want to load them again later.
Foreground alternative
You can run the viewer in the foreground instead:
daclhound graph --input lab.local.json
Keep that terminal open while using the viewer; Ctrl+C stops the server. To start without an initial file, run daclhound graph and import JSON files from Add data. In either mode, collect data from another terminal and upload each resulting JSON into the same running viewer.
The server listens on 127.0.0.1:8765 by default. Uploaded JSON files stay in memory while the server is running and are discarded when it stops. Use --bind and --port to change the listener. Run daclhound collect --help or daclhound graph --help for all options.
Authentication
NTLM password
daclhound collect --host DC01.lab.local -d lab.local -u 'user' -p 'password' --dc-ip 192.168.2.1
Cross-forest collection
When collecting from a trusted forest with an account from another forest, point --host to a domain controller in the forest you want to query. Set -d to the account's logon domain, and pass only the username to -u (do not prefix it with DOMAIN\; DACLhound uses -d to qualify the username).
For example, if analyst belongs to lab.local and lab.local has a bidirectional trust with megacorp.local, the collection command can look like this:
daclhound collect --host DC01.megacorp.local -d lab.local -u 'analyst' -p 'P@ssw0rd01!' --dc-ip 192.0.2.10
Replace 192.0.2.10 with the IP address of DC01.megacorp.local. The trust must permit the account to authenticate, and the account must have sufficient directory permissions for the data you want to collect.
NTLM pass-the-hash
Pass the NT hash directly, or use LMHASH:NTHASH when you have both hashes:
daclhound collect --host DC01.lab.local -d lab.local -u 'user' -hashes '613a519b5b0ef57c07bc6395aa1aff14' --dc-ip 192.168.2.1
Kerberos
Kerberos supports a password, pass-the-hash, or an existing ccache. When using a
ccache, -u is optional; the identity is taken from the ticket. -no-pass is
an explicit flag for ccache authentication.
Password:
daclhound collect --host DC01.lab.local -d lab.local -u 'user' -p 'password' -k --dc-ip 192.168.2.1
Pass-the-hash (NT hash used as the Kerberos RC4 key):
daclhound collect --host DC01.lab.local -d lab.local -u 'user' -hashes '613a519b5b0ef57c07bc6395aa1aff14' -k --dc-ip 192.168.2.1
If both hashes are available, use -hashes '<LMHASH>:<NTHASH>'.
Existing ccache:
# Use the current KRB5CCNAME
daclhound collect --host DC01.lab.local -d lab.local -k -no-pass --dc-ip 192.168.2.1

# Or provide a ccache file directly
daclhound collect --host DC01.lab.local -d lab.local -k user.ccache -no-pass --dc-ip 192.168.2.1
An AES key enables Kerberos automatically: use -aesKey '<AESKEY>' (with -u). Add -s to use LDAPS.
License
GPL-3.0-only. See LICENSE.
1 maintainer

Metadata
1 maintainer
Release files for DACLhound 0.1.40
For a detailed explanation of source distributions (sdists) and built distributions (wheels), please see the package formats documentation.
Source distribution (sdist)
| File | Size | Uploaded | Provenance | Actions |
|---|---|---|---|---|
| daclhound-0.1.40.tar.gz | 233.1 kB | Without provenance | Details for daclhound-0.1.40.tar.gz |
Built distribution (wheel)
| File | Interpreter | ABI | Platform | Actions Reset |
|---|---|---|---|---|
| daclhound-0.1.40-py3-none-any.whl | Python 3 | none | any | Details for daclhound-0.1.40-py3-none-any.whl |
Total release size: 475.7 kB
Release files / daclhound-0.1.40.tar.gz
| Download URL | daclhound-0.1.40.tar.gz |
|---|---|
| Size | 233.1 kB |
| Tags | Source |
|
SHA-256 checksum How to use checksums |
eb5cc688cdf0970ce1ad9caf7ea2de8c868cb25ff9f161c69d7f0097d028c1a4
|
|
BLAKE2b-256 checksum How to use checksums |
074168737d0cfb88e0f0935b70db860da4374a73ff63d800030b4215f09d086d
|
| Upload date | |
|
Uploaded using Trusted Publishing? What is trusted publishing? |
No |
| Uploaded via |
twine/7.0.0 CPython/3.14.7
|
Release files / daclhound-0.1.40-py3-none-any.whl
| Download URL | daclhound-0.1.40-py3-none-any.whl |
|---|---|
| Size | 242.6 kB |
| Tags | Python 3 |
|
SHA-256 checksum How to use checksums |
49e0acaa8b3fe46c2f615789b0ebdc6fbd4235f1aa9605a83fdb93acaefdf1d9
|
|
BLAKE2b-256 checksum How to use checksums |
d8c7a5fc86dc289ad270a32c331d56693786431c91082f1c86778b69a76da25c
|
| Upload date | |
|
Uploaded using Trusted Publishing? What is trusted publishing? |
No |
| Uploaded via |
twine/7.0.0 CPython/3.14.7
|
Security for DACLhound 0.1.40
Provenance
Provenance describes where a file came from. On PyPI, provenance is shared via attestations, which provide a verifiable record of the build or publishing details. View details, limitations and caveats.
No provenance found
None of the files in this release were uploaded with provenance metadata.
A note on package security
PyPI is a repository for distributing packages, not a service for auditing them. While third-party security researchers and our staff do their best to detect and remove malicious packages, PyPI cannot guarantee the quality, security or suitability of any given package.
To learn more about protecting yourself from malicious actors, visit our package security documentation.














