Use Lightning Apps to build everything from production-ready, multi-cloud ML systems to simple research demos.


Project description
** NEWS: PyTorch Lightning has been renamed Lightning! In addition to building models, you can now build lightning apps that glue together everything around the models, without the pain of infrastructure, cost management, scaling and everything else.**

Build and train PyTorch models and connect them to the ML lifecycle using Lightning App templates, without handling DIY infrastructure, cost management, scaling, and other headaches.
Lightning Gallery • Key Features • How To Use • Docs • Examples • Community • Contribute • License


*Codecov is > 90%+ but build delays may show less
PyTorch Lightning is just organized PyTorch
Lightning disentangles PyTorch code to decouple the science from the engineering.

Build AI products with Lightning Apps
Once you're done building models, publish a paper demo or build a full production end-to-end ML system with Lightning Apps. Lightning Apps remove the cloud infrastructure boilerplate so you can focus on solving the research or business problems. Lightning Apps can run on the Lightning Cloud, your own cluster or a private cloud.
Browse available Lightning apps here

Learn more about Lightning Apps
Lightning Design Philosophy
Lightning structures PyTorch code with these principles:
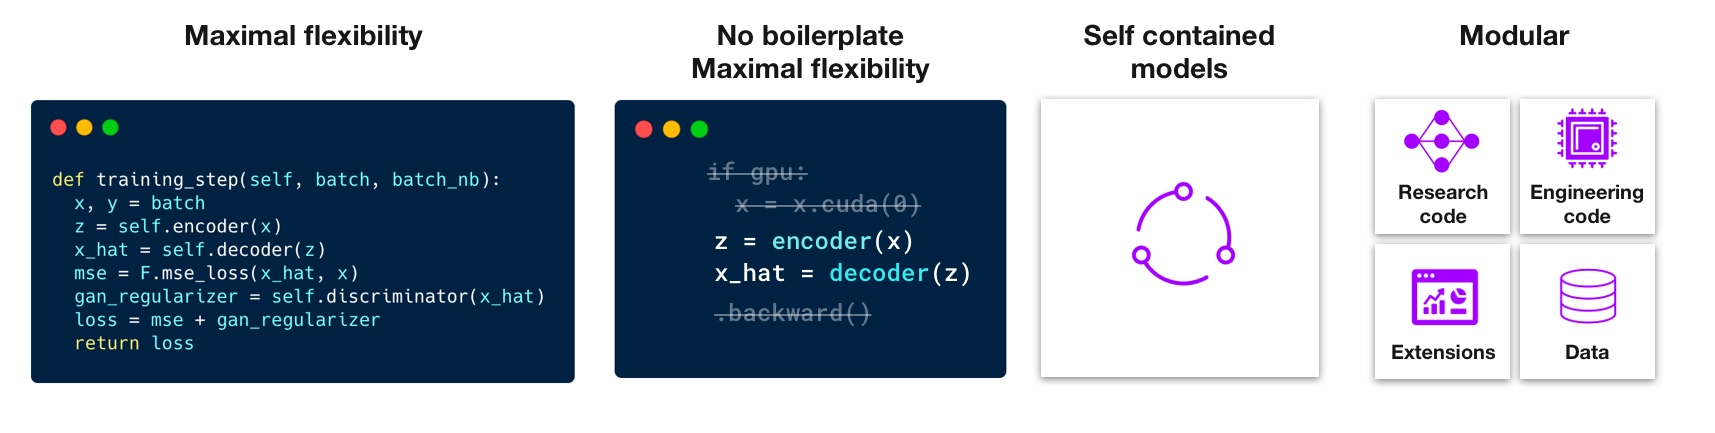
Lightning forces the following structure to your code which makes it reusable and shareable:
- Research code (the LightningModule).
- Engineering code (you delete, and is handled by the Trainer).
- Non-essential research code (logging, etc... this goes in Callbacks).
- Data (use PyTorch DataLoaders or organize them into a LightningDataModule).
Once you do this, you can train on multiple-GPUs, TPUs, CPUs and even in 16-bit precision without changing your code!
Get started in just 15 minutes
Continuous Integration
Lightning is rigorously tested across multiple CPUs, GPUs, TPUs, IPUs, and HPUs and against major Python and PyTorch versions.
Current build statuses
| System / PyTorch ver. | 1.10 | 1.12 |
|---|---|---|
| Linux py3.7 [GPUs**] | - | - |
| Linux py3.7 [TPUs***] | - | - |
| Linux py3.8 [IPUs] | - | - |
| Linux py3.8 [HPUs] |  |
- |
| Linux py3.{7,9} | - |  |
| OSX py3.{7,9} | - | |
| Windows py3.{7,9} | - | |
- ** tests run on two NVIDIA P100
- *** tests run on Google GKE TPUv2/3. TPU py3.7 means we support Colab and Kaggle env.
How To Use
Step 0: Install
Simple installation from PyPI
pip install pytorch-lightning
Step 1: Add these imports
import os
import torch
from torch import nn
import torch.nn.functional as F
from torchvision.datasets import MNIST
from torch.utils.data import DataLoader, random_split
from torchvision import transforms
import pytorch_lightning as pl
Step 2: Define a LightningModule (nn.Module subclass)
A LightningModule defines a full system (ie: a GAN, autoencoder, BERT or a simple Image Classifier).
class LitAutoEncoder(pl.LightningModule):
    def __init__(self):
        super().__init__()
        self.encoder = nn.Sequential(nn.Linear(28 * 28, 128), nn.ReLU(), nn.Linear(128, 3))
        self.decoder = nn.Sequential(nn.Linear(3, 128), nn.ReLU(), nn.Linear(128, 28 * 28))

    def forward(self, x):
        # in lightning, forward defines the prediction/inference actions
        embedding = self.encoder(x)
        return embedding

    def training_step(self, batch, batch_idx):
        # training_step defines the train loop. It is independent of forward
        x, y = batch
        x = x.view(x.size(0), -1)
        z = self.encoder(x)
        x_hat = self.decoder(z)
        loss = F.mse_loss(x_hat, x)
        self.log("train_loss", loss)
        return loss

    def configure_optimizers(self):
        optimizer = torch.optim.Adam(self.parameters(), lr=1e-3)
        return optimizer
Note: Training_step defines the training loop. Forward defines how the LightningModule behaves during inference/prediction.
Step 3: Train!
dataset = MNIST(os.getcwd(), download=True, transform=transforms.ToTensor())
train, val = random_split(dataset, [55000, 5000])

autoencoder = LitAutoEncoder()
trainer = pl.Trainer()
trainer.fit(autoencoder, DataLoader(train), DataLoader(val))
Advanced features
Lightning has over 40+ advanced features designed for professional AI research at scale.
Here are some examples:
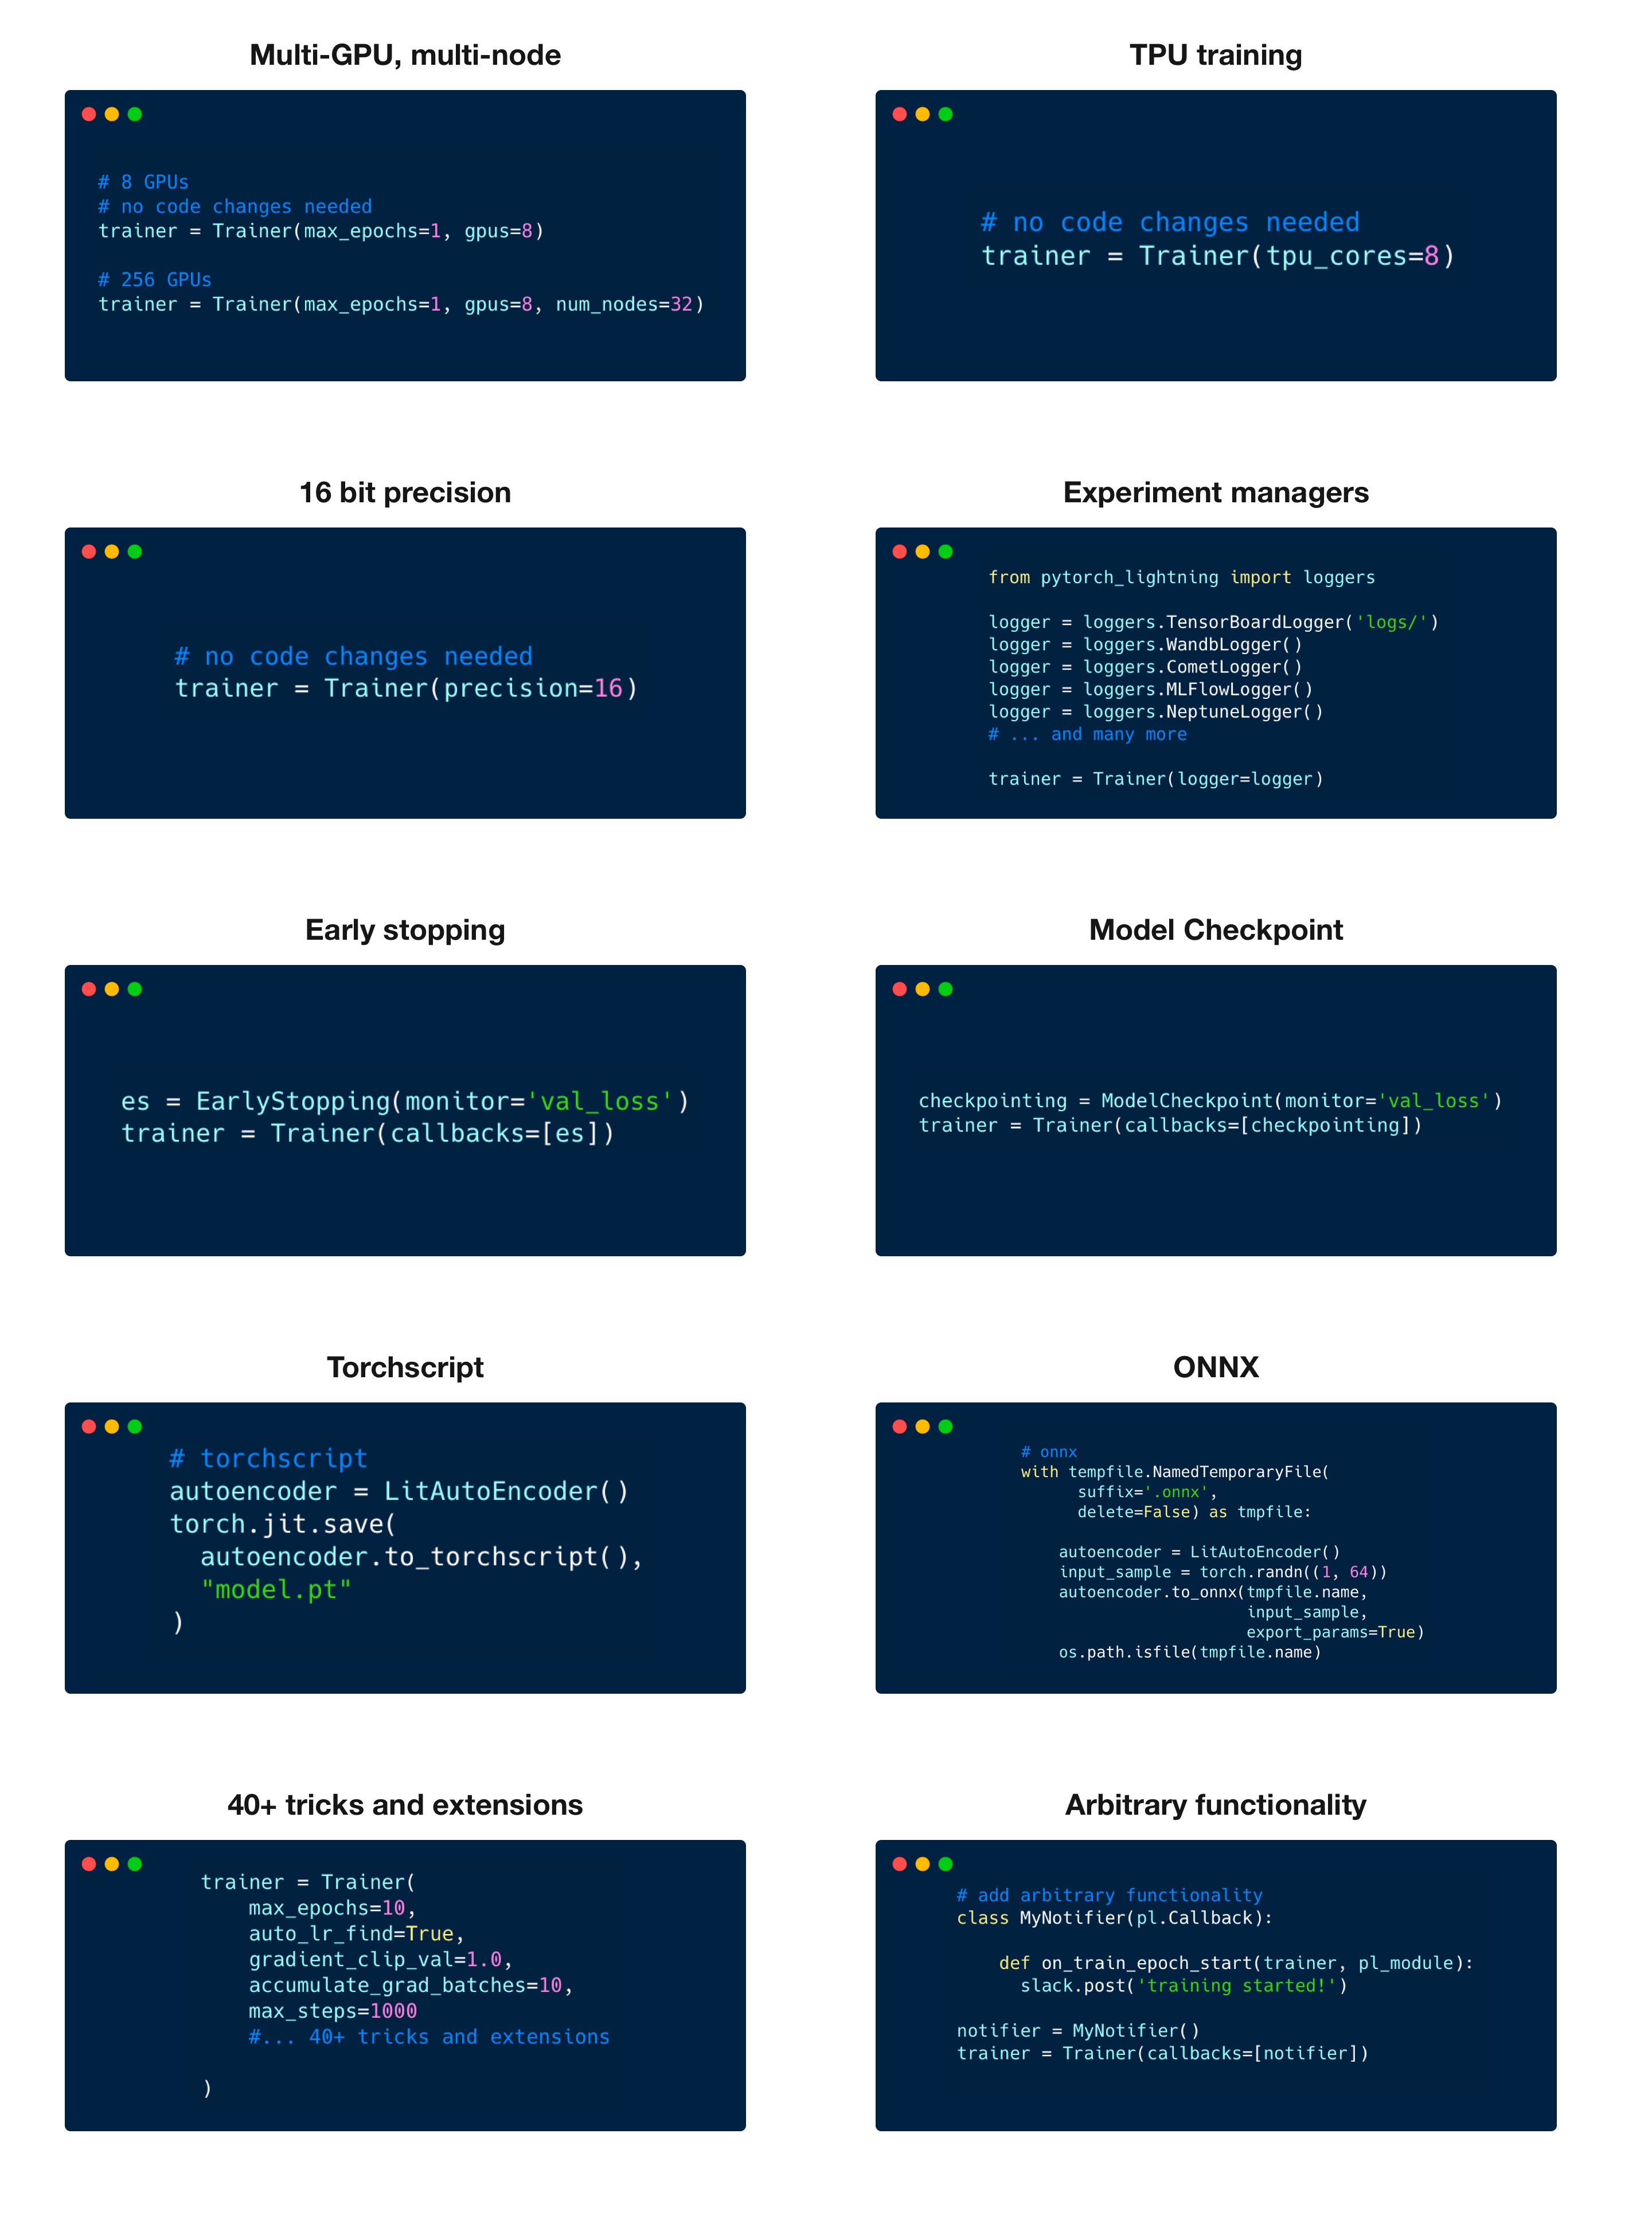
Highlighted feature code snippets
# 8 GPUs
# no code changes needed
trainer = Trainer(max_epochs=1, accelerator="gpu", devices=8)

# 256 GPUs
trainer = Trainer(max_epochs=1, accelerator="gpu", devices=8, num_nodes=32)
Train on TPUs without code changes
# no code changes needed
trainer = Trainer(accelerator="tpu", devices=8)
16-bit precision
# no code changes needed
trainer = Trainer(precision=16)
Experiment managers
from pytorch_lightning import loggers

# tensorboard
trainer = Trainer(logger=TensorBoardLogger("logs/"))

# weights and biases
trainer = Trainer(logger=loggers.WandbLogger())

# comet
trainer = Trainer(logger=loggers.CometLogger())

# mlflow
trainer = Trainer(logger=loggers.MLFlowLogger())

# neptune
trainer = Trainer(logger=loggers.NeptuneLogger())

# ... and dozens more
EarlyStopping
es = EarlyStopping(monitor="val_loss")
trainer = Trainer(callbacks=[es])
Checkpointing
checkpointing = ModelCheckpoint(monitor="val_loss")
trainer = Trainer(callbacks=[checkpointing])
Export to torchscript (JIT) (production use)
# torchscript
autoencoder = LitAutoEncoder()
torch.jit.save(autoencoder.to_torchscript(), "model.pt")
Export to ONNX (production use)
# onnx
with tempfile.NamedTemporaryFile(suffix=".onnx", delete=False) as tmpfile:
    autoencoder = LitAutoEncoder()
    input_sample = torch.randn((1, 64))
    autoencoder.to_onnx(tmpfile.name, input_sample, export_params=True)
    os.path.isfile(tmpfile.name)
Pro-level control of training loops (advanced users)
For complex/professional level work, you have optional full control of the training loop and optimizers.
class LitAutoEncoder(pl.LightningModule):
    def __init__(self):
        super().__init__()
        self.automatic_optimization = False

    def training_step(self, batch, batch_idx):
        # access your optimizers with use_pl_optimizer=False. Default is True
        opt_a, opt_b = self.optimizers(use_pl_optimizer=True)

        loss_a = ...
        self.manual_backward(loss_a, opt_a)
        opt_a.step()
        opt_a.zero_grad()

        loss_b = ...
        self.manual_backward(loss_b, opt_b, retain_graph=True)
        self.manual_backward(loss_b, opt_b)
        opt_b.step()
        opt_b.zero_grad()
Advantages over unstructured PyTorch
- Models become hardware agnostic
- Code is clear to read because engineering code is abstracted away
- Easier to reproduce
- Make fewer mistakes because lightning handles the tricky engineering
- Keeps all the flexibility (LightningModules are still PyTorch modules), but removes a ton of boilerplate
- Lightning has dozens of integrations with popular machine learning tools.
- Tested rigorously with every new PR. We test every combination of PyTorch and Python supported versions, every OS, multi GPUs and even TPUs.
- Minimal running speed overhead (about 300 ms per epoch compared with pure PyTorch).
Lightning Lite

In the Lightning v1.5 release, LightningLite now enables you to leverage all the capabilities of PyTorch Lightning Accelerators without any refactoring to your training loop. Check out the blogpost and docs for more info.
Examples
Self-supervised Learning
Convolutional Architectures
Reinforcement Learning
GANs
Classic ML
Community
The lightning community is maintained by
- 10+ core contributors who are all a mix of professional engineers, Research Scientists, and Ph.D. students from top AI labs.
- 590+ active community contributors.
Want to help us build Lightning and reduce boilerplate for thousands of researchers? Learn how to make your first contribution here
Lightning is also part of the PyTorch ecosystem which requires projects to have solid testing, documentation and support.
Asking for help
If you have any questions please:
Project details
Release history Release notifications | RSS feed


Download files
Download the file for your platform. If you're not sure which to choose, learn more about installing packages.
Source Distribution
Built Distribution
Filter files by name, interpreter, ABI, and platform.
If you're not sure about the file name format, learn more about wheel file names.
Copy a direct link to the current filters
File details
Details for the file lightning-1.9.0rc0.tar.gz.
File metadata
- Download URL: lightning-1.9.0rc0.tar.gz
- Upload date:
- Size: 2.1 MB
- Tags: Source
- Uploaded using Trusted Publishing? No
- Uploaded via: twine/4.0.1 CPython/3.8.10
File hashes
| Algorithm | Hash digest | |
|---|---|---|
| SHA256 |
3634d506e838652cef80f9612fa3d8348e5fafbb75734a42b3e1218d4bc97661
|
|
| MD5 |
bcae9ba0a5325c5930d24456cce47732
|
|
| BLAKE2b-256 |
c67b54fb55a0d0267e840dbf7c98d27d38397dcb5837c52c7c0e19c4290ae61d
|
File details
Details for the file lightning-1.9.0rc0-py3-none-any.whl.
File metadata
- Download URL: lightning-1.9.0rc0-py3-none-any.whl
- Upload date:
- Size: 2.1 MB
- Tags: Python 3
- Uploaded using Trusted Publishing? No
- Uploaded via: twine/4.0.1 CPython/3.8.10
File hashes
| Algorithm | Hash digest | |
|---|---|---|
| SHA256 |
5e5551e6c356f685958559f353c264ced4e56e12a85c5b6bbac2de72910dce5c
|
|
| MD5 |
a1c5f9c576f3113666276cb59cabc3bd
|
|
| BLAKE2b-256 |
8fae0cd98253373c6a46caaf08d4b746bc788daf965cd96065309862f3fe5c40
|


