Pixel and label classification using OpenCL-based Random Forest Classifiers

Project description
napari-accelerated-pixel-and-object-classification (APOC)


clesperanto meets scikit-learn to classify pixels and objects in images, on a GPU using OpenCL in napari.
For using the accelerated pixel and object classifiers in python, check out apoc. For executing APOC classifiers in Fiji using clij2 please read the documentation of the corresponding Fiji plugin.
Usage
Object and Semantic Segmentation
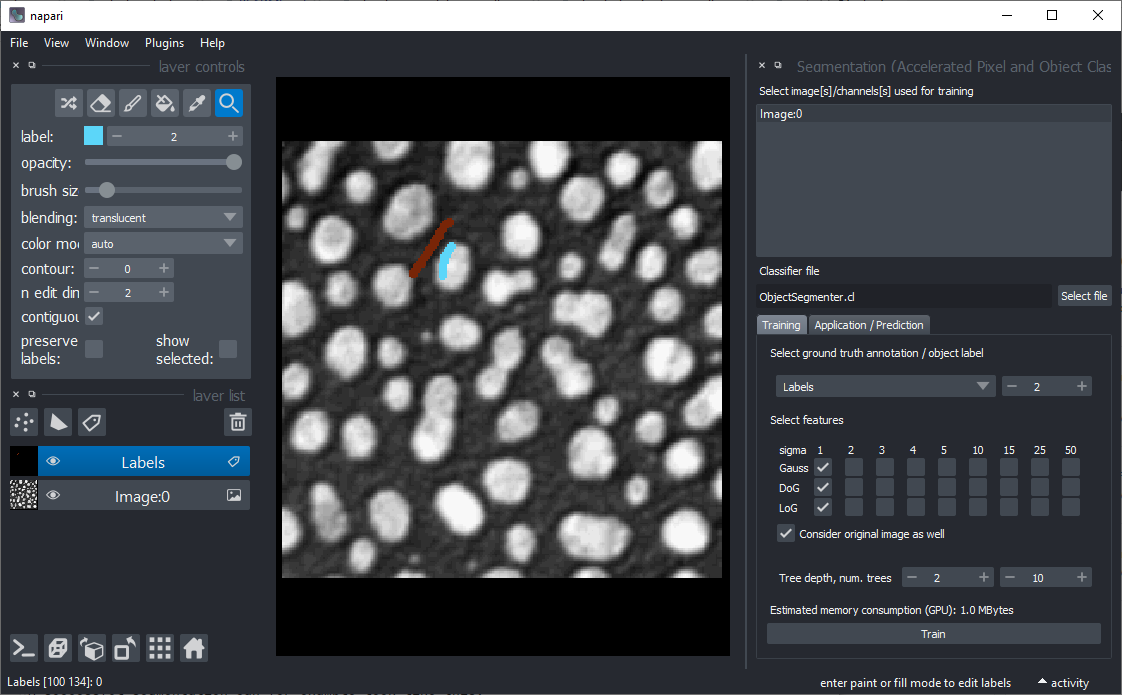
Starting point is napari with at least one image layer and one labels layer (your annotation).
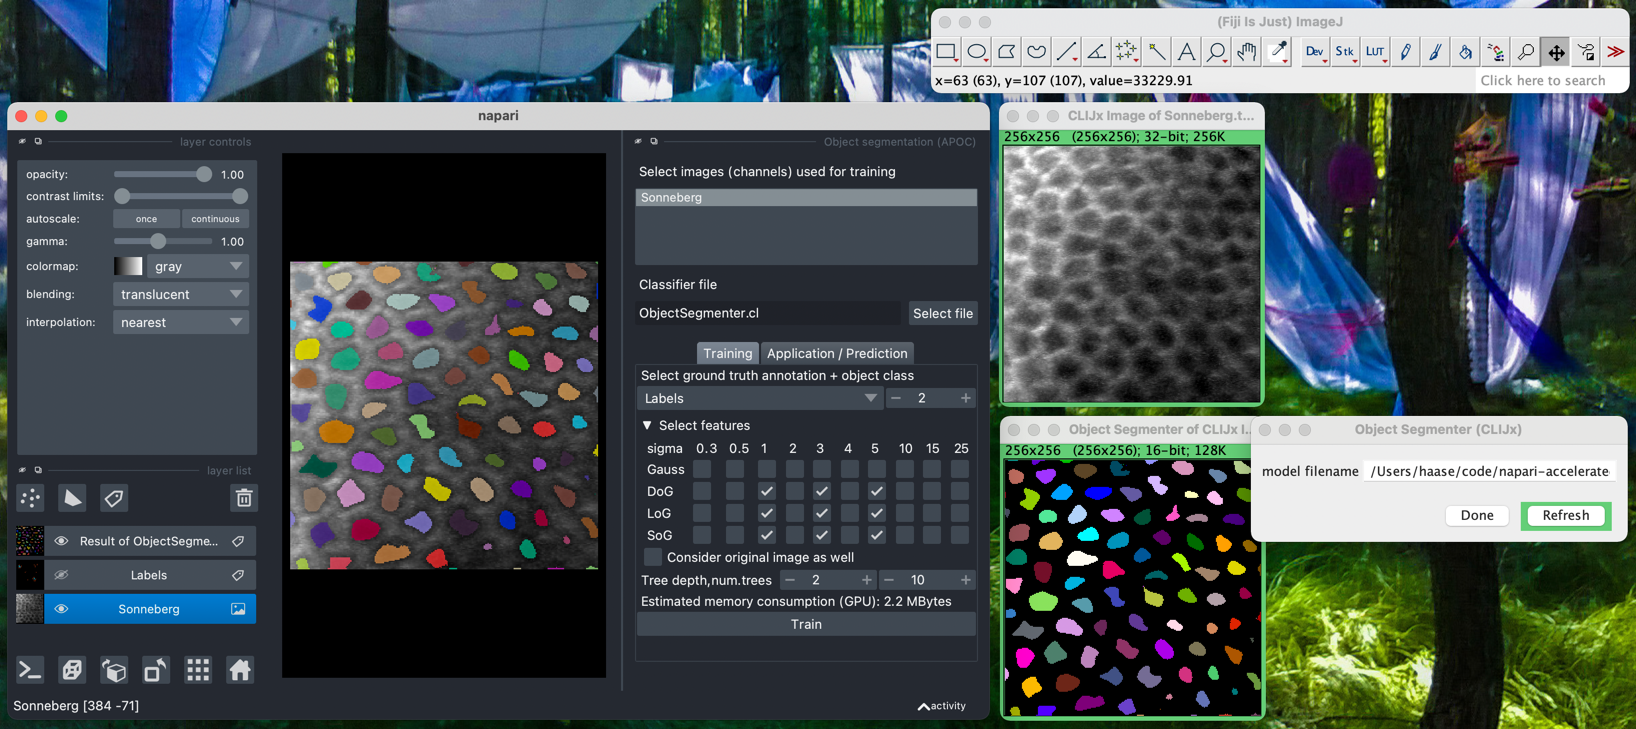
You find Object and Semantic Segmentation in the Tools > Segmentation / labeling. When starting those, the following graphical user interface will show up.
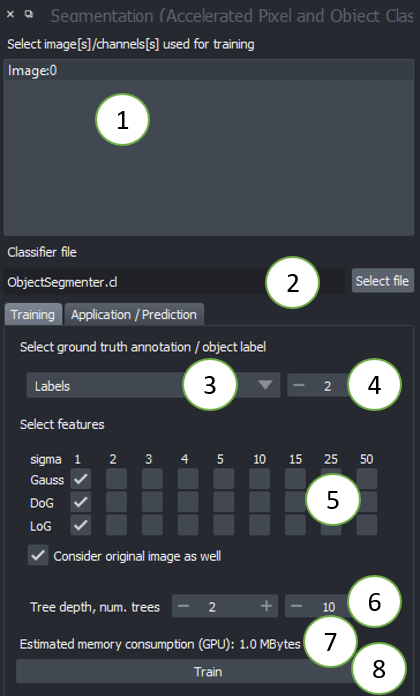
- Choose one or multiple images to train on. These images will be considered as multiple channels. Thus, they need to be spatially correlated. Training from multiple images showing different scenes is not (yet) supported from the graphical user interface. Check out this notebook if you want to train from multiple image-annotation pairs.
- Select a file where the classifier should be saved. If the file exists already, it will be overwritten.
- Select the ground-truth annotation labels layer.
- Select which label corresponds to foreground (not available in Semantic Segmentation)
- Select the feature images that should be considered for segmentation. If segmentation appears pixelated, try increasing the selected sigma values and untick
Consider original image. - Tree depth and number of trees allow you to fine-tune how to deal with manifold regions of different characteristics. The higher these numbers, the longer segmentation will take. In case you use many images and many features, high depth and number of trees might be necessary. (See also
max_depthandn_estimatorsin the scikit-learn documentation of the Random Forest Classifier. - The estimation of memory consumption allows you to tune the configuration to your GPU-hardware. Also consider the GPU-hardware of others who want to use your classifier.
- Click on Run when you're done with configuring. If the segmentation doesn't fit after the first execution, consider fine-tuning the ground-truth annotation and try again.
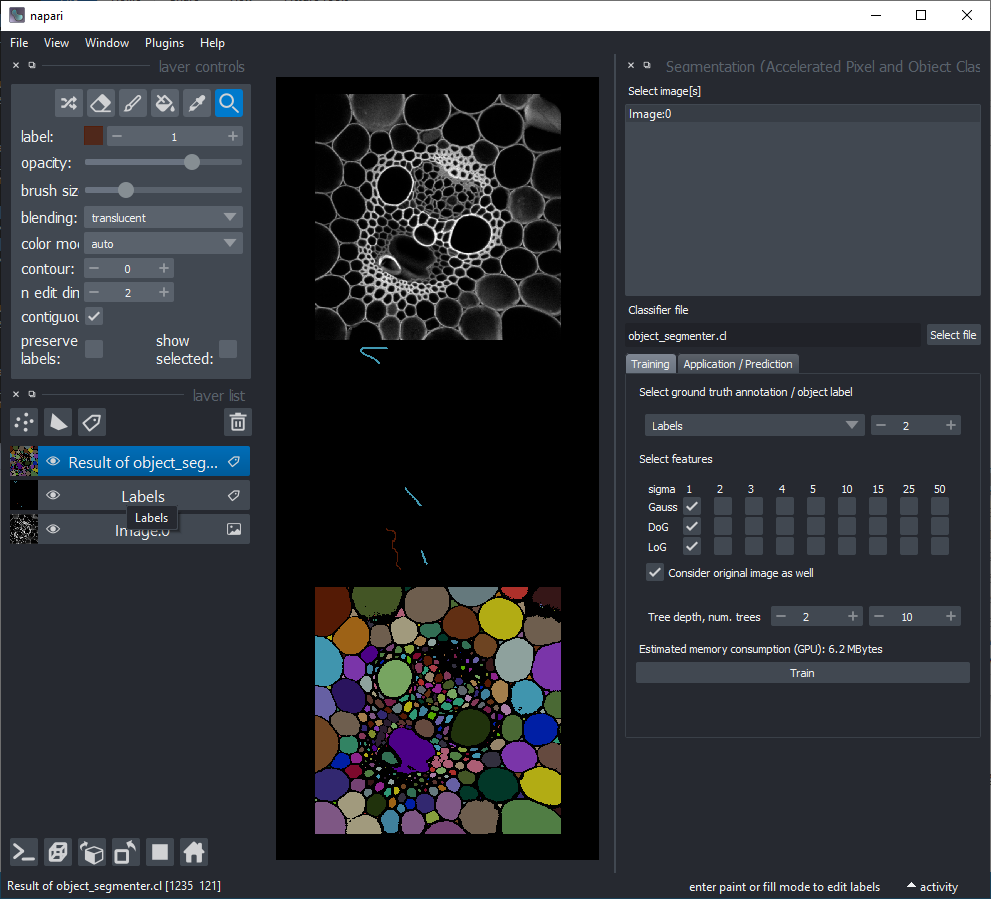
A successful segmentation can for example look like this:
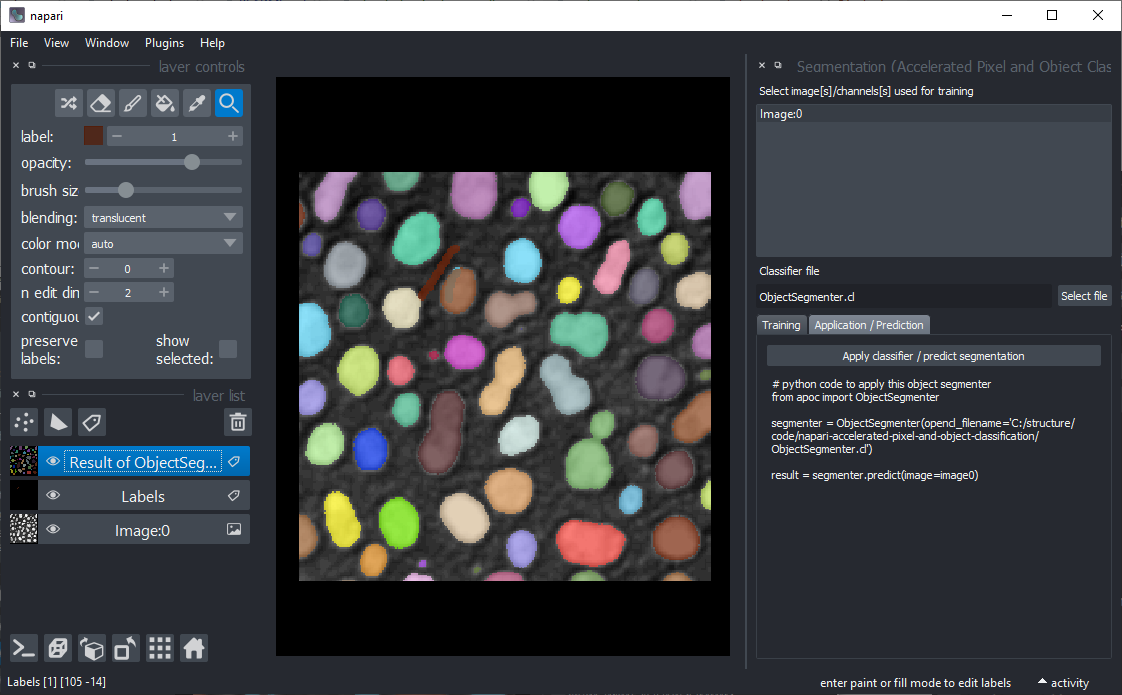
After your classifier has been trained successfully, click on the "Application / Prediction" tab. If you apply the classifier again, python code will be generated. You can use this code for example to apply the same classifier to a folder of images. If you're new to this, check out this notebook.
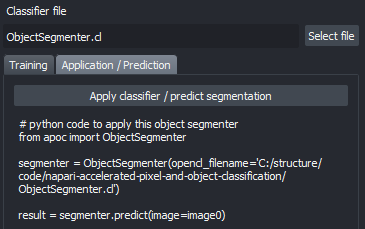
A pre-trained classifier can be applied from scripts as shown in the example notebook or from the Tools > Segmentation / labeling > Object segmentation (apply pretrained, APOC).
The tools for generating semantic segmentations and probability maps (Tools > Filtering menu) work analogously.
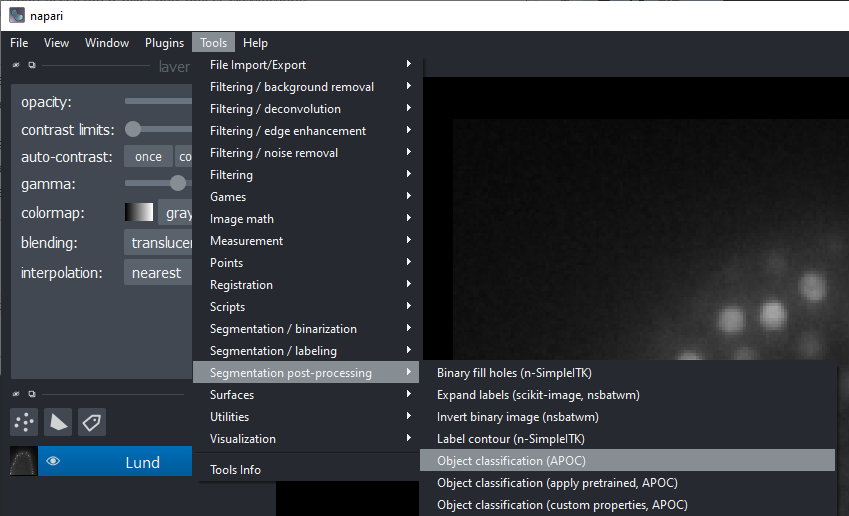
Object classification
Click the menu Tools > Segmentation post-processing > Object classification (APOC).
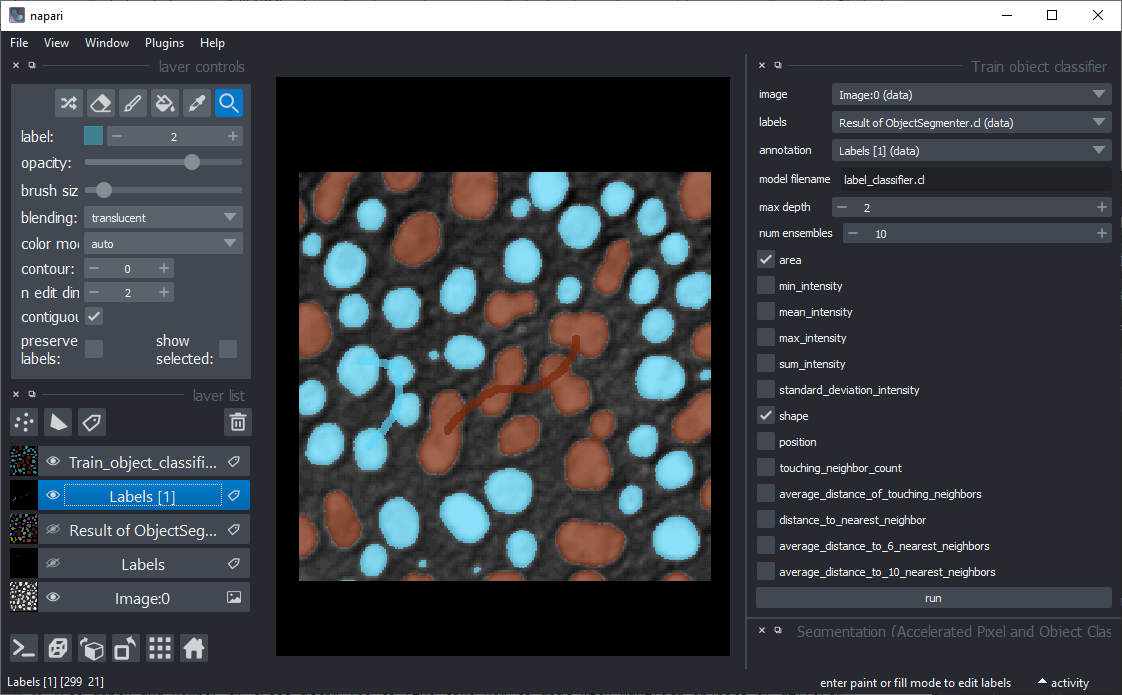
This user interface will be shown:

- The image layer will be used for intensity based feature extraction (see below).
- The labels layer should be contain the segmentation of objects that should be classified. You can use the Object Segmenter explained above to create this layer.
- The annotation layer should contain manual annotations of object classes. You can draw lines crossing single and multiple objects of the same kind. For example draw a line through some elongated objects with label "1" and another line through some rather roundish objects with label "2". If these lines touch the background, that will be ignored.
- Tree depth and number of trees allow you to fine-tune how to deal with manifold objects of different characteristics. The higher these numbers, the longer classification will take. In case you use many features, high depth and number of trees might be necessary. (See also
max_depthandn_estimatorsin the scikit-learn documentation of the Random Forest Classifier. - Select the right features for training. For example, for differentiating objects according to their shape as suggested above, select "shape". The features are extracted using clEsperanto and are shown by example in this notebook.
- Click on the
Runbutton. If classification doesn't perform well in the first attempt, try changing selected features.
If classification worked well, it may for example look like this. Note the two thick lines which were drawn to annotate elongated and roundish objects with brown and cyan:
A pre-trained model can later be applied from scripts as shown in the example notebook or using the menu Tools > Segmentation post-processing > Object classification (apply pretrained, APOC).
This napari plugin was generated with Cookiecutter using with @napari's cookiecutter-napari-plugin template.
Installation
It is recommended to install the plugin in a conda environment. Therefore install conda first, e.g. mini-conda. If you never worked with conda before, reading this short introduction might be helpful.
Optional: Setup a fresh conda environment, activate it and install napari:
conda create --name napari_apoc python=3.9
conda activate napari_apoc
conda install napari
If your conda environment is set up, you can install napari-accelerated-pixel-and-object-classification using pip. Note: you need pyopencl first.
 conda install pyopencl
 pip install napari-accelerated-pixel-and-object-classification
Contributing
Contributions, feedback and suggestions are very welcome. Tests can be run with tox, please ensure the coverage at least stays the same before you submit a pull request.
License
Distributed under the terms of the BSD-3 license, "napari-accelerated-pixel-and-object-classification" is free and open source software
Issues
If you encounter any problems, please open a thread on image.sc along with a detailed description and tag @haesleinhuepf.
Release history Release notifications | RSS feed


Download files
Download the file for your platform. If you're not sure which to choose, learn more about installing packages.
Source Distribution
Built Distribution
Filter files by name, interpreter, ABI, and platform.
If you're not sure about the file name format, learn more about wheel file names.
Copy a direct link to the current filters
File details
Details for the file napari-accelerated-pixel-and-object-classification-0.6.2.tar.gz.
File metadata
- Download URL: napari-accelerated-pixel-and-object-classification-0.6.2.tar.gz
- Upload date:
- Size: 2.7 MB
- Tags: Source
- Uploaded using Trusted Publishing? No
- Uploaded via: twine/3.7.1 importlib_metadata/4.8.2 pkginfo/1.8.2 requests/2.26.0 requests-toolbelt/0.9.1 tqdm/4.62.3 CPython/3.9.9
File hashes
| Algorithm | Hash digest | |
|---|---|---|
| SHA256 |
60496628fc86dac8e6916feaf71f625f98520b2084a94fcac8f50b39acd1cb7f
|
|
| MD5 |
61c75f0ea41b3a1a521a9f22a815152e
|
|
| BLAKE2b-256 |
63650ba26d926a764758197ed35278d5e0631d3272b3e7384c201cc3f9150212
|
File details
Details for the file napari_accelerated_pixel_and_object_classification-0.6.2-py3-none-any.whl.
File metadata
- Download URL: napari_accelerated_pixel_and_object_classification-0.6.2-py3-none-any.whl
- Upload date:
- Size: 16.3 kB
- Tags: Python 3
- Uploaded using Trusted Publishing? No
- Uploaded via: twine/3.7.1 importlib_metadata/4.8.2 pkginfo/1.8.2 requests/2.26.0 requests-toolbelt/0.9.1 tqdm/4.62.3 CPython/3.9.9
File hashes
| Algorithm | Hash digest | |
|---|---|---|
| SHA256 |
33723ed04515b3661e5cc6a7aef6e26ece0c7eb76da3b467ec56c17c96136619
|
|
| MD5 |
81af9c379583704f618ae5283c32ad04
|
|
| BLAKE2b-256 |
930e609d26635ef24674dd2fd41b06dc3238bda2f0607cf1b3ef280511429a39
|


