Desktop AI Assistant powered by GPT-4, GPT-4V, GPT-3.5, DALL-E 3, Langchain LLMs, Llama-index, Whisper with chatbot, assistant, text completion, vision and image generation, internet access, chat with files, commands and code execution, file upload and download and more

Project description
PyGPT - Desktop AI Assistant

Release: 2.1.0 | build: 2024.02.28 | Python: 3.10+
Official website: https://pygpt.net | Documentation: https://pygpt.readthedocs.io
Snap Store: https://snapcraft.io/pygpt | PyPi: https://pypi.org/project/pygpt-net
Compiled version for Linux (tar.gz) and Windows 10/11 (msi) 64-bit: https://pygpt.net/#download
Overview
PyGPT is all-in-one Desktop AI Assistant that provides direct interaction with OpenAI language models, including GPT-4, GPT-4 Vision, and GPT-3.5, through the OpenAI API. The application also integrates with alternative LLMs, like those available on HuggingFace, by utilizing Langchain.
This assistant offers multiple modes of operation such as chat, assistants, completions, and image-related tasks using DALL-E 3 for generation and GPT-4 Vision for image analysis. PyGPT has filesystem capabilities for file I/O, can generate and run Python code, execute system commands, execute custom commands and manage file transfers. It also allows models to perform web searches with the Google and Microsoft Bing.
For audio interactions, PyGPT includes speech synthesis using the Microsoft Azure, Google, Eleven Labs and OpenAI Text-To-Speech services. Additionally, it features speech recognition capabilities provided by OpenAI Whisper, Google and Bing enabling the application to understand spoken commands and transcribe audio inputs into text. It features context memory with save and load functionality, enabling users to resume interactions from predefined points in the conversation. Prompt creation and management are streamlined through an intuitive preset system.
PyGPT's functionality extends through plugin support, allowing for custom enhancements. Its multi-modal capabilities make it an adaptable tool for a range of AI-assisted operations, such as text-based interactions, system automation, daily assisting, vision applications, natural language processing, code generation and image creation.
Multiple operation modes are included, such as chat, text completion, assistant, vision, Langchain, Chat with files (via Llama-index), commands execution, external API calls and image generation, making PyGPT a multi-tool for many AI-driven tasks.
Video (mp4, version 2.0.153, build 2024-02-18):
https://github.com/szczyglis-dev/py-gpt/assets/61396542/996db435-fea3-4836-85b5-4f93505df6c4
Screenshot (version 2.0.153 build 2024-02-18):
You can download compiled 64-bit versions for Windows and Linux here: https://pygpt.net/#download
Features
- Desktop AI Assistant for
Linux,WindowsandMac, written in Python. - Works similarly to
ChatGPT, but locally (on a desktop computer). - 8 modes of operation: Chat, Vision, Completion, Assistant, Image generation, Langchain, Chat with files and Agent (autonomous).
- Supports multiple models:
GPT-4,GPT-3.5, and any model accessible throughLangchain. - Handles and stores the full context of conversations (short-term memory).
- Real-time video camera capture in Vision mode
- Internet access via
GoogleandMicrosoft Bing - Speech synthesis via
Microsoft Azure,Google,Eleven LabsandOpenAIText-To-Speech services. - Speech recognition via
OpenAI Whisper,Google,Google CloudandMicrosoft Bing. - Image analysis via
GPT-4 Vision. - Crontab / Task scheduler included
- Integrated
Langchainsupport (you can connect to any LLM, e.g., onHuggingFace). - Integrated
Llama-indexsupport: chat withtxt,pdf,csv,md,docx,json,epub,xlsxor use previous conversations as additional context provided to model. - Integrated calendar, day notes and search in contexts by selected date
- Commands execution (via plugins: access to the local filesystem, Python code interpreter, system commands execution).
- Custom commands creation and execution
- Manages files and attachments with options to upload, download, and organize.
- Context history with the capability to revert to previous contexts (long-term memory).
- Allows you to easily manage prompts with handy editable presets.
- Provides an intuitive operation and interface.
- Includes a notepad.
- Includes simple painter / drawing tool
- Includes optional Autonomous Mode (Agents)
- Supports multiple languages.
- Enables the use of all the powerful features of
GPT-4,GPT-4V, andGPT-3.5. - Requires no previous knowledge of using AI models.
- Simplifies image generation using
DALL-E 3andDALL-E 2. - Possesses the potential to support future OpenAI models.
- Fully configurable.
- Themes support.
- Plugins support.
- Built-in token usage calculation.
- It's open source; source code is available on
GitHub. - Utilizes the user's own API key.
The application is free, open-source, and runs on PCs with Linux, Windows 10, Windows 11 and Mac.
Full Python source code is available on GitHub.
PyGPT uses the user's API key - to use the application, you must have a registered OpenAI account and your own API key.
You can also use built-it Langchain support to connect to other Large Language Models (LLMs), such as those on HuggingFace. Additional API keys may be required.
Installation
Compiled versions (Linux, Windows 10 and 11)
You can download compiled versions for Linux and Windows (10/11).
Download the .msi or tar.gz for the appropriate OS from the download page at https://pygpt.net and then extract files from the archive and run the application. 64-bit only.
Snap Store
You can install PyGPT directly from Snap Store:
sudo snap install pygpt
To manage future updates just use:
sudo snap refresh pygpt

Using camera: to use camera in Snap version you must connect the camera with:
sudo snap connect pygpt:camera
Using microphone: to use microphone in Snap version you must connect the microphone with:
sudo snap connect pygpt:audio-record :audio-record
PyPi (pip)
The application can also be installed from PyPi using pip install:
- Create virtual environment:
python3 -m venv venv
source venv/bin/activate
- Install from PyPi:
pip install pygpt-net
- Once installed run the command to start the application:
pygpt
Source Code
An alternative method is to download the source code from GitHub and execute the application using the Python interpreter (version 3.10 or higher).
Running from GitHub source code
- Clone git repository or download .zip file:
git clone https://github.com/szczyglis-dev/py-gpt.git
cd py-gpt
- Create virtual environment:
python3 -m venv venv
source venv/bin/activate
- Install requirements:
pip install -r requirements.txt
- Run the application:
python3 run.py
Install with Poetry
- Clone git repository or download .zip file:
git clone https://github.com/szczyglis-dev/py-gpt.git
cd py-gpt
- Create virtual environment:
poetry shell
- Install requirements:
poetry install
- Run the application:
poetry run python3 run.py
Tip: you can use PyInstaller to create a compiled version of
the application for your system (required version >= 6.0.0).
Troubleshooting
If you have a problems with xcb plugin with newer versions of PySide on Linux, e.g. like this:
qt.qpa.plugin: Could not load the Qt platform plugin "xcb" in "" even though it was found.
This application failed to start because no Qt platform plugin could be initialized.
Reinstalling the application may fix this problem.
...then install libxcb:
sudo apt install libxcb-cursor0
If you have a problems with audio on Linux, then try to install portaudio19-dev and/or libasound2:
sudo apt install portaudio19-dev
sudo apt install libasound2
sudo apt install libasound2-data
sudo apt install libasound2-plugins
Access to camera in Snap version:
To use camera in Vision mode in Snap version you must connect the camera with:
sudo snap connect pygpt:camera
Access to microphone in Snap version:
To use microphone in Snap version you must connect the microphone with:
sudo snap connect pygpt:audio-record :audio-record
Windows and VC++ Redistributable
On Windows, the proper functioning requires the installation of the VC++ Redistributable, which can be found on the Microsoft website:
https://learn.microsoft.com/en-us/cpp/windows/latest-supported-vc-redist
The libraries from this environment are used by PySide6 - one of the base packages used by PyGPT.
The absence of the installed libraries may cause display errors or completely prevent the application from running.
It may also be necessary to add the path C:\path\to\venv\Lib\python3.x\site-packages\PySide6 to the PATH variable.
Other requirements
For operation, an internet connection is needed (for API connectivity), a registered OpenAI account, and an active API key that must be input into the program.
Debugging and logging
Tip: Go to Debugging and Logging section for instructions on how to log and diagnose issues in a more detailed manner.
Quick Start
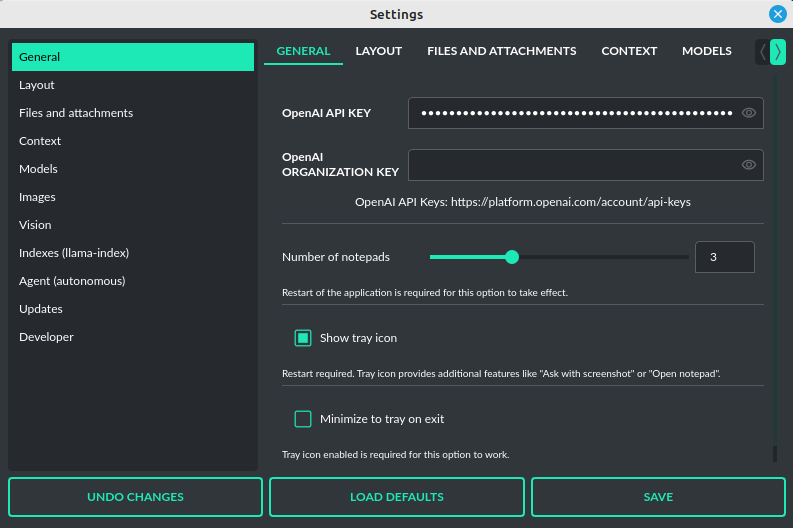
Setting-up OpenAI API KEY
During the initial launch, you must configure your API key within the application.
To do so, navigate to the menu:
Config -> Settings...
and then paste the API key into the OpenAI API KEY field.
Overview
The API key can be obtained by registering on the OpenAI website:
Your API keys will be available here:
https://platform.openai.com/account/api-keys
Note: The ability to use models within the application depends on the API user's access to a given model!
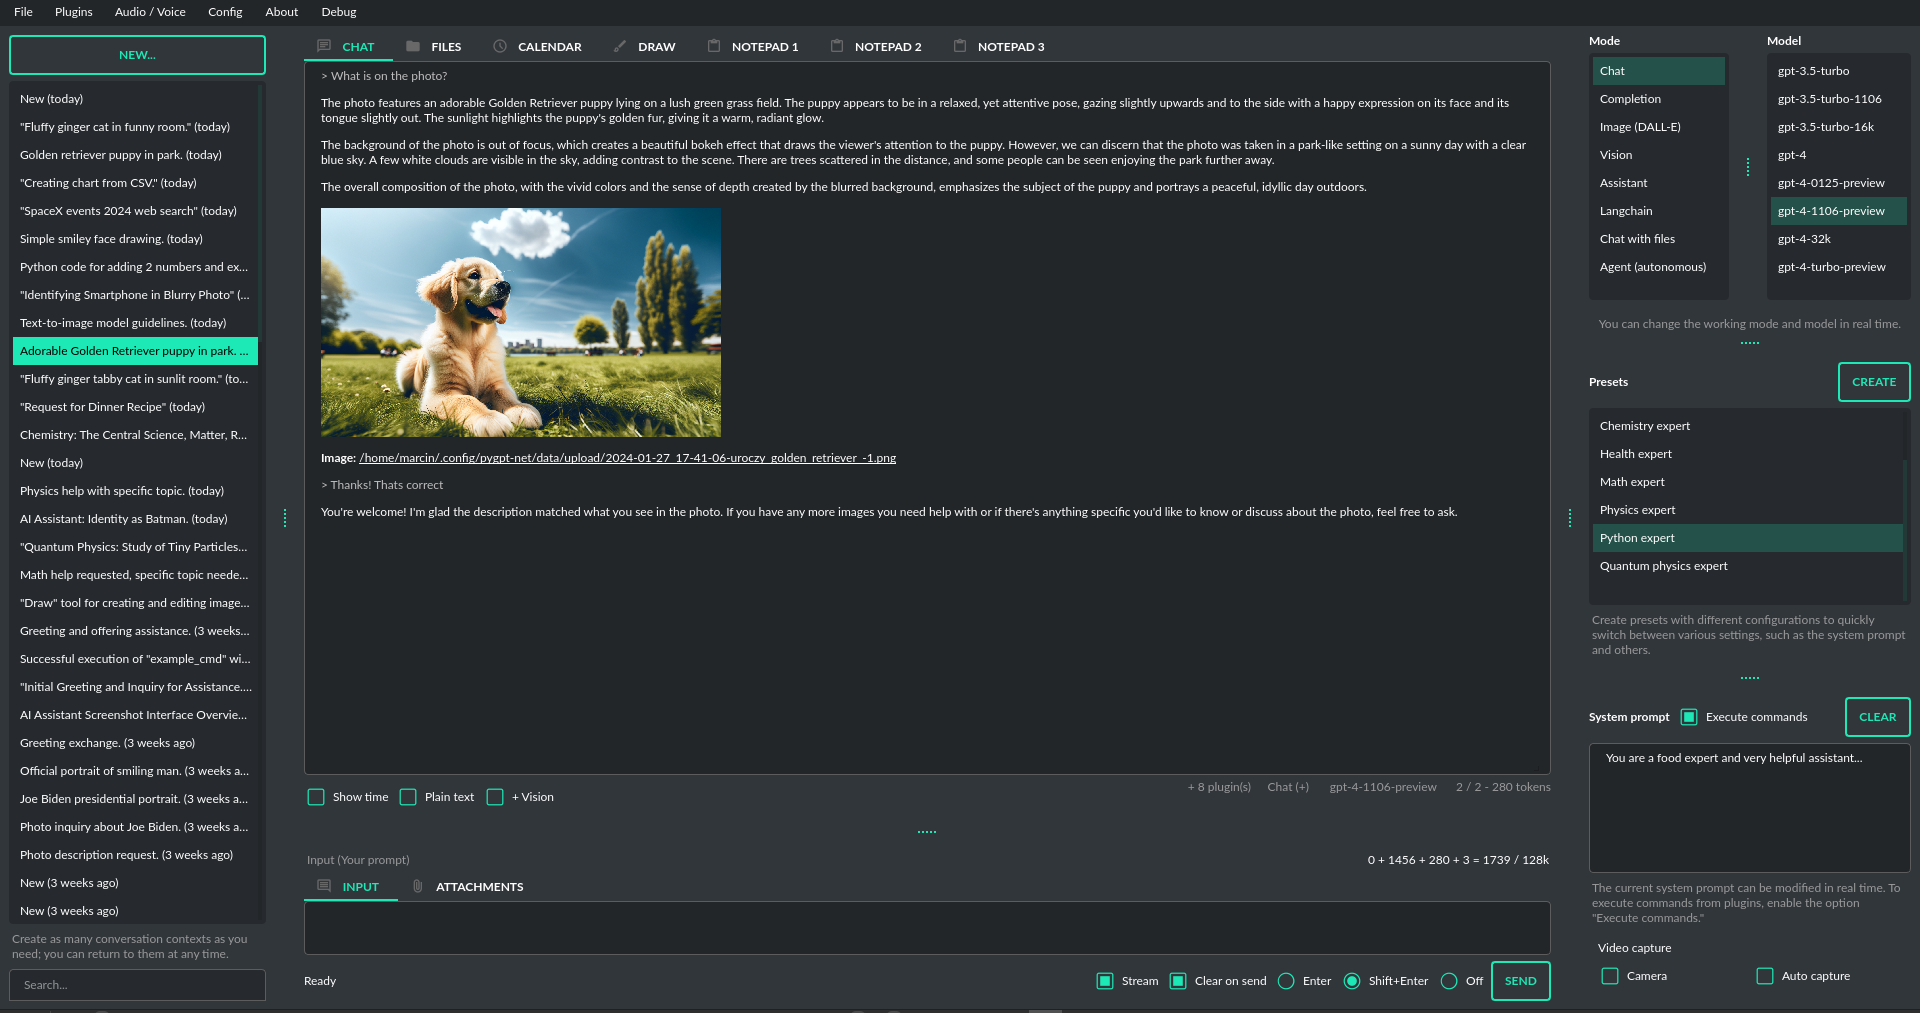
Chat, completion, assistants and vision (GPT-4, GPT-3.5, Langchain)
Chat
+ inline Vision and Image generation
This mode in PyGPT mirrors ChatGPT, allowing you to chat with models such as GPT-4, GPT-4 Turbo and GPT-3.5. It's easy to switch models whenever you want. It works by using the ChatCompletion API.
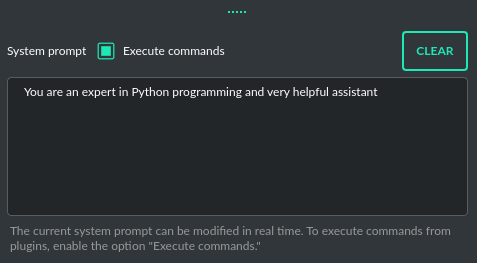
The main part of the interface is a chat window where conversations appear. Right below that is where you type your messages. On the right side of the screen, there's a section to set up or change your system prompts. You can also save these setups as presets to quickly switch between different models or tasks.
Above where you type your messages, the interface shows you the number of tokens your message will use up as you type it – this helps to keep track of usage. There's also a feature to upload files in this area. Go to the Files tab to manage your uploads or add attachments to send to the OpenAI API (but this makes effect only in Assisant and Vision modes).
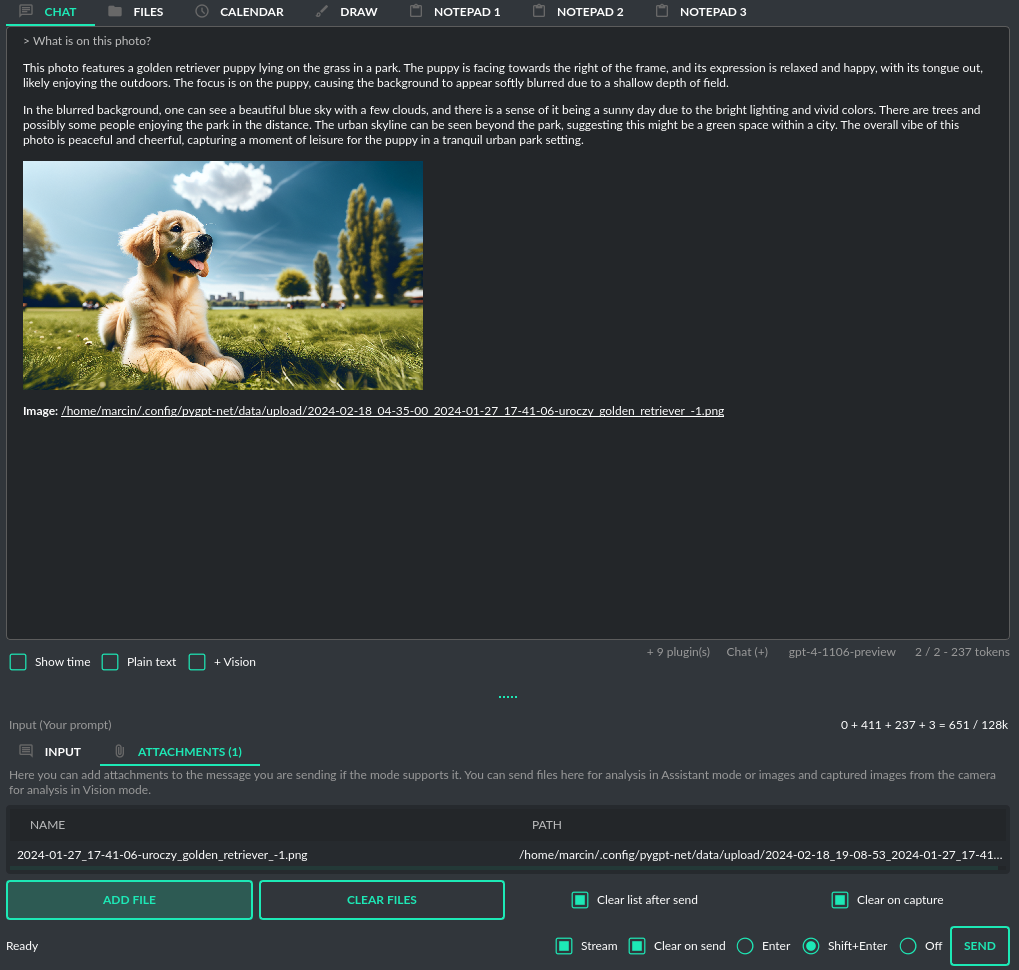
Vision: If you want to send photos or image from camera to analysis you must enable plugin GPT-4 Vision Inline in the Plugins menu. Plugin allows you to send photos or image from camera to analysis in any Chat mode:

With this plugin, you can capture an image with your camera or attach an image and send it for analysis to discuss the photograph:
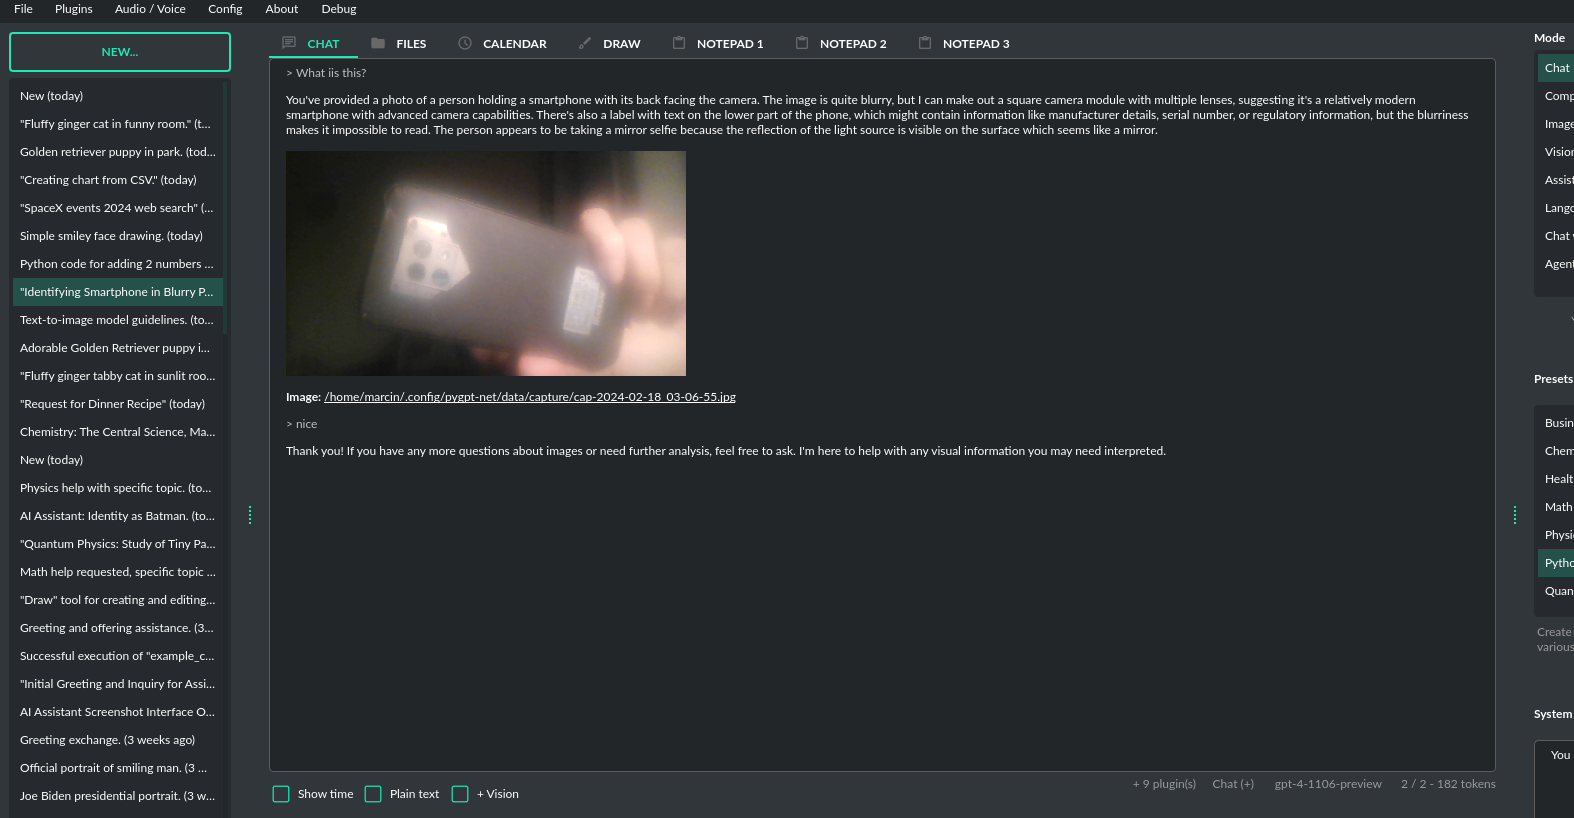
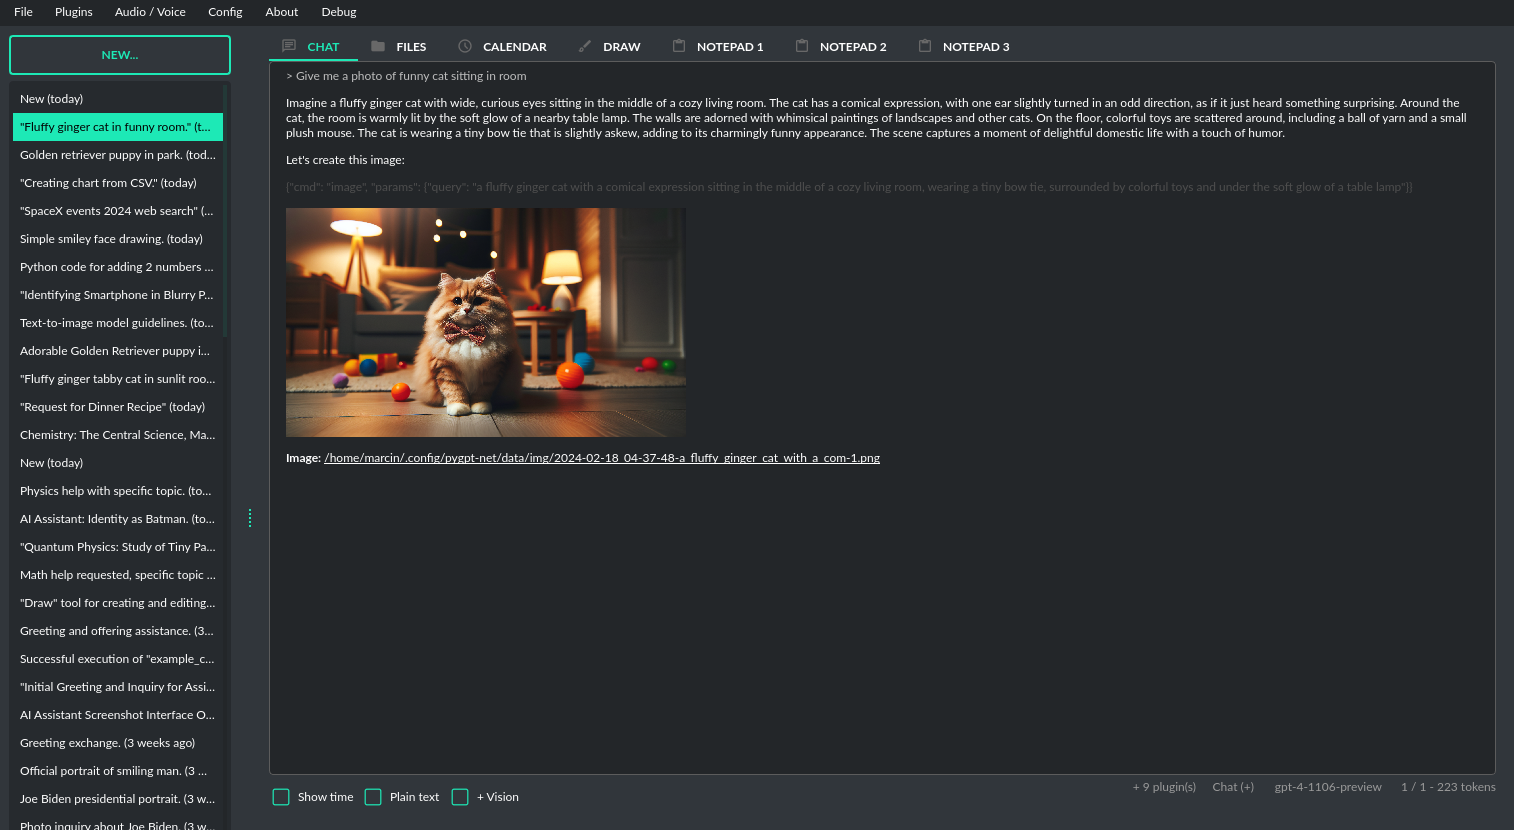
Image generation: If you want to generate images (using DALL-E) directly in chat you must enable plugin DALL-E 3 Inline in the Plugins menu. Plugin allows you to generate images in Chat mode:
Completion
This mode provides in-depth access to a broader range of capabilities offered by Large Language Models (LLMs). While it maintains a chat-like interface for user interaction, it introduces additional settings and functional richness beyond typical chat exchanges. Users can leverage this mode to prompt models for complex text completions, role-play dialogues between different characters, perform text analysis, and execute a variety of other sophisticated tasks. It supports any model provided by the OpenAI API as well as other models through Langchain.
Similar to chat mode, on the right-hand side of the interface, there are convenient presets. These allow you to fine-tune instructions and swiftly transition between varied configurations and pre-made prompt templates.
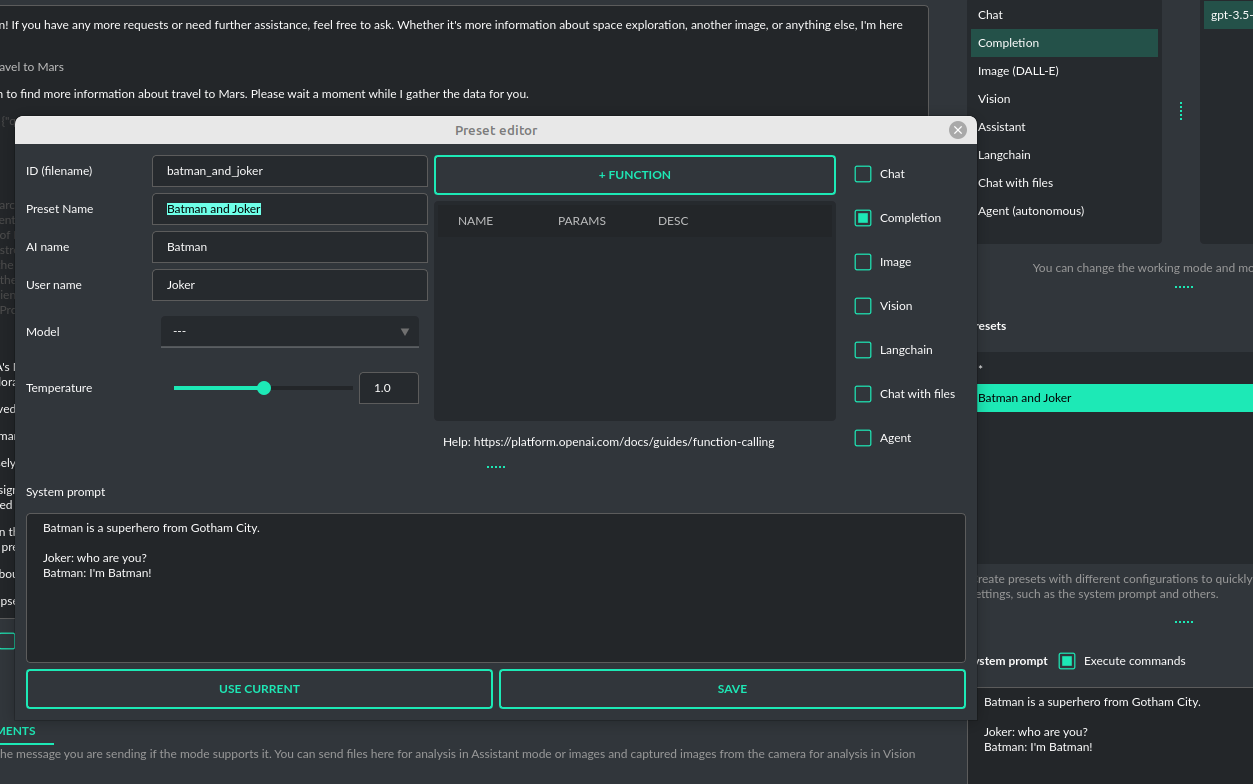
Additionally, this mode offers options for labeling the AI and the user, making it possible to simulate dialogues between specific characters - for example, you could create a conversation between Batman and the Joker, as predefined in the prompt. This feature presents a range of creative possibilities for setting up different conversational scenarios in an engaging and exploratory manner.
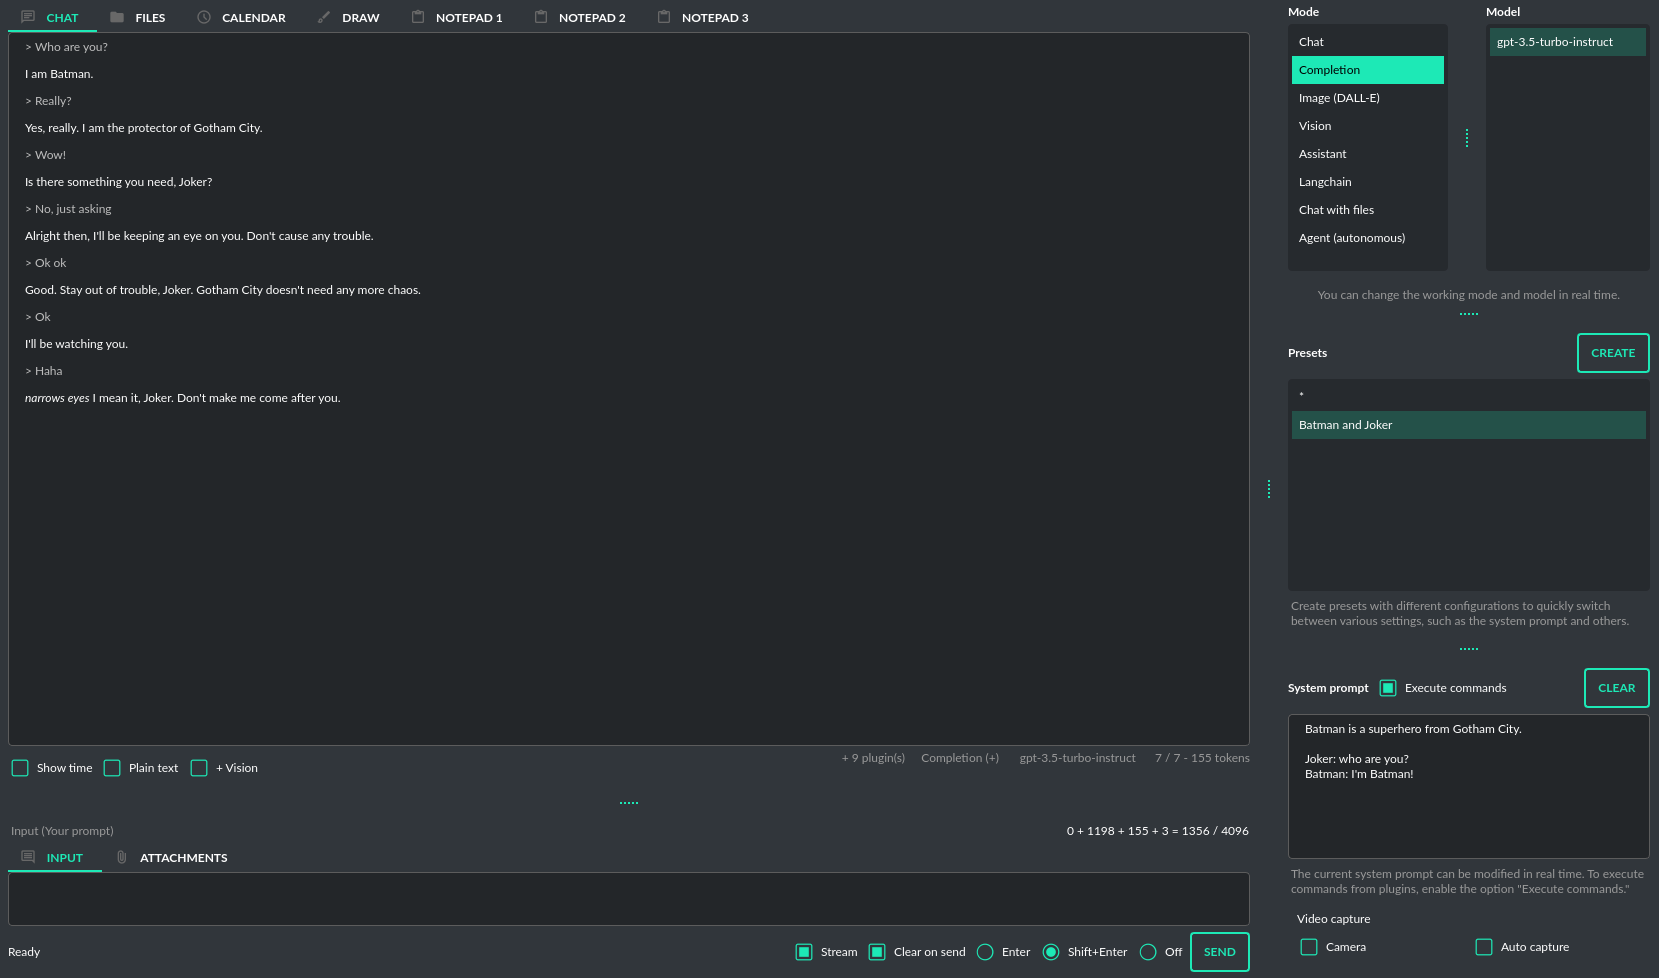
From version 2.0.107 the davinci models are deprecated and has been replaced with gpt-3.5-turbo-instruct model in Completion mode.
Assistants
This mode uses the new OpenAI's Assistants API.
This mode expands on the basic chat functionality by including additional external tools like a Code Interpreter for executing code, Retrieval Files for accessing files, and custom Functions for enhanced interaction and integration with other APIs or services. In this mode, you can easily upload and download files. PyGPT streamlines file management, enabling you to quickly upload documents and manage files created by the model.
Setting up new assistants is simple - a single click is all it takes, and they instantly sync with the OpenAI API. Importing assistants you've previously created with OpenAI into PyGPT is also a seamless process.
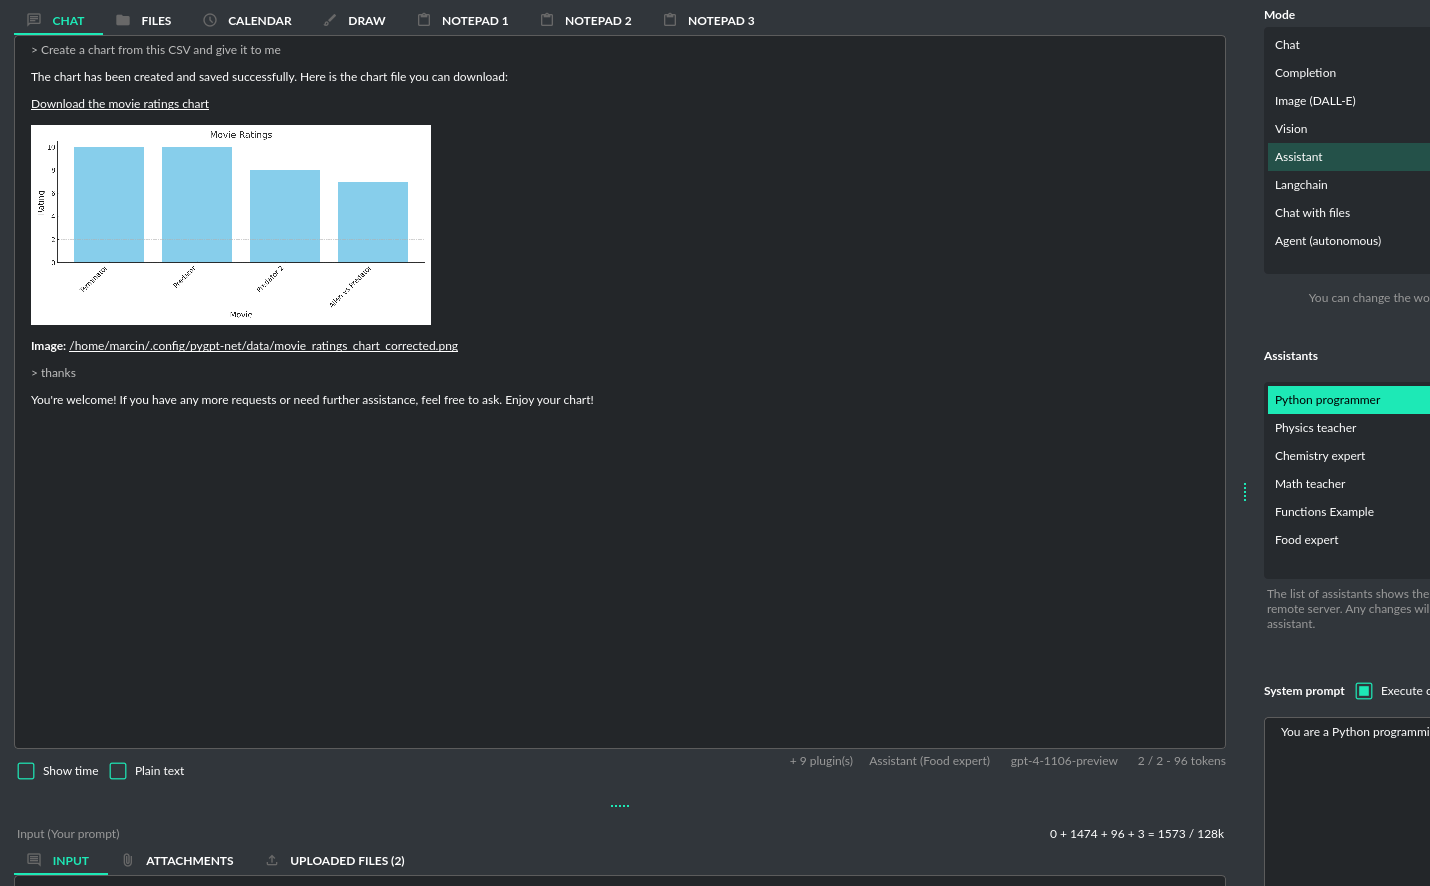
In Assistant mode you are allowed to storage your files (per Assistant) and manage them easily from app:

Please note that token usage calculation is unavailable in this mode. Nonetheless, file (attachment)
uploads are supported. Simply navigate to the Files tab to effortlessly manage files and attachments which
can be sent to the OpenAI API.
Vision (GPT-4 Vision)
This mode enables image analysis using the GPT-4 Vision model. Functioning much like the chat mode,
it also allows you to upload images or provide URLs to images. The vision feature can analyze both local
images and those found online.
From version 2.0.68 - Vision is integrated into any chat mode via plugin GPT-4 Vision (inline). Just enable the plugin and use Vision in standard modes.
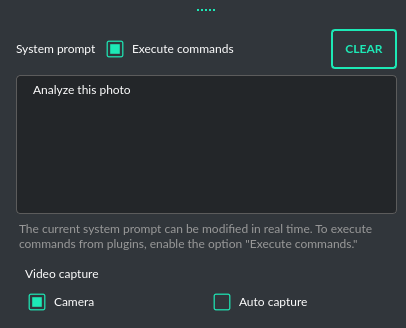
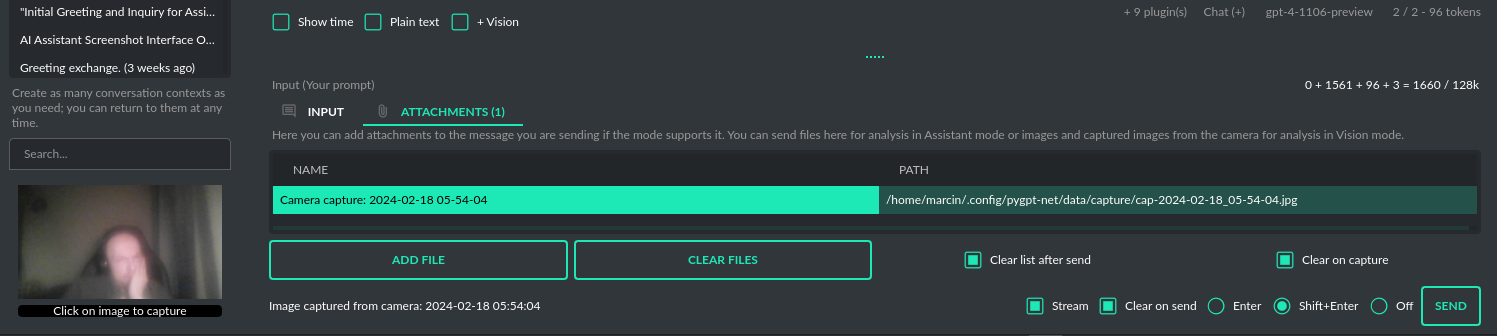
From version 2.0.14 - Vision mode also includes real-time video capture from camera. To enable capture check the option Camera on the right-bottom corner. It will enable real-time capturing from your camera. To capture image from camera and append it to chat just click on video at left side. You can also enable Auto capture - image will be captured and appended to chat message every time you send message.
1) Video camera real-time image capture
2) you can also provide an image URL

3) or you can just upload your local images or use the inline Vision in the standard chat mode:
Tip: When using Vision (inline) by utilizing a plugin in standard mode, such as Chat (not Vision mode), the + Vision special checkbox will appear at the bottom of the Chat window. It will be automatically enabled any time you provide content for analysis (like an uploaded photo). When the checkbox is enabled, the vision model is used. If you wish to exit the vision model after image analysis, simply uncheck the checkbox. It will activate again automatically when the next image content for analysis is provided.
Langchain
This mode enables you to work with models that are supported by Langchain. The Langchain support is integrated
into the application, allowing you to interact with any LLM by simply supplying a configuration
file for the specific model. You can add as many models as you like; just list them in the configuration
file named models.json.
Available LLMs providers supported by PyGPT:
- OpenAI
- Azure OpenAI
- HuggingFace
- Anthropic
- Llama 2
- Ollama
You have the ability to add custom model wrappers for models that are not available by default in PyGPT.
To integrate a new model, you can create your own wrapper and register it with the application.
Detailed instructions for this process are provided in the section titled Managing models / Adding models via Langchain.
Chat with files (Llama-index)
This mode enables chat interaction with your documents and entire context history through conversation.
It seamlessly incorporates Llama-index into the chat interface, allowing for immediate querying of your indexed documents.
To start, you need to index (embed) the files you want to use as additional context. Embedding transforms your text data into vectors. If you're unfamiliar with embeddings and how they work, check out this article:
https://stackoverflow.blog/2023/11/09/an-intuitive-introduction-to-text-embeddings/
For a visualization from OpenAI's page, see this picture:

Source: https://cdn.openai.com/new-and-improved-embedding-model/draft-20221214a/vectors-3.svg
To index your files, simply copy or upload them into the data directory and initiate indexing (embedding) by clicking the Index all button, or right-click on a file and select Index.... Additionally, you have the option to utilize data from indexed files in any Chat mode by activating the Chat with files (Llama-index, inline) plugin.
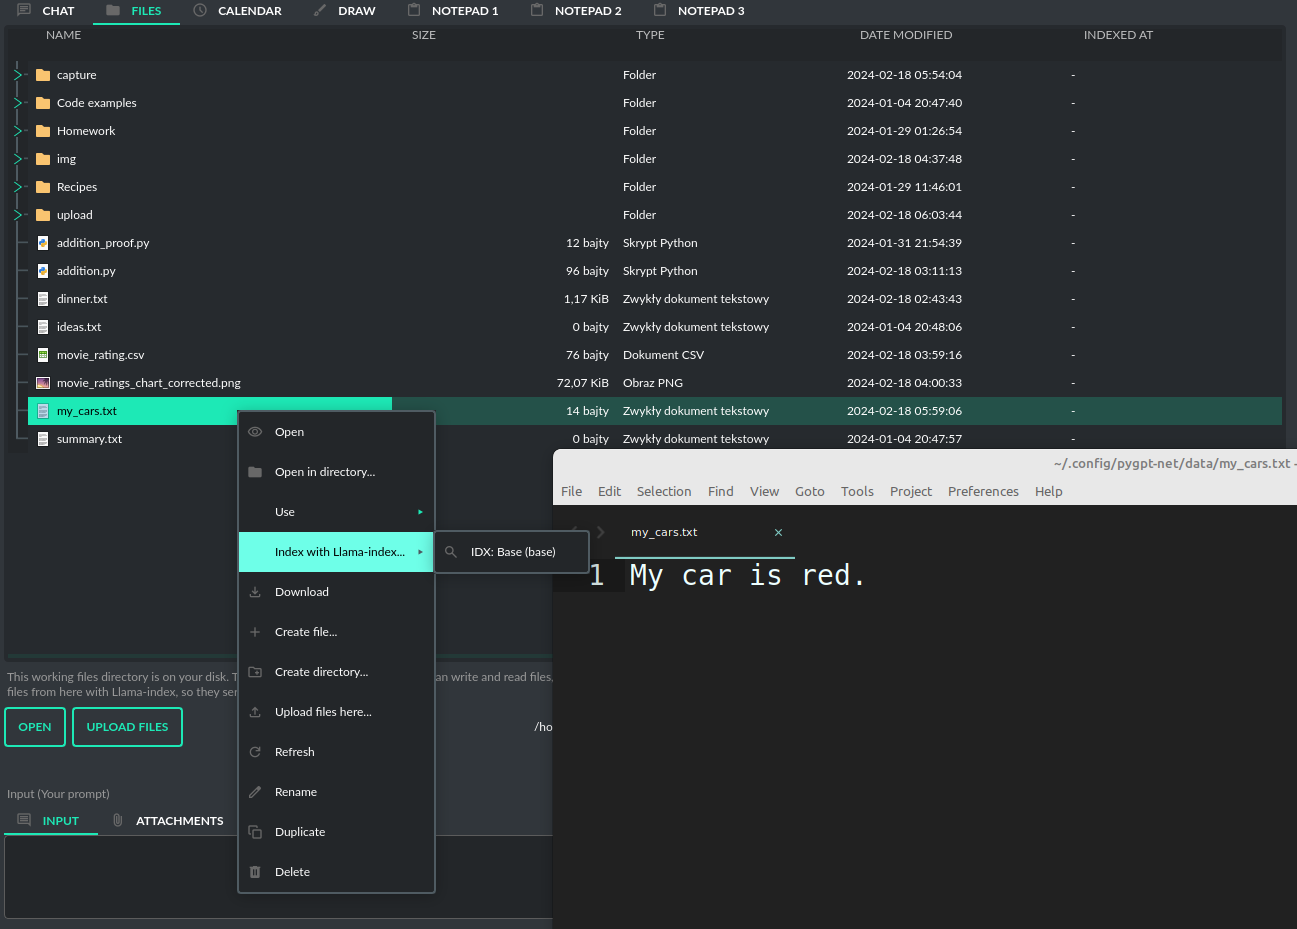
After the file(s) are indexed (embedded in vector store), you can use context from them in chat mode:

Built-in file loaders (offline): text files, pdf, csv, md, docx, json, epub, xlsx.
You can extend this list in Settings / Llama-index by providing list of online loaders (from LlamaHub) - but only for Python version, will not work in compiled version.
All loaders included for offline use are also from LlamaHub, but they are attached locally with all necessary library dependencies included.
You can also develop and provide your own custom offline loader and register it within the application.
From version 2.0.100 Llama-index is also integrated with context database - you can use data from database (your context history) as additional context in discussion.
Options for indexing existing context history or enabling real-time indexing new ones (from database) are available in Settings / Llama-index section.
WARNING: remember that when indexing content, API calls to the embedding model (text-embedding-ada-002) are used. Each indexing consumes additional tokens.
Always control the number of tokens used on the OpenAI page.
Tip: when using Chat with files you are using additional context from db data and files indexed from data directory, not the files sending via Attachments tab.
Attachments tab in Chat with files mode can be used to provide images to Vision (inline) plugin only.
Token limit: When you use Chat with files in non-query mode, Llama-index adds extra context to the system prompt. If you use a plugins (which also adds more instructions to system prompt), you might go over the maximum number of tokens allowed. If you get a warning that says you've used too many tokens, turn off plugins you're not using or turn off the "Execute commands" option to reduce the number of tokens used by the system prompt.
Available vector stores (provided by Llama-index):
- ChromaVectorStore
- ElasticsearchStore
- PinecodeVectorStore
- RedisVectorStore
- SimpleVectorStore
You can configure selected vector store by providing config options like api_key, etc. in Settings -> Llama-index window.
Arguments provided here (on list: Vector Store (**kwargs) in Advanced settings will be passed to selected vector store provider.
You can check keyword arguments needed by selected provider on Llama-index API reference page:
https://docs.llamaindex.ai/en/stable/api_reference/storage/vector_store.html
Which keyword arguments are passed to providers?
For ChromaVectorStore and SimpleVectorStore all arguments are set by PyGPT and passed internally (you do not need to configure anything).
For other providers you can provide these arguments:
ElasticsearchStore
Arguments for ElasticsearchStore(**kwargs):
- index_name (default: current index ID, already set, not required)
- any other keyword arguments provided on list
PinecodeVectorStore
Arguments for Pinecone(**kwargs):
- api_key
- index_name (default: current index ID, already set, not required)
RedisVectorStore
Arguments for RedisVectorStore(**kwargs):
- index_name (default: current index ID, already set, not required)
- any other keyword arguments provided on list
You can extend list of available providers by creating custom provider and registering it on app launch.
Multiple vector databases support is already in beta. Will work better in next releases.
By default, you are using chat-based mode when using Chat with files.
If you want to only query index (without chat) you can enable Query index only (without chat) option.
Adding custom vector stores and offline data loaders
You can create a custom vector store provider or data loader for your data and develop a custom launcher for the application.
To register your custom vector store provider or data loader, simply register it by passing the vector store provider instance to vector_stores keyword argument and loader instance in the loaders keyword argument:
# custom_launcher.py

from pygpt_net.app import run
from plugins import CustomPlugin, OtherCustomPlugin
from llms import CustomLLM
from vector_stores import CustomVectorStore
from loaders import CustomLoader

plugins = [
    CustomPlugin(),
    OtherCustomPlugin(),
]
llms = [
    CustomLLM(),
]
vector_stores = [
    CustomVectorStore(),
]
loaders = [
    CustomLoader(),
]

run(
    plugins=plugins,
    llms=llms,
    vector_stores=vector_stores,  # <--- list with custom vector store providers
    loaders=loaders  # <--- list with custom data loaders
)
The vector store provider must be an instance of pygpt_net.provider.vector_stores.base.BaseStore.
You can review the code of the built-in providers in pygpt_net.provider.vector_stores and use them as examples when creating a custom provider.
The data loader must be an instance of pygpt_net.provider.loaders.base.BaseLoader.
You can review the code of the built-in loaders in pygpt_net.provider.loaders and use them as examples when creating a custom loader.
Agent (autonomous)
This mode is experimental.
WARNING: Please use this mode with caution! - autonomous mode, when connected with other plugins, may produce unexpected results!
The mode activates autonomous mode, where AI begins a conversation with itself. You can set this loop to run for any number of iterations. Throughout this sequence, the model will engage in self-dialogue, answering his own questions and comments, in order to find the best possible solution, subjecting previously generated steps to criticism.
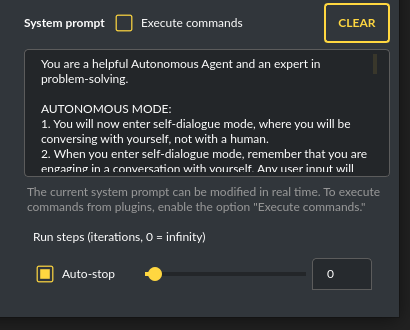
WARNING: Setting the number of run steps (iterations) to 0 activates an infinite loop which can generate a large number of requests and cause very high token consumption, so use this option with caution! Confirmation will be displayed every time you run the infinite loop.
This mode is similar to Auto-GPT - it can be used to create more advanced inferences and to solve problems by breaking them down into subtasks that the model will autonomously perform one after another until the goal is achieved.
You can create presets with custom instructions for multiple agents, incorporating various workflows, instructions, and goals to achieve.
All plugins are available for agents, so you can enable features such as file access, command execution, web searching, image generation, vision analysis, etc., for your agents. Connecting agents with plugins can create a fully autonomous, self-sufficient system. All currently enabled plugins are automatically available to the Agent.
When the Auto-stop option is enabled, the agent will attempt to stop once the goal has been reached.
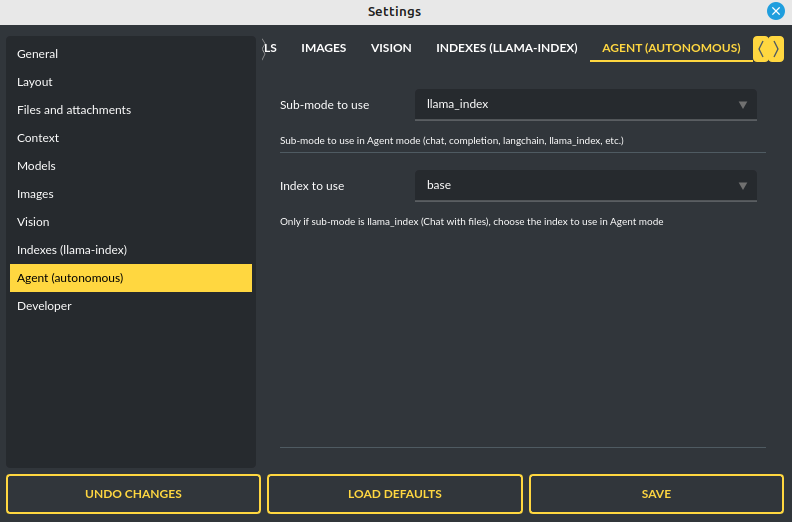
Options
The agent is essentially a virtual mode that internally sequences the execution of a selected underlying mode. You can choose which internal mode the agent should use in the settings:
Settings / Agent (autonomous) / Sub-mode to use
Available choices include: chat, completion, langchain, vision, llama_index (Chat with files).
Default is: chat.
If you want to use the Llama-index mode when running the agent, you can also specify which index Llama-index should use with the option:
Settings / Agent (autonomous) / Index to use
Files and attachments
Input attachments (upload)
PyGPT makes it simple for users to upload files to the server and send them to the model for tasks like analysis, similar to attaching files in ChatGPT. There's a separate Files tab next to the text input area specifically for managing file uploads. Users can opt to have files automatically deleted after each upload or keep them on the list for repeated use.
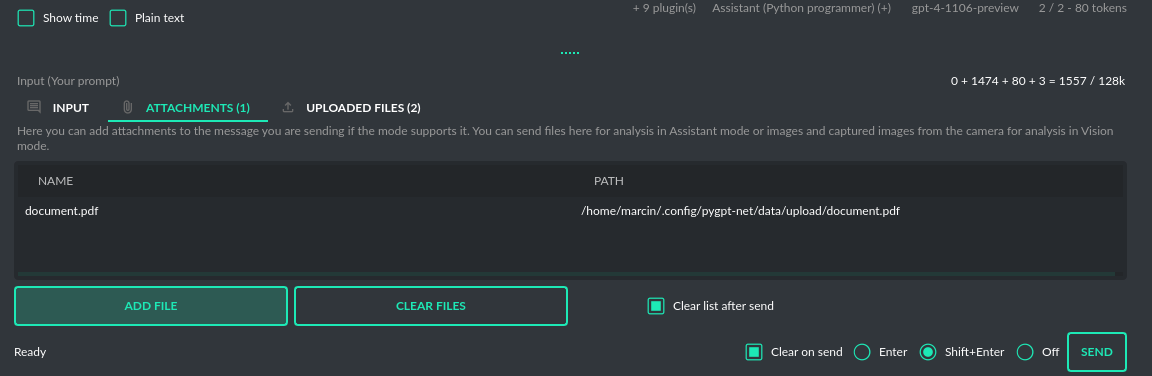
The attachment feature is available in both the Assistant and Vision modes at default.
In Assistant mode, you can send documents and files to analyze, while in Vision mode, you can send images.
In other modes, you can enable attachments by activating the Vision (inline) plugin (for providing images only).
Files (download, code generation)
PyGPT enables the automatic download and saving of files created by the model. This is carried out in the background, with the files being saved to an data folder located within the user's working directory. To view or manage these files, users can navigate to the Files tab which features a file browser for this specific directory. Here, users have the interface to handle all files sent by the AI.
This data directory is also where the application stores files that are generated locally by the AI, such as code files or any other data requested from the model. Users have the option to execute code directly from the stored files and read their contents, with the results fed back to the AI. This hands-off process is managed by the built-in plugin system and model-triggered commands. You can also indexing files from this directory (using integrated Llama-index) and use it's contents as additional context provided to discussion.
The Command: Files I/O plugin takes care of file operations in the data directory, while the Command: Code Interpreter plugin allows for the execution of code from these files.
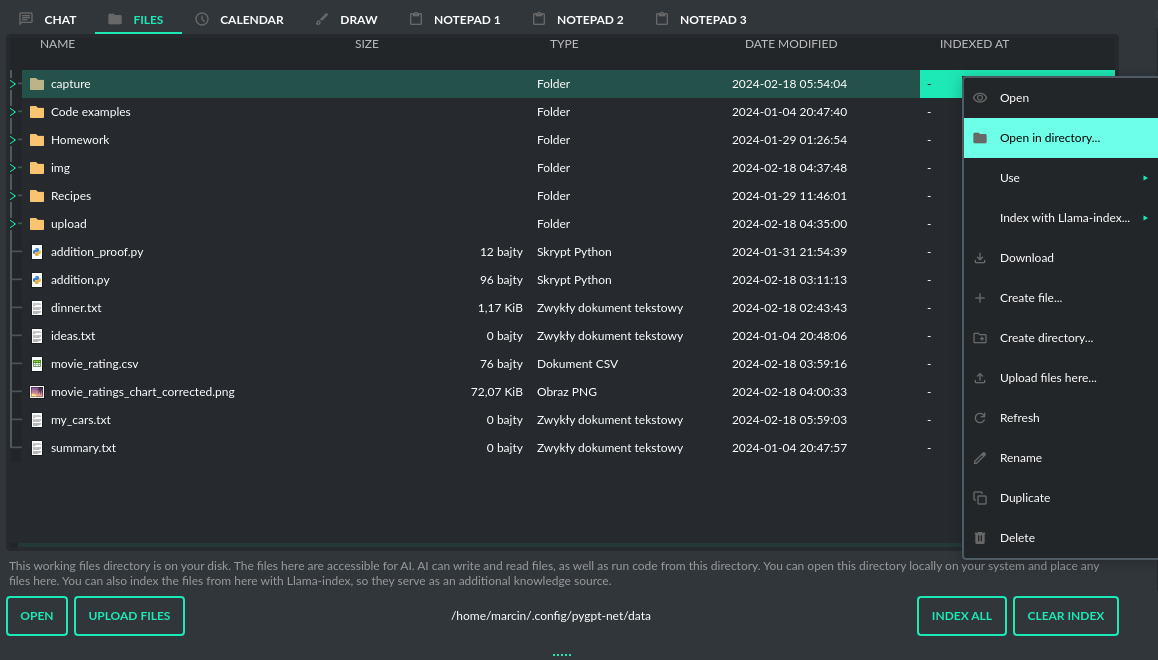
To allow the model to manage files or python code execution, the Execute commands option must be active, along with the above-mentioned plugins:
Draw (paint)
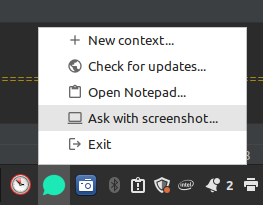
Using the Draw tool, you can create quick sketches and submit them to the model for analysis. You can also edit opened from disk or captured from camera images, for example, by adding elements like arrows or outlines to objects. Additionally, you can capture screenshots from the system - the captured image is placed in the drawing tool and attached to the query being sent.

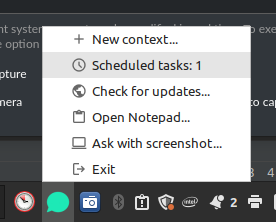
To capture the screenshot just click on the Ask with screenshot option in a tray-icon dropdown:
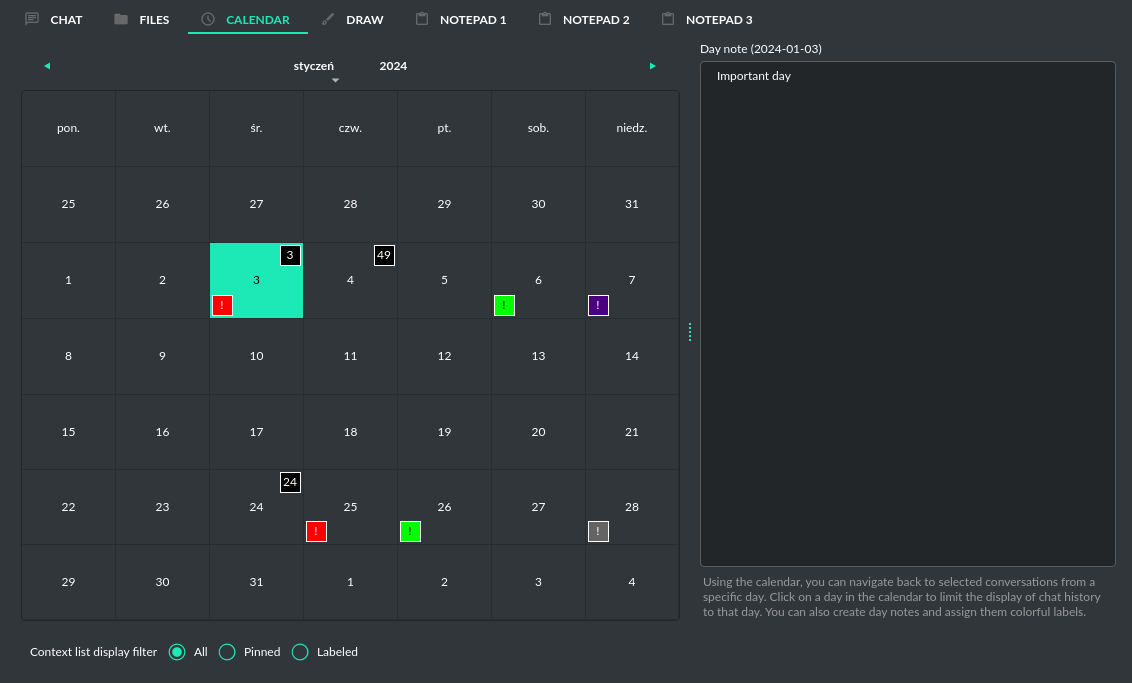
Calendar
Using the calendar, you can go back to selected conversations from a specific day and add daily notes. After adding a note, it will be marked on the list, and you can change the color of its label by right-clicking and selecting Set label color. By clicking on a particular day of the week, conversations from that day will be displayed.
Context and memory
Short and long-term memory
PyGPT features a continuous chat mode that maintains a long context of the ongoing dialogue. It preserves the entire conversation history and automatically appends it to each new message (prompt) you send to the AI. Additionally, you have the flexibility to revisit past conversations whenever you choose. The application keeps a record of your chat history, allowing you to resume discussions from the exact point you stopped.
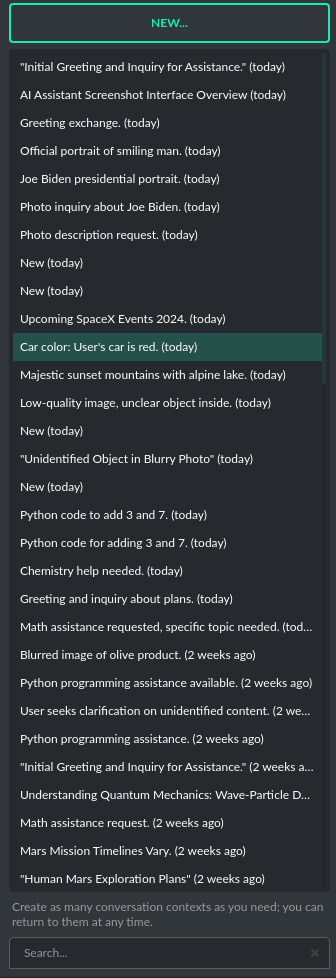
Handling multiple contexts
On the left side of the application interface, there is a panel that displays a list of saved conversations. You can save numerous contexts and switch between them with ease. This feature allows you to revisit and continue from any point in a previous conversation. PyGPT automatically generates a summary for each context, akin to the way ChatGPT operates and gives you the option to modify these titles itself.
You can disable context support in the settings by using the following option:
Config -> Settings -> Use context
Clearing history
You can clear the entire memory (all contexts) by selecting the menu option:
File -> Clear history...
Context storage
On the application side, the context is stored in the SQLite database located in the working directory (db.sqlite).
In addition, all history is also saved to .txt files for easy reading.
Once a conversation begins, a title for the chat is generated and displayed on the list to the left. This process is similar to ChatGPT, where the subject of the conversation is summarized, and a title for the thread is created based on that summary. You can change the name of the thread at any time.
Presets
What is preset?
Presets in PyGPT are essentially templates used to store and quickly apply different configurations. Each preset includes settings for the mode you want to use (such as chat, completion, or image generation), an initial system message, an assigned name for the AI, a username for the session, and the desired "temperature" for the conversation. A warmer "temperature" setting allows the AI to provide more creative responses, while a cooler setting encourages more predictable replies. These presets can be used across various modes and with models accessed via the OpenAI API or Langchain.
The system lets you create as many presets as needed and easily switch among them. Additionally, you can clone an existing preset, which is useful for creating variations based on previously set configurations and experimentation.
Example usage
The application includes several sample presets that help you become acquainted with the mechanism of their use.
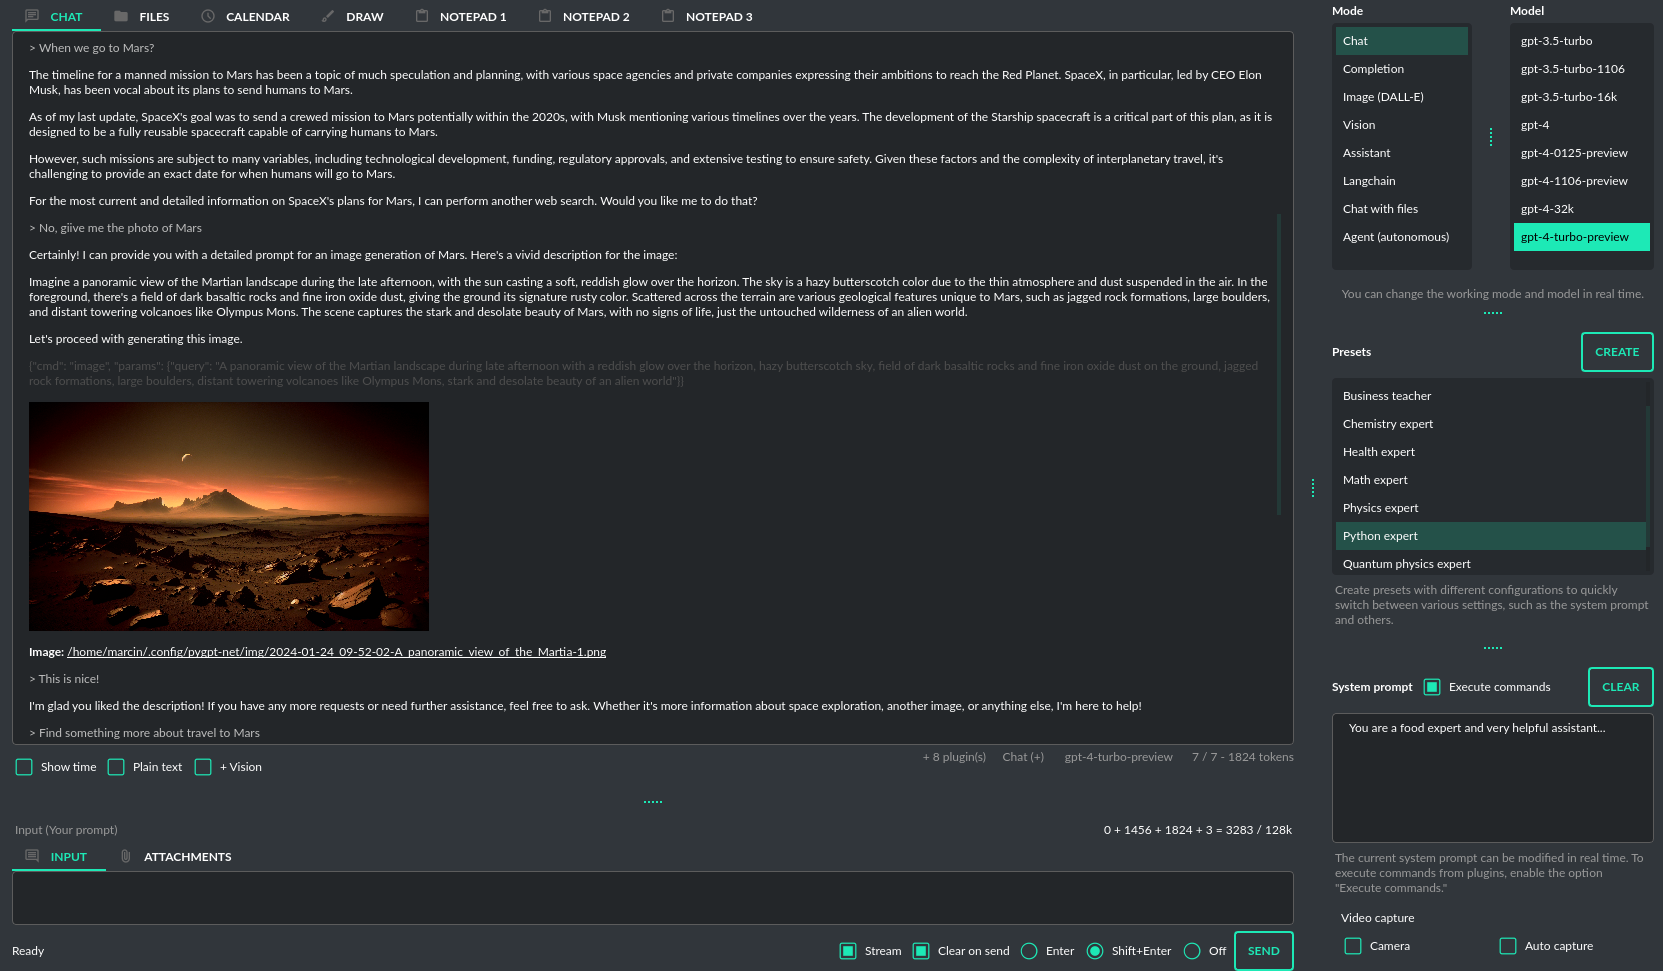
Image generation (DALL-E 3 and DALL-E 2)
DALL-E 3
PyGPT enables quick and easy image creation with DALL-E 3.
The older model version, DALL-E 2, is also accessible. Generating images is akin to a chat conversation - a user's prompt triggers the generation, followed by downloading, saving to the computer,
and displaying the image onscreen. You can send raw prompt to DALL-E in Image generation mode or ask the model for the best prompt.
From version 2.0.68 (released 2023-12-31) image generation using DALL-E is available in every mode via plugin DALL-E 3 Image Generation (inline). Just ask any model, in any mode, like e.g. GPT-4 to generate an image and it will do it inline, without need to mode change.
If you want to generate images (using DALL-E) directly in chat you must enable plugin DALL-E 3 Inline in the Plugins menu. Plugin allows you to generate images in Chat mode:
Multiple variants
You can generate up to 4 different variants (DALL-E 2) for a given prompt in one session. DALL-E 3 allows one image. To select the desired number of variants to create, use the slider located in the right-hand corner at the bottom of the screen. This replaces the conversation temperature slider when you switch to image generation mode.
Raw mode
There is an option for switching prompt generation mode.
If Raw Mode is enabled, DALL-E will receive the prompt exactly as you have provided it. If Raw Mode is disabled, GPT will generate the best prompt for you based on your instructions.
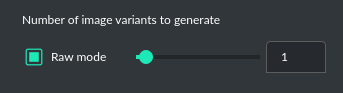
Image storage
Once you've generated an image, you can easily save it anywhere on your disk by right-clicking on it. You also have the options to delete it or view it in full size in your web browser.
Tip: Use presets to save your prepared prompts. This lets you quickly use them again for generating new images later on.
The app keeps a history of all your prompts, allowing you to revisit any session and reuse previous prompts for creating new images.
Images are stored in img directory in PyGPT user data folder.
Managing models
All models are specified in the configuration file models.json, which you can customize.
This file is located in your working directory. You can add new models provided directly by OpenAI API
and those supported by Langchain to this file. Configuration for Langchain wrapper is placed in langchain key.
Adding custom LLMs via Langchain
To add a new model using the Langchain wrapper in PyGPT, insert the model's configuration details into the models.json file. This should include the model's name, its supported modes (either chat, completion, or both), the LLM provider (which can be either e.g. OpenAI or HuggingFace), and, if you are using a HuggingFace model, an optional API KEY.
Example of models configuration - models.json:
"gpt-3.5-turbo": {
    "id": "gpt-3.5-turbo",
    "name": "gpt-3.5-turbo",
    "mode": [
        "chat",
        "assistant",
        "langchain",
        "llama_index"
    ],
    "langchain": {
        "provider": "openai",
        "mode": [
            "chat"
        ],
        "args": [
            {
                "name": "model_name",
                "value": "gpt-3.5-turbo",
                "type": "str"
            }
        ],
        "env": [
            {
                "name": "OPENAI_API_KEY",
                "value": "{api_key}"
            }
        ]
    },
    "llama_index": {
        "provider": "openai",
        "mode": [
            "chat"
        ],
        "args": [
            {
                "name": "model",
                "value": "gpt-3.5-turbo",
                "type": "str"
            }
        ],
        "env": [
            {
                "name": "OPENAI_API_KEY",
                "value": "{api_key}"
            }
        ]
    },
    "ctx": 4096,
    "tokens": 4096,
    "default": false
},
There is bult-in support for those LLMs providers:
- OpenAI (openai)
- Azure OpenAI (azure_openai)
- HuggingFace (huggingface)
- Anthropic (anthropic)
- Llama 2 (llama2)
- Ollama (ollama)
Adding custom LLM providers
Handling LLMs with Langchain is implemented through separated wrappers. This allows for the addition of support for any provider and model available via Langchain. All built-in wrappers for the models and its providers are placed in the pygpt_net.provider.llms.
These wrappers are loaded into the application during startup using launcher.add_llm() method:
# app.py

from pygpt_net.provider.llms.openai import OpenAILLM
from pygpt_net.provider.llms.azure_openai import AzureOpenAILLM
from pygpt_net.provider.llms.anthropic import AnthropicLLM
from pygpt_net.provider.llms.hugging_face import HuggingFaceLLM
from pygpt_net.provider.llms.llama import Llama2LLM
from pygpt_net.provider.llms.ollama import OllamaLLM


def run(**kwargs):
    """Runs the app."""
    # Initialize the app
    launcher = Launcher()
    launcher.init()

    # Register plugins
    ...

    # Register langchain LLMs wrappers
    launcher.add_llm(OpenAILLM())
    launcher.add_llm(AzureOpenAILLM())
    launcher.add_llm(AnthropicLLM())
    launcher.add_llm(HuggingFaceLLM())
    launcher.add_llm(Llama2LLM())
    launcher.add_llm(OllamaLLM())

    # Launch the app
    launcher.run()
To add support for providers not included by default, you can create your own wrapper that returns a custom model to the application and then pass this custom wrapper to the launcher.
Extending PyGPT with custom plugins and LLM wrappers is straightforward:
- Pass instances of custom plugins and LLM wrappers directly to the launcher.
To register custom LLM wrappers:
- Provide a list of LLM wrapper instances as
llmskeyword argument.
Example:
# launcher.py

from pygpt_net.app import run
from plugins import CustomPlugin, OtherCustomPlugin
from llms import CustomLLM

plugins = [
    CustomPlugin(),
    OtherCustomPlugin(),
]
llms = [
    CustomLLM(),
]
vector_stores = []

run(
    plugins=plugins,
    llms=llms,
    vector_stores=vector_stores
)
Examples (tutorial files)
See the examples directory in this repository with examples of custom launcher, plugin, vector store, LLM (Langchain and Llama-index) provider and data loader:
-
examples/custom_launcher.py -
examples/example_audio_input.py -
examples/example_audio_output.py -
examples/example_data_loader.py -
examples/example_llm.py<-- use it as an example -
examples/example_plugin.py -
examples/example_vector_store.py -
examples/example_web_search.py
These example files can be used as a starting point for creating your own extensions for PyGPT.
To integrate your own model or provider into PyGPT, you can also reference the classes located in the pygpt_net.provider.llms. These samples can act as an more complex example for your custom class. Ensure that your custom wrapper class includes two essential methods: chat and completion. These methods should return the respective objects required for the model to operate in chat and completion modes.
Adding custom Vector Store providers
From version 2.0.114 you can also register your own Vector Store provider:
# app.py

# vector stores
from pygpt_net.provider.vector_stores.chroma import ChromaProvider
from pygpt_net.provider.vector_stores.elasticsearch import ElasticsearchProvider
from pygpt_net.provider.vector_stores.pinecode import PinecodeProvider
from pygpt_net.provider.vector_stores.redis import RedisProvider
from pygpt_net.provider.vector_stores.simple import SimpleProvider

def run(**kwargs):
    # ...
    # register base vector store providers (llama-index)
    launcher.add_vector_store(ChromaProvider())
    launcher.add_vector_store(ElasticsearchProvider())
    launcher.add_vector_store(PinecodeProvider())
    launcher.add_vector_store(RedisProvider())
    launcher.add_vector_store(SimpleProvider())

    # register custom vector store providers (llama-index)
    vector_stores = kwargs.get('vector_stores', None)
    if isinstance(vector_stores, list):
        for store in vector_stores:
            launcher.add_vector_store(store)

    # ...
To register your custom vector store provider just register it by passing provider instance in vector_stores keyword argument:
# custom_launcher.py

from pygpt_net.app import run
from plugins import CustomPlugin, OtherCustomPlugin
from llms import CustomLLM
from vector_stores import CustomVectorStore

plugins = [
    CustomPlugin(),
    OtherCustomPlugin(),
]
llms = [
    CustomLLM(),
]
vector_stores = [
    CustomVectorStore(),
]

run(
    plugins=plugins,
    llms=llms,
    vector_stores=vector_stores
)
Plugins
PyGPT can be enhanced with plugins to add new features.
The following plugins are currently available, and model can use them instantly:
-
Audio Input- provides speech recognition. -
Audio Output- provides voice synthesis. -
Autonomous Agent (inline)- enables autonomous conversation (AI to AI), manages loop, and connects output back to input. This is the inline Agent mode. -
Chat with files (Llama-index, inline)- plugin integratesLlama-indexstorage in any chat and provides additional knowledge into context (from indexed files and previous context from database). -
Command: API calls- plugin lets you connect the model to the external services using custom defined API calls. -
Command: Code Interpreter- responsible for generating and executing Python code, functioning much like the Code Interpreter on ChatGPT, but locally. This means GPT can interface with any script, application, or code. The plugin can also execute system commands, allowing GPT to integrate with your operating system. Plugins can work in conjunction to perform sequential tasks; for example, theFilesplugin can write generated Python code to a file, which theCode Interpretercan execute it and return its result to GPT. -
Command: Custom Commands- allows you to create and execute custom commands on your system. -
Command: Files I/O- provides access to the local filesystem, enabling GPT to read and write files, as well as list and create directories. -
Command: Web Search- allows searching the internet and reading web pages. -
Command: Serial port / USB- plugin provides commands for reading and sending data to USB ports. -
Context history (calendar, inline)- provides access to context history database. -
Crontab / Task scheduler- plugin provides cron-based job scheduling - you can schedule tasks/prompts to be sent at any time using cron-based syntax for task setup. -
DALL-E 3: Image Generation (inline)- integrates DALL-E 3 image generation with any chat and mode. Just enable and ask for image in Chat mode, using standard model like GPT-4. The plugin does not require theExecute commandsoption to be enabled. -
GPT-4 Vision (inline)- integrates Vision capabilities with any chat mode, not just Vision mode. When the plugin is enabled, the model temporarily switches to vision in the background when an image attachment or vision capture is provided. -
Real Time- automatically appends the current date and time to the system prompt, informing the model about current time. -
System Prompt Extra (append)- appends additional system prompts (extra data) from a list to every current system prompt. You can enhance every system prompt with extra instructions that will be automatically appended to the system prompt.
Audio Input
The plugin facilitates speech recognition (by default using the Whisper model from OpenAI, Google and Bing are also available). It allows for voice commands to be relayed to the AI using your own voice. Whisper doesn't require any extra API keys or additional configurations; it uses the main OpenAI key. In the plugin's configuration options, you should adjust the volume level (min energy) at which the plugin will respond to your microphone. Once the plugin is activated, a new Speak option will appear at the bottom near the Send button - when this is enabled, the application will respond to the voice received from the microphone.
The plugin can be extended with other speech recognition providers.
Options:
Providerprovider
Choose the provider. Default: Whisper
Available providers:
- Whisper (via
OpenAI API) - Google (via
SpeechRecognitionlibrary) - Google Cloud (via
SpeechRecognitionlibrary) - Microsoft Bing (via
SpeechRecognitionlibrary)
Whisper
Modelwhisper_model
Choose the model. Default: whisper-1
Additional keywords argumentsgoogle_args
Additional keywords arguments for r.recognize_google(audio, **kwargs)
Google Cloud
Additional keywords argumentsgoogle_cloud_args
Additional keywords arguments for r.recognize_google_cloud(audio, **kwargs)
Bing
Additional keywords argumentsbing_args
Additional keywords arguments for r.recognize_bing(audio, **kwargs)
General options
Auto sendauto_send
Automatically send recognized speech as input text after recognition. Default: True
Advanced modeadvanced
Enable only if you want to use advanced mode and the settings below. Do not enable this option if you just want to use the simplified mode (default). Default: False
Advanced mode options
Timeouttimeout
The duration in seconds that the application waits for voice input from the microphone. Default: 5
Phrase max lengthphrase_length
Maximum duration for a voice sample (in seconds). Default: 10
Min energymin_energy
Minimum threshold multiplier above the noise level to begin recording. Default: 1.3
Adjust for ambient noiseadjust_noise
Enables adjustment to ambient noise levels. Default: True
Continuous listencontinuous_listen
Experimental: continuous listening - do not stop listening after a single input.
Warning: This feature may lead to unexpected results and requires fine-tuning with
the rest of the options! If disabled, listening must be started manually
by enabling the Speak option. Default: False
Wait for responsewait_response
Wait for a response before initiating listening for the next input. Default: True
Magic wordmagic_word
Activate listening only after the magic word is provided. Default: False
Reset Magic wordmagic_word_reset
Reset the magic word status after it is received (the magic word will need to be provided again). Default: True
Magic wordsmagic_words
List of magic words to initiate listening (Magic word mode must be enabled). Default: OK, Okay, Hey GPT, OK GPT
Magic word timeoutmagic_word_timeout
The number of seconds the application waits for magic word. Default: 1
Magic word phrase max lengthmagic_word_phrase_length
The minimum phrase duration for magic word. Default: 2
Prefix wordsprefix_words
List of words that must initiate each phrase to be processed. For example, you can define words like "OK" or "GPT"—if set, any phrases not starting with those words will be ignored. Insert multiple words or phrases separated by commas. Leave empty to deactivate. Default: empty
Stop wordsstop_words
List of words that will stop the listening process. Default: stop, exit, quit, end, finish, close, terminate, kill, halt, abort
Options related to Speech Recognition internals:
energy_thresholdrecognition_energy_threshold
Represents the energy level threshold for sounds. Default: 300
dynamic_energy_thresholdrecognition_dynamic_energy_threshold
Represents whether the energy level threshold (see recognizer_instance.energy_threshold) for sounds
should be automatically adjusted based on the currently ambient noise level while listening. Default: True
dynamic_energy_adjustment_dampingrecognition_dynamic_energy_adjustment_damping
Represents approximately the fraction of the current energy threshold that is retained after one second
of dynamic threshold adjustment. Default: 0.15
pause_thresholdrecognition_pause_threshold
Represents the minimum length of silence (in seconds) that will register as the end of a phrase. Default: 0.8
adjust_for_ambient_noise: durationrecognition_adjust_for_ambient_noise_duration
The duration parameter is the maximum number of seconds that it will dynamically adjust the threshold
for before returning. Default: 1
Options reference: https://pypi.org/project/SpeechRecognition/1.3.1/
Audio Output
The plugin lets you turn text into speech using the TTS model from OpenAI or other services like Microsoft Azure, Google, and Eleven Labs. You can add more text-to-speech providers to it too. OpenAI TTS does not require any additional API keys or extra configuration; it utilizes the main OpenAI key.
Microsoft Azure requires to have an Azure API Key. Before using speech synthesis via Microsoft Azure, Google or Eleven Labs, you must configure the audio plugin with your API keys, regions and voices if required.
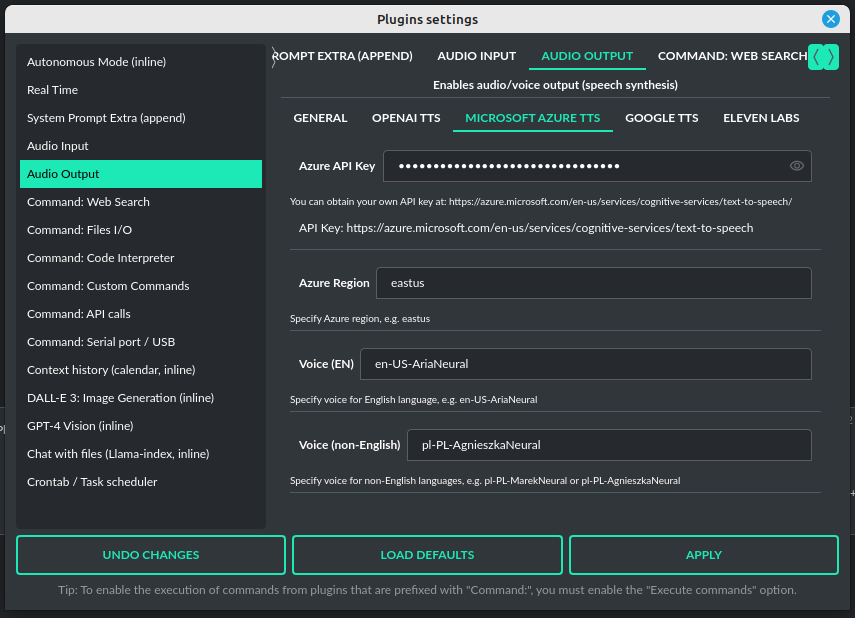
Through the available options, you can select the voice that you want the model to use. More voice synthesis providers coming soon.
To enable voice synthesis, activate the Audio Output plugin in the Plugins menu or turn on the Audio Output option in the Audio / Voice menu (both options in the menu achieve the same outcome).
Options
Providerprovider
Choose the provider. Default: OpenAI TTS
Available providers:
- OpenAI TTS
- Microsoft Azure TTS
- Google TTS
- Eleven Labs TTS
OpenAI Text-To-Speech
Modelopenai_model
Choose the model. Available options:
  - tts-1
  - tts-1-hd
Default: tts-1
Voiceopenai_voice
Choose the voice. Available voices to choose from:
  - alloy
  - echo
  - fable
  - onyx
  - nova
  - shimmer
Default: alloy
Microsoft Azure Text-To-Speech
Azure API Keyazure_api_key
Here, you should enter the API key, which can be obtained by registering for free on the following website: https://azure.microsoft.com/en-us/services/cognitive-services/text-to-speech
Azure Regionazure_region
You must also provide the appropriate region for Azure here. Default: eastus
Voice (EN)azure_voice_en
Here you can specify the name of the voice used for speech synthesis for English. Default: en-US-AriaNeural
Voice (non-English)azure_voice_pl
Here you can specify the name of the voice used for speech synthesis for other non-english languages. Default: pl-PL-AgnieszkaNeural
Google Text-To-Speech
Google Cloud Text-to-speech API Keygoogle_api_key
You can obtain your own API key at: https://console.cloud.google.com/apis/library/texttospeech.googleapis.com
Voicegoogle_voice
Specify voice. Voices: https://cloud.google.com/text-to-speech/docs/voices
Language codegoogle_api_key
Language code. Language codes: https://cloud.google.com/speech-to-text/docs/speech-to-text-supported-languages
Eleven Labs Text-To-Speech
Eleven Labs API Keyeleven_labs_api_key
You can obtain your own API key at: https://elevenlabs.io/speech-synthesis
Voice IDeleven_labs_voice
Voice ID. Voices: https://elevenlabs.io/voice-library
Modeleleven_labs_model
Specify model. Models: https://elevenlabs.io/docs/speech-synthesis/models
If speech synthesis is enabled, a voice will be additionally generated in the background while generating a response via GPT.
Both OpenAI TTS and OpenAI Whisper use the same single API key provided for the OpenAI API, with no additional keys required.
Autonomous Agent (inline)
WARNING: Please use autonomous mode with caution! - this mode, when connected with other plugins, may produce unexpected results!
The plugin activates autonomous mode in standard chat modes, where AI begins a conversation with itself. You can set this loop to run for any number of iterations. Throughout this sequence, the model will engage in self-dialogue, answering his own questions and comments, in order to find the best possible solution, subjecting previously generated steps to criticism.
This mode is similar to Auto-GPT - it can be used to create more advanced inferences and to solve problems by breaking them down into subtasks that the model will autonomously perform one after another until the goal is achieved. The plugin is capable of working in cooperation with other plugins, thus it can utilize tools such as web search, access to the file system, or image generation using DALL-E.
You can adjust the number of iterations for the self-conversation in the Plugins / Settings... menu under the following option:
Iterationsiterations
Default: 3
WARNING: Setting this option to 0 activates an infinity loop which can generate a large number of requests and cause very high token consumption, so use this option with caution!
Promptsprompts
Editable list of prompts used to instruct how to handle autonomous mode, you can create as many prompts as you want. First active prompt on list will be used to handle autonomous mode.
Auto-stop after goal is reachedauto_stop
If enabled, plugin will stop after goal is reached." Default: True
Reverse roles between iterationsreverse_roles
Only for Completion/Langchain modes.
If enabled, this option reverses the roles (AI <> user) with each iteration. For example,
if in the previous iteration the response was generated for "Batman," the next iteration will use that
response to generate an input for "Joker." Default: True
Chat with files (Llama-index, inline)
Plugin integrates Llama-index storage in any chat and provides additional knowledge into context.
Ask Llama-index firstask_llama_first
When enabled, then Llama-index will be asked first, and response will be used as additional knowledge in prompt. When disabled, then Llama-index will be asked only when needed.
Modelmodel_query
Model used for querying Llama-index, default: gpt-3.5-turbo
Indexes IDsidx
Indexes to use, default: base, if you want to use multiple indexes at once then separate them by comma.
Command: API calls
PyGPT lets you connect the model to the external services using custom defined API calls.
To activate this feature, turn on the Command: API calls plugin found in the Plugins menu.
In this plugin you can provide list of allowed API calls, their parameters and request types. The model will replace provided placeholders with required params and make API call to external service.
Your custom API callscmds
You can provide custom API calls on the list here.
Params to specify for API call:
- Enabled (True / False)
- Name: unique API call name (ID)
- Instruction: description for model when and how to use this API call
- GET params: list, separated by comma, GET params to append to endpoint URL
- POST params: list, separated by comma, POST params to send in POST request
- POST JSON: provide the JSON object, template to send in POST JSON request, use
%param%as POST param placeholders - Headers: provide the JSON object with dictionary of extra request headers, like Authorization, API keys, etc.
- Request type: use GET for basic GET request, POST to send encoded POST params or POST_JSON to send JSON-encoded object as body
- Endpoint: API endpoint URL, use
{param}as GET param placeholders
An example API call is provided with plugin by default, it calls the Wikipedia API:
- Name:
search_wiki - Instructiom:
send API call to Wikipedia to search pages by query - GET params:
query, limit - Type:
GET - API endpoint: https://en.wikipedia.org/w/api.php?action=opensearch&limit={limit}&format=json&search={query}
In the above example, every time you ask the model for query Wiki for provided query (e.g. Call the Wikipedia API for query: Nikola Tesla) it will replace placeholders in provided API endpoint URL with a generated query and it will call prepared API endpoint URL, like below:
https://en.wikipedia.org/w/api.php?action=opensearch&limit=5&format=json&search=Nikola%20Tesla
You can specify type of request: GET, POST and POST JSON.
In the POST request you can provide POST params, they will be encoded and send as POST data.
In the POST JSON request you must provide JSON object template to be send, using %param% placeholders in the JSON object to be replaced with the model.
You can also provide any required credentials, like Authorization headers, API keys, tokens, etc. using the headers field - you can provide a JSON object here with a dictionary key => value - provided JSON object will be converted to headers dictonary and send with the request.
Disable SSL verifydisable_ssl
Disables SSL verification when making requests
Timeouttimeout
Connection timeout (seconds)
User agentuser_agent
User agent to use when making requests, default: Mozilla/5.0
Command: Code Interpreter
Executing Code
The plugin operates similarly to the Code Interpreter in ChatGPT, with the key difference that it works locally on the user's system. It allows for the execution of any Python code on the computer that the model may generate. When combined with the Command: Files I/O plugin, it facilitates running code from files saved in the data directory. You can also prepare your own code files and enable the model to use them or add your own plugin for this purpose. You can execute commands and code on the host machine or in Docker container.
Executing system commands
Another feature is the ability to execute system commands and return their results. With this functionality, the plugin can run any system command, retrieve the output, and then feed the result back to the model. When used with other features, this provides extensive integration capabilities with the system.
Tip: always remember to enable the Execute commands option to allow execute commands from the plugins.
Options:
Python command templatepython_cmd_tpl
Python command template (use {filename} as path to file placeholder). Default: python3 {filename}
Enable: Python Code Generate and Executecmd_code_execute
Allows Python code execution (generate and execute from file). Default: True
Enable: Python Code Execute (File)cmd_code_execute_file
Allows Python code execution from existing file. Default: True
Enable: System Command Executecmd_sys_exec
Allows system commands execution. Default: True
Sandbox (docker container)sandbox_docker
Execute commands in sandbox (docker container). Docker must be installed and running. Default: False
Docker imagesandbox_docker_image
Docker image to use for sandbox Default: python:3.8-alpine
Auto-append CWD to sys_execauto_cwd
Automatically append current working directory to sys_exec command. Default: True
Command: Custom Commands
With the Custom Commands plugin, you can integrate PyGPT with your operating system and scripts or applications. You can define an unlimited number of custom commands and instruct GPT on when and how to execute them. Configuration is straightforward, and PyGPT includes a simple tutorial command for testing and learning how it works:
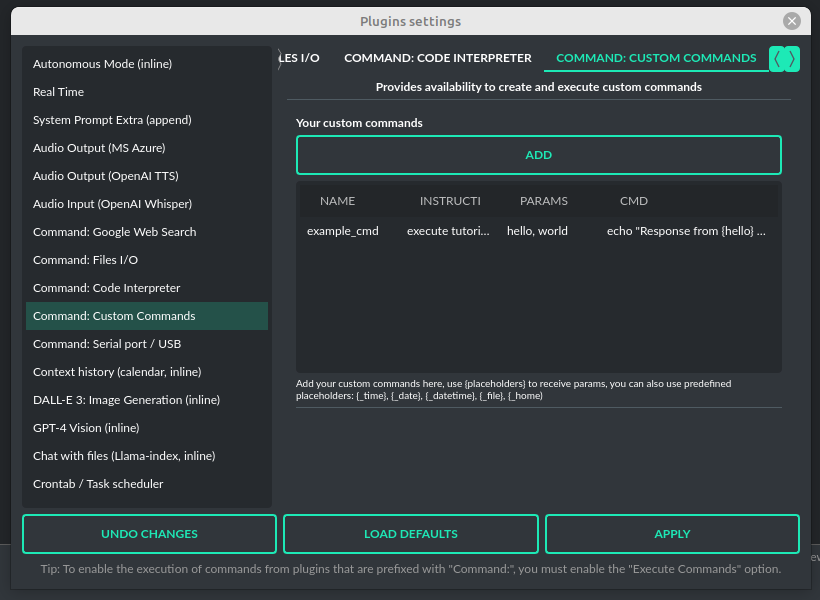
To add a new custom command, click the ADD button and then:
- Provide a name for your command: this is a unique identifier for GPT.
- Provide an
instructionexplaining what this command does; GPT will know when to use the command based on this instruction. - Define
params, separated by commas - GPT will send data to your commands using these params. These params will be placed into placeholders you have defined in thecmdfield. For example:
If you want instruct GPT to execute your Python script named smart_home_lights.py with an argument, such as 1 to turn the light ON, and 0 to turn it OFF, define it as follows:
- name: lights_cmd
- instruction: turn lights on/off; use 1 as 'arg' to turn ON, or 0 as 'arg' to turn OFF
- params: arg
- cmd:
python /path/to/smart_home_lights.py {arg}
The setup defined above will work as follows:
When you ask GPT to turn your lights ON, GPT will locate this command and prepare the command python /path/to/smart_home_lights.py {arg} with {arg} replaced with 1. On your system, it will execute the command:
python /path/to/smart_home_lights.py 1
And that's all. GPT will take care of the rest when you ask to turn ON the lights.
You can define as many placeholders and parameters as you desire.
Here are some predefined system placeholders for use:
{_time}- current time inH:M:Sformat{_date}- current date inY-m-dformat{_datetime}- current date and time inY-m-d H:M:Sformat{_file}- path to the file from which the command is invoked{_home}- path to PyGPT's home/working directory
You can connect predefined placeholders with your own params.
Example:
- name: song_cmd
- instruction: store the generated song on hard disk
- params: song_text, title
- cmd:
echo "{song_text}" > {_home}/{title}.txt
With the setup above, every time you ask GPT to generate a song for you and save it to the disk, it will:
- Generate a song.
- Locate your command.
- Execute the command by sending the song's title and text.
- The command will save the song text into a file named with the song's title in the PyGPT working directory.
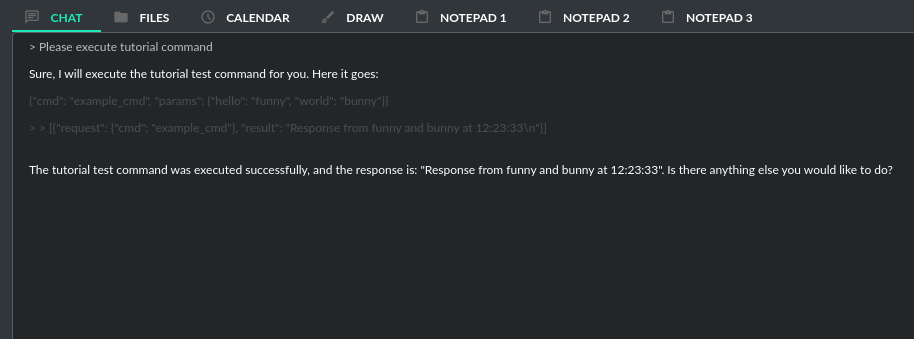
Example tutorial command
PyGPT provides simple tutorial command to show how it works, to run it just ask GPT for execute tutorial test command and it will show you how it works:
> please execute tutorial test command
Command: Files I/O
The plugin allows for file management within the local filesystem. It enables the model to create, read, and write files and directories located in the data directory, which can be found in the user's work directory. With this plugin, the AI can also generate Python code files and thereafter execute that code within the user's system.
Plugin capabilities include:
- Sending files as attachments
- Reading files
- Appending to files
- Writing files
- Deleting files and directories
- Listing files and directories
- Creating directories
- Downloading files
- Copying files and directories
- Moving (renaming) files and directories
- Reading file info
- Indexing files and directories using Llama-index
If a file being created (with the same name) already exists, a prefix including the date and time is added to the file name.
Options:
Enable: Send (upload) file as attachmentcmd_send_file
Allows cmd_send_file command execution. Default: True
Enable: Read filecmd_read_file
Allows read_file command execution. Default: True
Enable: Append to filecmd_append_file
Allows append_file command execution. Default: True
Enable: Save filecmd_save_file
Allows save_file command execution. Default: True
Enable: Delete filecmd_delete_file
Allows delete_file command execution. Default: True
Enable: List files (ls)cmd_list_files
Allows list_dir command execution. Default: True
Enable: List files in dirs in directory (ls)cmd_list_dir
Allows mkdir command execution. Default: True
Enable: Downloading filescmd_download_file
Allows download_file command execution. Default: True
Enable: Removing directoriescmd_rmdir
Allows rmdir command execution. Default: True
Enable: Copying filescmd_copy_file
Allows copy_file command execution. Default: True
Enable: Copying directories (recursive)cmd_copy_dir
Allows copy_dir command execution. Default: True
Enable: Move files and directories (rename)cmd_move
Allows move command execution. Default: True
Enable: Check if path is directorycmd_is_dir
Allows is_dir command execution. Default: True
Enable: Check if path is filecmd_is_file
Allows is_file command execution. Default: True
Enable: Check if file or directory existscmd_file_exists
Allows file_exists command execution. Default: True
Enable: Get file sizecmd_file_size
Allows file_size command execution. Default: True
Enable: Get file infocmd_file_info
Allows file_info command execution. Default: True
Enable: Get current working directorycmd_cwd
Allows cwd command execution. Default: True
Enable: indexing filescmd_file_index
If enabled, model will be able to index file or directory using Llama-index (file_index command). Default: True
Index to use when indexing filesidx
ID of index to use for files indexing. Default: base
Use data loadersuse_loaders
Use data loaders from Llama-index for file reading (read_file command). Default: True
Auto index reading filesauto_index
If enabled, every time file is read, it will be automatically indexed. Default: False
Only index reading filesonly_index
If enabled, file will be indexed without return its content on file read. Default: False
Command: Web Search
PyGPT lets you connect GPT to the internet and carry out web searches in real time as you make queries.
To activate this feature, turn on the Command: Web Search plugin found in the Plugins menu.
Web searches are provided by Google Custom Search Engine and Microsoft Bing APIs and can be extended with other search engine providers.
Options
Providerprovider
Choose the provider. Default: OpenAI TTS
Available providers:
- Microsoft Bing
To use this provider, you need an API key, which you can obtain by registering an account at:
https://developers.google.com/custom-search/v1/overview
After registering an account, create a new project and select it from the list of available projects:
https://programmablesearchengine.google.com/controlpanel/all
After selecting your project, you need to enable the Whole Internet Search option in its settings.
Then, copy the following two items into PyGPT:
Api KeyCX ID
These data must be configured in the appropriate fields in the Plugins / Settings... menu:
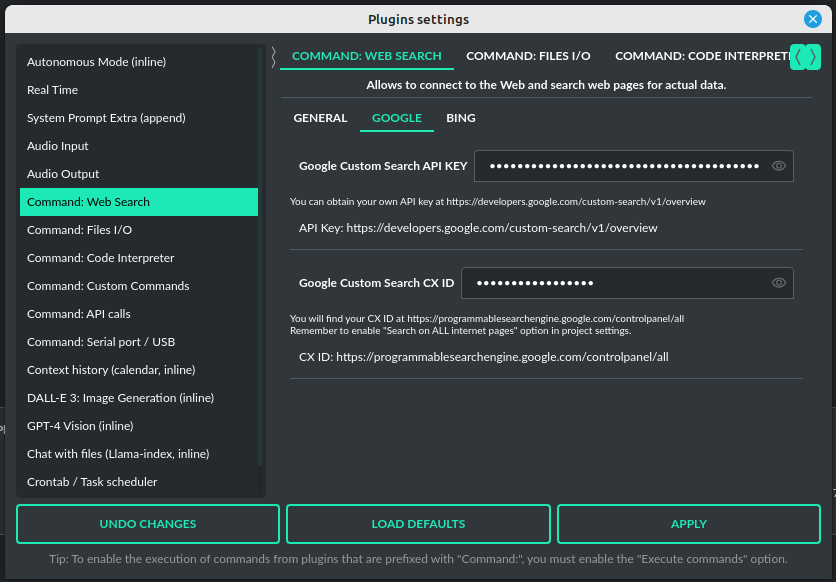
Google Custom Search API KEYgoogle_api_key
You can obtain your own API key at https://developers.google.com/custom-search/v1/overview
Google Custom Search CX IDgoogle_api_cx
You will find your CX ID at https://programmablesearchengine.google.com/controlpanel/all - remember to enable "Search on ALL internet pages" option in project settings.
Microsoft Bing
Bing Search API KEYbing_api_key
You can obtain your own API key at https://www.microsoft.com/en-us/bing/apis/bing-web-search-api
Bing Search API endpointbing_endpoint
API endpoint for Bing Search API, default: https://api.bing.microsoft.com/v7.0/search
General options
Number of pages to searchnum_pages
Number of max pages to search per query
Max content charactersmax_page_content_length
Max characters of page content to get (0 = unlimited)
Per-page content chunk sizechunk_size
Per-page content chunk size (max characters per chunk)
Disable SSL verifydisable_ssl
Disables SSL verification when crawling web pages
Timeouttimeout
Connection timeout (seconds)
User agentuser_agent
User agent to use when making requests, default: Mozilla/5.0
Max result lengthmax_result_length
Max length of summarized result (characters)
Max summary tokenssummary_max_tokens
Max tokens in output when generating summary
Enable: "web_search" commandcmd_web_search
If enabled, model will be able to search the Web
Enable: "web_url_open" commandcmd_web_url_open
If enabled, model will be able to open specified URL and summarize content
Enable: "web_url_raw" commandcmd_web_url_raw
If enabled, model will be able to open specified URL and get raw content
Enable: "web_urls" commandcmd_web_urls
If enabled, model will be able to search the Web and get founded URLs list
If enabled, model will be able to search the Web and get founded URLs list
Enable: "web_index" commandcmd_web_index
If enabled, model will be able to index web pages using Llama-index
Auto-index all used URLs using Llama-indexauto_index
If enabled, every URL used by the model will be automatically indexed using Llama-index
Index to useidx
ID of index to use for web page indexing
Model used for web page summarizesummary_model
Model used for web page summarize, default: gpt-3.5-turbo-1106
Summarize promptprompt_summarize
Prompt used for web search results summarize, use {query} as a placeholder for search query
Summarize prompt (URL open)prompt_summarize_url
Prompt used for specified URL page summarize
Syntax: web_searchsyntax_web_search
Syntax for web_search command
Syntax: web_url_opensyntax_web_url_open
Syntax for web_url_open command
Syntax: web_url_rawsyntax_web_url_raw
Syntax for web_url_raw command
Syntax: web_urlssyntax_web_urls
Syntax for web_urls command
Syntax: web_indexsyntax_web_index
Syntax for web_index command
Command: Serial port / USB
Provides commands for reading and sending data to USB ports.
Tip: in Snap version you must connect the interface first: https://snapcraft.io/docs/serial-port-interface
You can send commands to, for example, an Arduino or any other controllers using the serial port for communication.
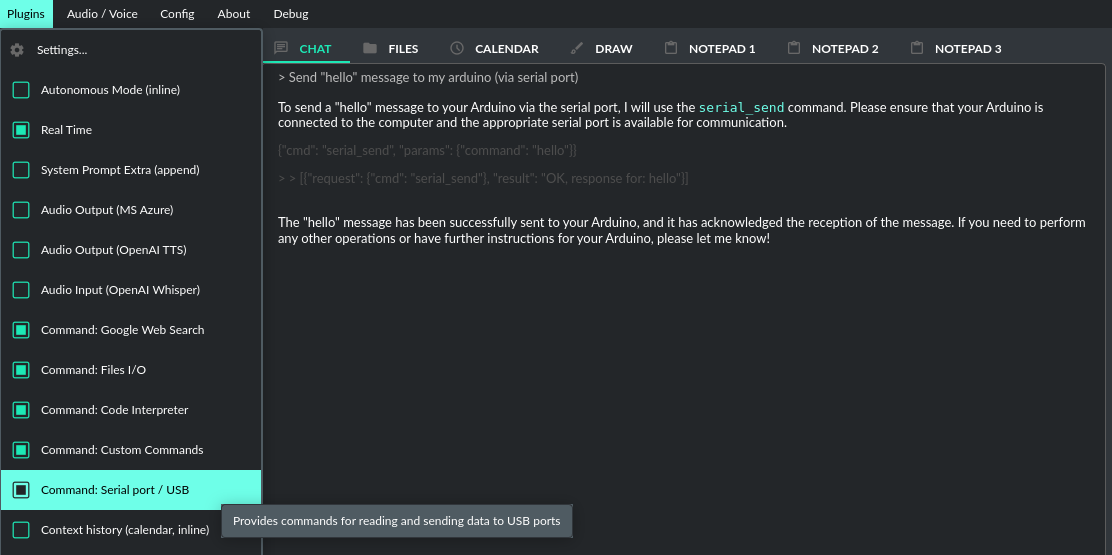
Above is an example of co-operation with the following code uploaded to Arduino Uno and connected via USB:
// example.ino

void setup() {
  Serial.begin(9600);
}

void loop() {
  if (Serial.available() > 0) {
    String input = Serial.readStringUntil('\n');
    if (input.length() > 0) {
      Serial.println("OK, response for: " + input);
    }
  }
}
Options
USB portserial_port
USB port name, e.g. /dev/ttyUSB0, /dev/ttyACM0, COM3 Default: /dev/ttyUSB0
Connection speed (baudrate, bps)serial_bps
Port connection speed, in bps Default: 9600
Timeouttimeout
Timeout in seconds Default: 1
Sleepsleep
Sleep in seconds after connection Default: 2
Enable: Send text commands to USB portcmd_serial_send
Allows serial_send command execution" Default: True
Enable: Send raw bytes to USB portcmd_serial_send_bytes
Allows serial_send_bytes command execution Default: True
Enable: Read data from USB portcmd_serial_read
Allows serial_read command execution Default: True
Syntax: serial_sendsyntax_serial_send
Syntax for sending text command to USB port Default: "serial_send": send text command to USB port, params: "command"
Syntax: serial_send_bytessyntax_serial_send_bytes
Syntax for sending raw bytes to USB port Default: "serial_send_bytes": send raw bytes to USB port, params: "bytes"
Syntax: serial_readsyntax_serial_read
Syntax for reading data from USB port Default: "serial_read": read data from serial port in seconds duration, params: "duration"
Context history (calendar, inline)
Provides access to context history database. Plugin also provides access to reading and creating day notes.
Examples of use, you can ask e.g. for the following:
Give me today day note
Save a new note for today
Update my today note with...
Get the list of yesterday conversations
Get contents of conversation ID 123
etc.
From version 2.0.147 it is possible to use @ ID tags to automatically use summary of previous contexts in current discussion.
To use context from previous discussion with specified ID use following syntax in your query:
@123
Where 123 is the ID of previous context (conversation) in database, example of use:
Let's talk about discussion @123
Options
Enable: using context @ ID tagsuse_tags
When enabled, it allows to automatically retrieve context history using @ tags, e.g. use @123 in question to use summary of context with ID 123 as additional context. Default: False
Enable: get date range context listcmd_get_ctx_list_in_date_range
When enabled, it allows getting the list of context history (previous conversations). Default: True
Enable: get context content by IDcmd_get_ctx_content_by_id
When enabled, it allows getting summarized content of context with defined ID. Default: True
Enable: count contexts in date rangecmd_count_ctx_in_date
When enabled, it allows counting contexts in date range. Default: True
Enable: get day notecmd_get_day_note
When enabled, it allows retrieving day note for specific date. Default: True
Enable: add day notecmd_add_day_note
When enabled, it allows adding day note for specific date. Default: True
Enable: update day notecmd_update_day_note
When enabled, it allows updating day note for specific date. Default: True
Enable: remove day notecmd_remove_day_note
When enabled, it allows removing day note for specific date. Default: True
Modelmodel_summarize
Model used for summarize. Default: gpt-3.5-turbo
Max summary tokenssummary_max_tokens
Max tokens in output when generating summary. Default: 1500
Max contexts to retrievectx_items_limit
Max items in context history list to retrieve in one query. 0 = no limit. Default: 30
Per-context items content chunk sizechunk_size
Per-context content chunk size (max characters per chunk). Default: 100000 chars
Options (advanced)
Syntax: get_ctx_list_in_date_rangesyntax_get_ctx_list_in_date_range
Syntax for get_ctx_list_in_date_range command.
Syntax: get_ctx_content_by_idsyntax_get_ctx_content_by_id
Syntax for get_ctx_content_by_id command.
Syntax: count_ctx_in_datesyntax_count_ctx_in_date
Syntax for count_ctx_in_date command
Syntax: get_day_notesyntax_get_day_note
Syntax for get_day_note command
Syntax: add_day_notesyntax_add_day_note
Syntax for add_day_note command.
Syntax: update_day_notesyntax_update_day_note
Syntax for update_day_note command.
Syntax: remove_day_notesyntax_remove_day_note
Syntax for remove_day_note command.
Prompt: @ tags (system)prompt_tag_system
Prompt for use @ tag (system).
Prompt: @ tags (summary)prompt_tag_summary
Prompt for use @ tag (summary).
Crontab / Task scheduler
Plugin provides cron-based job scheduling - you can schedule tasks/prompts to be sent at any time using cron-based syntax for task setup.
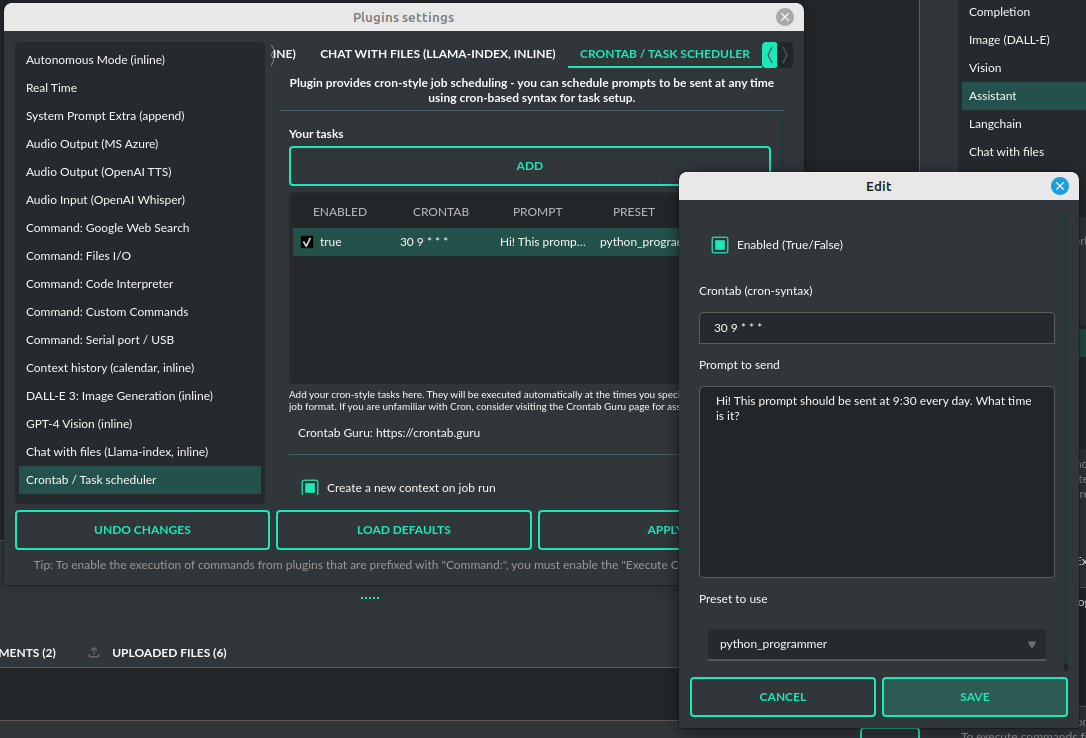
Your taskscrontab
Add your cron-style tasks here. They will be executed automatically at the times you specify in the cron-based job format. If you are unfamiliar with Cron, consider visiting the Cron Guru page for assistance: https://crontab.guru
Number of active tasks is always displayed in a tray dropdown menu:
Create a new context on job runnew_ctx
If enabled, then a new context will be created on every run of the job. Default: True
Show notification on job runshow_notify
If enabled, then a tray notification will be shown on every run of the job. Default: True
DALL-E 3: Image Generation (inline)
The plugin integrates DALL-E 3 image generation with any chat mode. Simply enable it and request an image in Chat mode, using a standard model such as GPT-4. The plugin does not require the Execute commands option to be enabled.
Options
Promptprompt
The prompt is used to generate a query for the DALL-E image generation model, which runs in the background.
GPT-4 Vision (inline)
The plugin integrates vision capabilities across all chat modes, not just Vision mode. Once enabled, it allows the model to seamlessly switch to vision processing in the background whenever an image attachment or vision capture is detected.
Tip: When using Vision (inline) by utilizing a plugin in standard mode, such as Chat (not Vision mode), the + Vision special checkbox will appear at the bottom of the Chat window. It will be automatically enabled any time you provide content for analysis (like an uploaded photo). When the checkbox is enabled, the vision model is used. If you wish to exit the vision model after image analysis, simply uncheck the checkbox. It will activate again automatically when the next image content for analysis is provided.
Options
Modelmodel
The model used to temporarily provide vision capabilities; default is gpt-4-vision-preview.
Promptprompt
The prompt used for vision mode. It will append or replace current system prompt when using vision model.
Replace promptreplace_prompt
Replace whole system prompt with vision prompt against appending it to the current prompt.
Enable: "camera capture" commandcmd_capture
Allows using command: camera capture (Execute commands option enabled is required).
If enabled, model will be able to capture images from camera itself.
Enable: "make screenshot" commandcmd_screenshot
Allows using command: make screenshot (Execute commands option enabled is required).
If enabled, model will be able to making screenshots itself.
Real Time
This plugin automatically adds the current date and time to each system prompt you send. You have the option to include just the date, just the time, or both.
When enabled, it quietly enhances each system prompt with current time information before sending it to GPT.
Options
Append timehour
If enabled, it appends the current time to the system prompt. Default: True
Append datedate
If enabled, it appends the current date to the system prompt. Default: True
Templatetpl
Template to append to the system prompt. The placeholder {time} will be replaced with the
current date and time in real-time. Default: Current time is {time}.
System Prompt Extra (append)
The plugin appends additional system prompts (extra data) from a list to every current system prompt. You can enhance every system prompt with extra instructions that will be automatically appended to the system prompt.
Options
Promptsprompts
List of extra prompts - prompts that will be appended to system prompt. All active extra prompts defined on list will be appended to the system prompt in the order they are listed here.
Creating Your Own Plugins
You can create your own plugin for PyGPT at any time. The plugin can be written in Python and then registered with the application just before launching it. All plugins included with the app are stored in the plugin directory - you can use them as coding examples for your own plugins.
PyGPT can be extended with:
-
Custom plugins
-
Custom LLMs wrappers
-
Custom vector store providers
-
Custom data loaders
-
Custom audio input providers
-
Custom audio output providers
-
Custom web search engine providers
Examples (tutorial files)
See the examples directory in this repository with examples of custom launcher, plugin, vector store, LLM (Langchain and Llama-index) provider and data loader:
-
examples/custom_launcher.py -
examples/example_audio_input.py -
examples/example_audio_output.py -
examples/example_data_loader.py -
examples/example_llm.py -
examples/example_plugin.py -
examples/example_vector_store.py -
examples/example_web_search.py
These example files can be used as a starting point for creating your own extensions for PyGPT.
Extending PyGPT with custom plugins, LLMs wrappers and vector stores:
-
You can pass custom plugin instances, LLMs wrappers and vector store providers to the launcher.
-
This is useful if you want to extend PyGPT with your own plugins, vectors storage and LLMs.
To register custom plugins:
- Pass a list with the plugin instances as
pluginskeyword argument.
To register custom LLMs wrappers:
- Pass a list with the LLMs wrappers instances as
llmskeyword argument.
To register custom vector store providers:
- Pass a list with the vector store provider instances as
vector_storeskeyword argument.
To register custom data loaders:
- Pass a list with the data loader instances as
loaderskeyword argument.
To register custom audio input providers:
- Pass a list with the audio input provider instances as
audio_inputkeyword argument.
To register custom audio output providers:
- Pass a list with the audio output provider instances as
audio_outputkeyword argument.
To register custom web providers:
- Pass a list with the web provider instances as
webkeyword argument.
Example:
# custom_launcher.py

from pygpt_net.app import run
from plugins import CustomPlugin, OtherCustomPlugin
from llms import CustomLLM
from vector_stores import CustomVectorStore

plugins = [
    CustomPlugin(),
    OtherCustomPlugin(),
]
llms = [
    CustomLLM(),
]
vector_stores = [
    CustomVectorStore(),
]

run(
    plugins=plugins,
    llms=llms,
    vector_stores=vector_stores
)
Handling events
In the plugin, you can receive and modify dispatched events.
To do this, create a method named handle(self, event, *args, **kwargs) and handle the received events like here:
# custom_plugin.py

from pygpt_net.core.dispatcher import Event


def handle(self, event: Event, *args, **kwargs):
    """
    Handle dispatched events

    :param event: event object
    """
    name = event.name
    data = event.data
    ctx = event.ctx

    if name == Event.INPUT_BEFORE:
        self.some_method(data['value'])
    elif name == Event.CTX_BEGIN:
        self.some_other_method(ctx)
    else:
    	# ...
List of Events
Event names are defined in Event class in pygpt_net.core.dispatcher.Event.
Syntax: event name - triggered on, event data (data type):
-
AI_NAME- when preparing an AI name,data['value'](string, name of the AI assistant) -
AUDIO_INPUT_STOP- force stop audio input -
AUDIO_INPUT_TOGGLE- when speech input is enabled or disabled,data['value'](bool, True/False) -
AUDIO_OUTPUT_STOP- force stop audio output -
AUDIO_OUTPUT_TOGGLE- when speech output is enabled or disabled,data['value'](bool, True/False) -
AUDIO_READ_TEXT- on text read with speech synthesis,data['value'](str) -
CMD_EXECUTE- when a command is executed,data['commands'](list, commands and arguments) -
CMD_INLINE- when an inline command is executed,data['commands'](list, commands and arguments) -
CMD_SYNTAX- when appending syntax for commands,data['prompt'], data['syntax'](string, list, prompt and list with commands usage syntax) -
CMD_SYNTAX_INLINE- when appending syntax for commands (inline mode),data['prompt'], data['syntax'](string, list, prompt and list with commands usage syntax) -
CTX_AFTER- after the context item is sent,ctx -
CTX_BEFORE- before the context item is sent,ctx -
CTX_BEGIN- when context item create,ctx -
CTX_END- when context item handling is finished,ctx -
CTX_SELECT- when context is selected on list,data['value'](int, ctx meta ID) -
DISABLE- when the plugin is disabled,data['value'](string, plugin ID) -
ENABLE- when the plugin is enabled,data['value'](string, plugin ID) -
FORCE_STOP- on force stop plugins -
INPUT_BEFORE- upon receiving input from the textarea,data['value'](string, text to be sent) -
MODE_BEFORE- before the mode is selecteddata['value'], data['prompt'](string, string, mode ID) -
MODE_SELECT- on mode selectdata['value'](string, mode ID) -
MODEL_BEFORE- before the model is selecteddata['value'](string, model ID) -
MODEL_SELECT- on model selectdata['value'](string, model ID) -
PLUGIN_SETTINGS_CHANGED- on plugin settings update -
PLUGIN_OPTION_GET- on request for plugin option valuedata['name'], data['value'](string, any, name of requested option, value) -
POST_PROMPT- after preparing a system prompt,data['value'](string, system prompt) -
PRE_PROMPT- before preparing a system prompt,data['value'](string, system prompt) -
SYSTEM_PROMPT- when preparing a system prompt,data['value'](string, system prompt) -
UI_ATTACHMENTS- when the attachment upload elements are rendered,data['value'](bool, show True/False) -
UI_VISION- when the vision elements are rendered,data['value'](bool, show True/False) -
USER_NAME- when preparing a user's name,data['value'](string, name of the user) -
USER_SEND- just before the input text is sent,data['value'](string, input text)
You can stop the propagation of a received event at any time by setting stop to True:
event.stop = True
Functions and commands execute
Tip: gpt-4-1106-preview is the best model to use for command handling, The gpt-4-turbo-preview model can sometimes refuse to execute commands.
PyGPT uses an internal syntax to define commands and their parameters, which can then be used by the model and executed on the application side or even directly in the system. This syntax looks as follows (example command below):
~###~{"cmd": "send_email", "params": {"quote": "Why don't skeletons fight each other? They don't have the guts!"}}~###~
It is JSON wrapped between ~###~. The application extracts the JSON object from such formatted text and executes the appropriate function based on the provided parameters and command name. Many of these types of commands are defined in plugins (e.g., those used for file operations or internet searches). You can also define your own commands using the Custom Commands plugin, or simply by creating your own plugin and adding it to the application.
Tip: The Execute commands option checkbox must be enabled to allow the execution of commands from plugins. Disable the option if you do not want to use commands, to prevent additional token usage (as the command execution system prompt consumes additional tokens).
A special system prompt responsible for invoking commands is added to the main system prompt if the Execute commands option is active.
However, there is an additional possibility to define your own commands and execute them with the help of GPT. These are functions - defined on the OpenAI API side and described using JSON objects. You can find a complete guide on how to define functions here:
https://platform.openai.com/docs/guides/function-calling
https://cookbook.openai.com/examples/how_to_call_functions_with_chat_models
From version 2.0.150, PyGPT offers compatibility of these functions with commands used in the application. All you need to do is define the appropriate functions using the syntax required by OpenAI, and PyGPT will do the rest, translating such syntax on the fly into its own internal format.
You can define functions for modes: Chat and Assistants.
Note that - in Chat mode, they should be defined in Presets, and for Assistants, in the Assistant settings.
Example of usage:
- Chat
Create a new Preset, open the Preset edit dialog and add a new function using + Function button with the following content:
Name: send_email
Description: Sends a quote using email
Params (JSON):
{
        "type": "object",
        "properties": {
            "quote": {
                "type": "string",
                "description": "A generated funny quote"
            }
        },
        "required": [
            "quote"
        ]
}
Then, in the Custom Commands plugin, create a new command with the same name and the same parameters:
Command name: send_email
Instruction/prompt: send mail (don't needed, because it will be called on OpenAI side)
Params list: quote
Command to execute: echo "OK. Email sent: {quote}"
At next, enable the Execute commands option and enable the plugin.
Ask GPT in Chat mode:
Create a funny quote and email it
In response you will receive prepared command, like this:
~###~{"cmd": "send_email", "params": {"quote": "Why do we tell actors to 'break a leg?' Because every play has a cast!"}}~###~
After receiving this, PyGPT will execute the system echo command with params given from params field and replacing {quote} placeholder with quote param value.
As a result, response like this will be sent to the model:
[{"request": {"cmd": "send_email"}, "result": "OK. Email sent: Why do we tell actors to 'break a leg?' Because every play has a cast!"}]
- Assistant
In this mode (via Assistants API), it should be done similarly, with the difference that here the functions should be defined in the assistant's settings.
With this flow you can use both forms - OpenAI and PyGPT - to define and execute commands and functions in the application. They will cooperate with each other and you can use them interchangeably.
Token usage calculation
Input tokens
The application features a token calculator. It attempts to forecast the number of tokens that a particular query will consume and displays this estimate in real time. This gives you improved control over your token usage. The app provides detailed information about the tokens used for the user's prompt, the system prompt, any additional data, and those used within the context (the memory of previous entries).
Remember that these are only approximate calculations and do not include, for example, the number of tokens consumed by some plugins. You can find the exact number of tokens used on the OpenAI website.

Total tokens
After receiving a response from the model, the application displays the actual total number of tokens used for the query (received from the API).
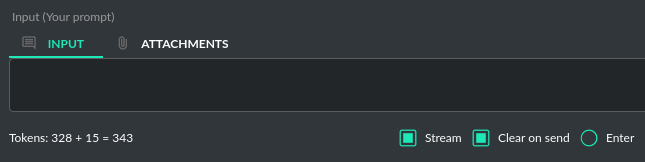
Configuration
Settings
The following basic options can be modified directly within the application:
Config -> Settings...
General
-
OpenAI API KEY: The personal API key you'll need to enter into the application for it to function. -
OpenAI ORGANIZATION KEY: The organization's API key, which is optional for use within the application. -
Number of notepads: Number of notepad tabs. Restart of the application is required for this option to take effect. -
Minimize to tray on exit: Minimize to tray icon on exit. Tray icon enabled is required for this option to work. Default: False.
Layout
-
Font Size (chat window): Adjusts the font size in the chat window. -
Font Size (input): Adjusts the font size in the input window. -
Font Size (ctx list): Adjusts the font size in contexts list. -
Font Size (toolbox): Adjusts the font size in toolbox on right. -
Layout density: Adjusts layout elements density. Default: -1. -
DPI scaling: Enable/disable DPI scaling. Restart of the application is required for this option to take effect. Default: True. -
DPI factor: DPI factor. Restart of the application is required for this option to take effect. Default: 1.0. -
Display tips (help descriptions): Display help tips, Default: True. -
Store dialog window positions: Enable or disable dialogs positions store/restore, Default: True. -
Use theme colors in chat window: Use color theme in chat window, Default: True. -
Disable markdown formatting in output: Enables plain-text display in output window, Default: False.
Files and attachments
-
Store attachments in the workdir upload directory: Enable to store a local copy of uploaded attachments for future use. Default: True -
Store images, capture and upload in data directory: Enable to store everything in single data directory. Default: False -
Directory for file downloads: Subdirectory for downloaded files, e.g. in Assistants mode, inside "data". Default: "download"
Context
-
Context Threshold: Sets the number of tokens reserved for the model to respond to the next prompt. -
Limit of last contexts on list to show (0 = unlimited): Limit of the last contexts on list, default: 0 (unlimited) -
Use Context: Toggles the use of conversation context (memory of previous inputs). -
Store History: Toggles conversation history store. -
Store Time in History: Chooses whether timestamps are added to the .txt files. -
Context Auto-summary: Enables automatic generation of titles for contexts, Default: True. -
Lock incompatible modes: If enabled, the app will create a new context when switched to an incompatible mode within an existing context. -
Search also in conversation content, not only in titles: When enabled, context search will also consider the content of conversations, not just the titles of conversations. -
Model used for auto-summary: Model used for context auto-summary (default: gpt-3.5-turbo-1106). -
Prompt (sys): auto summary: System prompt for context auto-summary. -
Prompt (user): auto summary: User prompt for context auto-summary.
Models
-
Max Output Tokens: Determines the maximum number of tokens the model can generate for a single response. -
Max Total Tokens: Defines the maximum token count that the application can send to the model, including the conversation context. -
Temperature: Sets the randomness of the conversation. A lower value makes the model's responses more deterministic, while a higher value increases creativity and abstraction. -
Top-p: A parameter that influences the model's response diversity, similar to temperature. For more information, please check the OpenAI documentation. -
Frequency Penalty: Decreases the likelihood of repetition in the model's responses. -
Presence Penalty: Discourages the model from mentioning topics that have already been brought up in the conversation. -
Prompt (append): command execute instruction: Prompt for appending command execution instructions.
Images
-
DALL-E Image size: The resolution of the generated images (DALL-E). Default: 1792x1024. -
DALL-E Image quality: The image quality of the generated images (DALL-E). Default: standard. -
Open image dialog after generate: Enable the image dialog to open after an image is generated in Image mode. -
DALL-E: Prompt (sys): prompt generation: Prompt for generating prompts for DALL-E (if RAW mode is disabled). -
DALL-E: prompt generation model: Model used for generating prompts for DALL-E (if RAW mode is disabled).
Vision
-
Vision: Camera capture width (px): Video capture resolution (width). -
Vision: Camera capture height (px): Video capture resolution (height). -
Vision: Camera IDX (number): Video capture camera index (number of camera). -
Vision: Image capture quality: Video capture image JPEG quality (%).
Indexes (Llama-index)
-
Indexes: List of created indexes. -
Auto-index DB in real time: Enables conversation context auto-indexing. -
Recursive directory indexing: Enables recursive directory indexing, default is False. -
Replace old document versions in the index during re-indexing: If enabled, previous versions of documents will be deleted from the index when the newest versions are indexed, default is True. -
Vector Store: Vector store in use (vector database provided by Llama-index). -
Excluded file extensions: File extensions to exclude if no data loader for this extension, separated by comma. -
Vector Store (**kwargs): Arguments for vector store (api_key, index_name, etc.). -
Additional online data loaders: List of online data loaders from Llama Hub to use. Only for Python version, will not work in compiled version. -
DB (ALL), DB (UPDATE), FILES (ALL): Index the data – batch indexing is available here.
Agent (autonomous)
-
Sub-mode to use: Sub-mode to use in Agent mode (chat, completion, langchain, llama_index, etc.). Default: chat. -
Index to use: Only if sub-mode is llama_index (Chat with files), choose the index to use in Agent mode. -
Display a tray notification when the goal is achieved.: If enabled, a notification will be displayed after goal achieved / finished run.
Updates
-
Check for updates on start: Enables checking for updates on start. Default: True. -
Check for updates in background: Enables checking for updates in background (checking every 5 minutes). Default: True.
Developer
-
Show debug menu: enables debug (developer) menu -
Log llama-index usages to console: Enables logging llama-index usages to console.
JSON files
The configuration is stored in JSON files for easy manual modification outside of the application. These configuration files are located in the user's work directory within the following subdirectory:
{HOME_DIR}/.config/pygpt-net/
Notepad
The application has a built-in notepad, divided into several tabs. This can be useful for storing information in a convenient way, without the need to open an external text editor. The content of the notepad is automatically saved whenever the content changes.
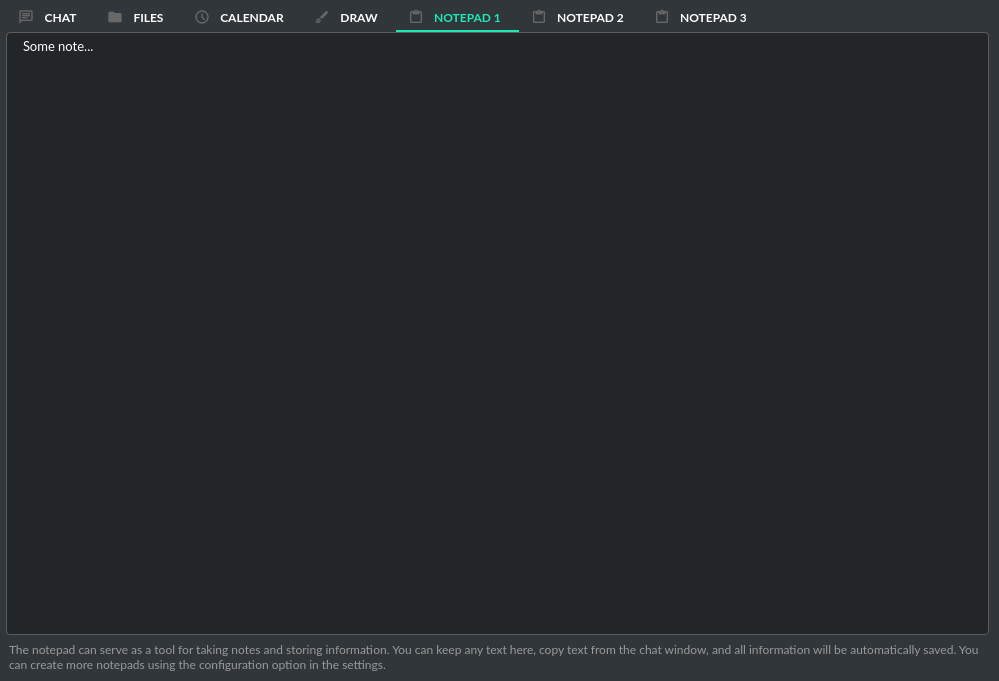
Advanced configuration
Manual configuration
You can manually edit the configuration files in this directory (this is your work directory):
{HOME_DIR}/.config/pygpt-net/
assistants.json- stores the list of assistants.attachments.json- stores the list of current attachments.config.json- stores the main configuration settings.models.json- stores models configurations.capture- a directory for captured images from camera and screenshotscss- a directory for CSS stylesheets (user override)history- a directory for context history in.txtformat.idx-Llama-indexindexesimg- a directory for images generated withDALL-E 3andDALL-E 2, saved as.pngfiles.locale- a directory for locales (user override)data- a directory for data files and files downloaded/generated by GPT.presets- a directory for presets stored as.jsonfiles.upload- a directory for local copies of attachments coming from outside the workdirdb.sqlite- a database with contexts, notepads and indexes data recordsapp.log- a file with error and debug log
Translations / Locale
Locale .ini files are located in the app directory:
./data/locale
This directory is automatically scanned when the application launches. To add a new translation, create and save the file with the appropriate name, for example:
locale.es.ini
This will add Spanish as a selectable language in the application's language menu.
Overwriting CSS and locales with your own files:
You can also overwrite files in the locale and css app directories with your own files in the user directory.
This allows you to overwrite language files or CSS styles in a very simple way - by just creating files in your working directory.
{HOME_DIR}/.config/pygpt-net/
locale- a directory for locales in.iniformat.css- a directory for CSS styles in.cssformat.
Debugging and Logging
In Settings -> Developer dialog, you can enable the Show debug menu option to turn on the debugging menu. The menu allows you to inspect the status of application elements. In the debugging menu, there is a Logger option that opens a log window. In the window, the program's operation is displayed in real-time.
Logging levels:
By default, all errors and exceptions are logged to the file:
{HOME_DIR}/.config/pygpt-net/app.log
To increase the logging level (ERROR level is default), run the application with --debug argument:
python3 run.py --debug=1
or
python3 run.py --debug=2
The value 1 enables the INFOlogging level.
The value 2 enables the DEBUG logging level (most information).
Updates
Updating PyGPT
PyGPT comes with an integrated update notification system. When a new version with additional features is released, you'll receive an alert within the app.
To get the new version, simply download it and start using it in place of the old one. All your custom settings like configuration, presets, indexes, and past conversations will be kept and ready to use right away in the new version.
Coming soon
- Enhanced integration with Langchain
- More vector databases support
- Development of autonomous agents
DISCLAIMER
This application is not officially associated with OpenAI. The author shall not be held liable for any damages resulting from the use of this application. It is provided "as is," without any form of warranty. Users are reminded to be mindful of token usage - always verify the number of tokens utilized by the model on the OpenAI website and engage with the application responsibly. Activating plugins, such as Web Search, may consume additional tokens that are not displayed in the main window.
Always monitor your actual token usage on the OpenAI website.
CHANGELOG
Recent changes:
2.1.0 (2024-02-28)
- Upgraded Llama-index from the legacy version
0.9to the current version0.10(note: upgrading PyPi version of PyGPT to2.1.0requires reinstallation in a virtual environment to remove old library versions). - Upgraded Langchain to
0.1.9. - Upgraded PyInstaller (and compiled versions) to version
6. - Removed LlamaHub and restored support for Python
3.12. - Fixed imports for Llama-index in the compiled versions.
- Added icons for quickly toggling audio input/output.
- UI fixes.
2.0.171 (2024-02-27)
- Added core for loading web resources (not only webpages) to Llama-index.
- Added a data loader for transcriptions of YouTube videos (simply ask for index a YouTube video URL using the
Command: Web Searchplugin - theweb_indexcommand must be enabled). - Fixed the "Initial token count exceeds token limit" error in Chat with files mode.
- Added missing translations for dictionary items in settings dialogs.
2.0.170 (2024-02-26)
- Added "simplified" mode to the "Audio Input" plugin, now set as default, allowing for faster and simpler speech recognition without requiring any configuration. Meanwhile, all current options have been moved to "advanced" mode.
- Improved microphone support in Snap version.
- Improved file browser update after performing file operations.
- Added check for file availability for indexing in the file browser.
2.0.169 (2024-02-25)
- Improved and refactored debugging
2.0.168 (2024-02-25)
- Added auto index file on read option in the
Files I/Oplugin - Improved debugger
- Fixed Bing speech recognition
2.0.167 (2024-02-25)
- Fixed empty API key dialog.
2.0.166 (2024-02-25)
- Enabled the use of data loaders from Llama-index in the
Files I/Oplugin for reading files, which allows for reading not only text files using the plugin'sread_filecommand. - Added a command for indexing files to the
Files I/Oplugin. - The
self_loopplugin has been internally renamed to theagentplugin. - Fixed the display of pinned contexts when the indexed filter is enabled.
2.0.165 (2024-02-25)
- Added search provider:
Bing. - Added audio output providers:
GoogleandEleven Labs. - Added audio input providers:
Google,Google Cloud, andBing. - Added a new plugin:
Command: API callswhich allows defining commands for API calls to external services. - Added an
Excluded file extensionsconfiguration option inSettings -> Llama-index. - Fixed audio input listener initialization in the Audio Input plugin.
2.0.164 (2024-02-24)
- Refactored the Audio Input, Audio Output, and Google Web Search plugins to support multiple audio and search engine providers.
- Introduced the option to add your own audio input, output, and web search providers.
2.0.163 (2024-02-23)
- Added storage of indexed urls
- Added info about used library versions in About dialog
2.0.162 (2024-02-23)
- Index data storage migrated from JSON to DB.
- Added add/remove to index context menu on ctx list.
- Added last indexed info on ctx list.
- Added option "Replace old document versions in the index during re-indexing" in "Settings -> Llama-index".
- Refactored, optimized and improved file and context indexing.
- Fixed context search SQL query.
2.0.161 (2024-02-22)
- Added the option to search within conversation content, not just by titles (disabled by default, can be enabled in: "Settings -> Context -> Search also in conversation content, not only in titles").
- Added a "download" subdirectory for files downloaded in Assistants mode and an option to configure the directory in: "Settings -> Files and attachments -> Directory for file downloads")
- Added logging of options available in: "Config -> Debug" to the logger window, not just to the console.
- Added descriptions in the models editor.
2.0.160 (2024-02-21)
- Added auto-replacement of sandbox download links in Assistants with links to downloaded local files.
- Added setup for Poetry.
- Added connection timeout config option to Google Search plugin.
- Fixed recursion error on app exit.
- Updated dependencies.
2.0.159 (2024-02-21)
- Added workdir placeholders to images stored from Assistants.
- Added tooltips on modes list.
- Added force synchronous command call if more than one command to execute.
2.0.158 (2024-02-21)
- Improved Assistants: added annotations handling, added async function outputs submit
- Fixed creating function duplicates on re-import existing Assistant
2.0.157 (2024-02-20)
- Added webpage (URL) indexing using Llama-Index; new options were added to the Google Search plugin: the command "web_index" for indexing a specified page (just ask to index any URL) and "Auto-index", which enables automatic indexing of URLs used by the plugin (disabled by default).
- Decreased the default chunk size in the Google Search plugin.
- Assistant run creation and message sending moved to an async thread.
- Improved files receive from Assistants.
2.0.156 (2024-02-19)
- Added disable SSL verify option for search engine calls (not only for search results) in
Google Search plugin- issue #20. - Updated certifi to 2024.2.2.
- Added custom launcher, custom plugin, custom vector store, custom LLM provider and custom data loader code examples in
examplesdirectory in repository. - Updated documentation.
2.0.155 (2024-02-18)
- Importing assistants and assistant files (from API) has been moved to an asynchronous thread.
- Upgraded OpenAI API to 1.12.0.
2.0.154 (2024-02-18)
- Fixed hidden user input in Assistants mode
- Fixed system prompt change when switching to Assistants mode without selected Assistant
2.0.153 (2024-02-17)
- Added image display in the chat window when a file received from the Assistant is an image
- Added color labels in color select combo boxes
- Added dialog window position save and restore (+ option in Settings to enable/disable this feature)
- Added command "web_url_raw" to the Google Search Plugin which allows you to get the raw HTML/txt content from web pages (without summary)
- Fixed CSS backup path
- Updated documentation
2.0.152 (2024-02-16)
- Improved updater, added direct links to new releases
- Improved command execute system prompt
- Added
cwdcommand toFiles I/Oplugin - Added automatic current working directory passing to
sys_execcommand prompt inCode Interpreter. - Added
Refreshoption in File Explorer - Added monit about camera connect in Snap version with command to execute
- Disabled MenuRoles on MacOS-affected menu items - issue #19
The full changelog is located in the CHANGELOG.md file in the main folder of this repository.
Credits and links
Official website: https://pygpt.net
Documentation: https://pygpt.readthedocs.io
GitHub: https://github.com/szczyglis-dev/py-gpt
Snap Store: https://snapcraft.io/pygpt
PyPI: https://pypi.org/project/pygpt-net
Author: Marcin Szczygliński (Poland, EU)
Contact: info@pygpt.net
License: MIT License
Special thanks
GitHub community:
-
kaneda2004
-
moritz-t-w
Third-party libraries
Full list of external libraries used in this project is located in the requirements.txt file in the main folder of this repository.
All used SVG icons are from Material Design Icons provided by Google:
https://github.com/google/material-design-icons
https://fonts.google.com/icons
Code of the Llama-index offline loaders integrated into app is taken from LlamaHub: https://llamahub.ai
Release history Release notifications | RSS feed


Download files
Download the file for your platform. If you're not sure which to choose, learn more about installing packages.
Source Distribution
Built Distribution
Filter files by name, interpreter, ABI, and platform.
If you're not sure about the file name format, learn more about wheel file names.
Copy a direct link to the current filters
File details
Details for the file pygpt_net-2.1.0.tar.gz.
File metadata
- Download URL: pygpt_net-2.1.0.tar.gz
- Upload date:
- Size: 980.7 kB
- Tags: Source
- Uploaded using Trusted Publishing? No
- Uploaded via: twine/4.0.2 CPython/3.10.12
File hashes
| Algorithm | Hash digest | |
|---|---|---|
| SHA256 |
5a720dd2e66d956b0113fdddde8bd972fb8161d1b27209dfaf1cdbcb830c702e
|
|
| MD5 |
a62c299342360bd4b5f3df5e7c7f04d7
|
|
| BLAKE2b-256 |
e6f515ba6c00cea84e8e9eeb5a1afa6bc26530527f409d6f0ba0a0c3134f148d
|
File details
Details for the file pygpt_net-2.1.0-py3-none-any.whl.
File metadata
- Download URL: pygpt_net-2.1.0-py3-none-any.whl
- Upload date:
- Size: 1.3 MB
- Tags: Python 3
- Uploaded using Trusted Publishing? No
- Uploaded via: twine/4.0.2 CPython/3.10.12
File hashes
| Algorithm | Hash digest | |
|---|---|---|
| SHA256 |
7b7355d3c84e3d6cbc2697abae8b74c147923901ec63e573a98f513e969f1b6c
|
|
| MD5 |
9255bf5873f7626c436977f2fecc0970
|
|
| BLAKE2b-256 |
f950ae0d524f68e0768506d7dccf14332c8e6110125929c353503f4eeeac8b9f
|


