What could go wrong giving full shell access to chatgpt?

Project description
Shell and Coding agent on Chatgpt and Claude desktop apps
- An MCP server on claude desktop for autonomous shell, coding and desktop control agent.
- A custom gpt on chatgpt web/desktop apps to interact with your local shell, edit files, run code, etc.


[New feature] [26-Nov-2024] Claude desktop support for shell, computer-control, coding agent. src/wcgw/client/mcp_server/Readme.md
🚀 Highlights
- ⚡ Full Shell Access: No restrictions, complete control.
- ⚡ Desktop control on Claude: Screen capture, mouse control, keyboard control on claude desktop (on mac with docker linux)
- ⚡ Create, Execute, Iterate: Ask the gpt to keep running compiler checks till all errors are fixed, or ask it to keep checking for the status of a long running command till it's done.
- ⚡ Interactive Command Handling: Supports interactive commands using arrow keys, interrupt, and ansi escape sequences.
- ⚡ REPL support: [beta] Supports python/node and other REPL execution.
Claude
Full readme src/wcgw/client/mcp_server/Readme.md
Setup
Update claude_desktop_config.json
{
  "mcpServers": {
    "wcgw": {
      "command": "uvx",
      "args": ["--from", "wcgw@latest", "wcgw_mcp"]
    }
  }
}
Then restart claude app. You can then ask claude to execute shell commands, read files, edit files, run your code, etc.
ChatGPT
🪜 Steps:
- Run the cli client in any directory of choice.
- Share the generated id with this GPT:
https://chatgpt.com/g/g-Us0AAXkRh-wcgw-giving-shell-access - The custom GPT can now run any command on your cli
Client
You need to keep running this client for GPT to access your shell. Run it in a version controlled project's root.
Option 1: using uv [Recommended]
$ curl -LsSf https://astral.sh/uv/install.sh | sh
$ uvx wcgw@latest
Option 2: using pip
Supports python >=3.10 and <3.13
$ pip3 install wcgw
$ wcgw
This will print a UUID that you need to share with the gpt.
Chat
Open the following link or search the "wcgw" custom gpt using "Explore GPTs" on chatgpt.com
https://chatgpt.com/g/g-Us0AAXkRh-wcgw-giving-shell-access
Finally, let the chatgpt know your user id in any format. E.g., "user_id=" followed by rest of your instructions.
NOTE: you can resume a broken connection
wcgw --client-uuid $previous_uuid
How it works on chatgpt app?
Your commands are relayed through a server to the terminal client. You could host the server on your own. For public convenience I've hosted one at https://wcgw.arcfu.com thanks to the gcloud free tier plan.
Chatgpt sends a request to the relay server using the user id that you share with it. The relay server holds a websocket with the terminal client against the user id and acts as a proxy to pass the request.
It's secure in both the directions. Either a malicious actor or a malicious Chatgpt has to correctly guess your UUID for any security breach.
Showcase
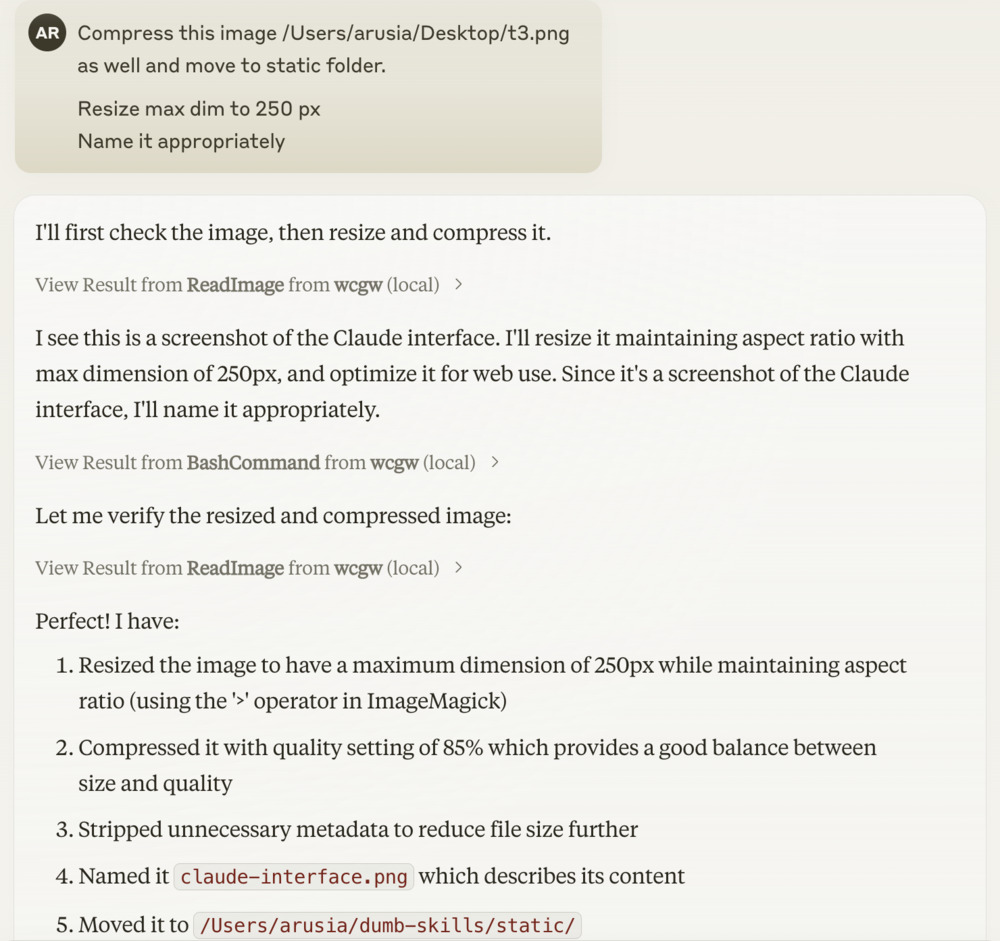
Claude desktop
Resize image and move it to a new dir
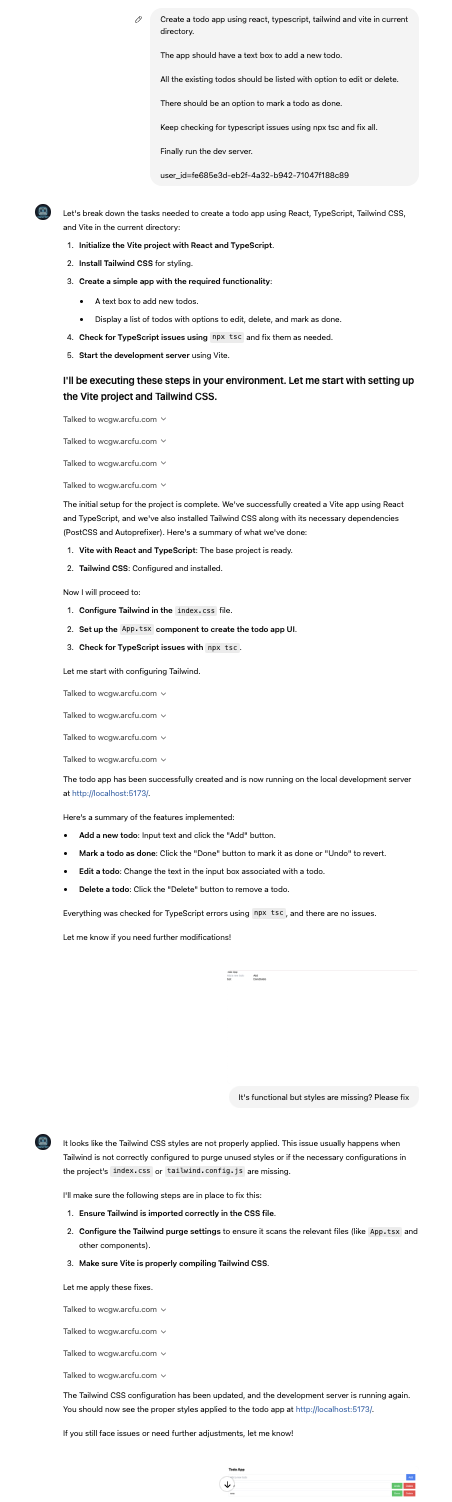
Chatgpt app
Unit tests and github actions
Create a todo app using react + typescript + vite
Privacy
The relay server doesn't store any data. I can't access any information passing through it and only secure channels are used to communicate.
You may host the server on your own and create a custom gpt using the following section.
Creating your own custom gpt and the relay server.
I've used the following instructions and action json schema to create the custom GPT. (Replace wcgw.arcfu.com with the address to your server)
https://github.com/rusiaaman/wcgw/blob/main/gpt_instructions.txt https://github.com/rusiaaman/wcgw/blob/main/gpt_action_json_schema.json
Run the server
gunicorn --worker-class uvicorn.workers.UvicornWorker --bind 0.0.0.0:443 src.wcgw.relay.serve:app --certfile fullchain.pem --keyfile privkey.pem
If you don't have public ip and domain name, you can use ngrok or similar services to get a https address to the api.
The specify the server url in the wcgw command like so
wcgw --server-url https://your-url/v1/register
[Optional] Local shell access with openai API key or anthropic API key
Openai
Add OPENAI_API_KEY and OPENAI_ORG_ID env variables.
Then run
uvx --from wcgw@latest wcgw_local --limit 0.1 # Cost limit $0.1
You can now directly write messages or press enter key to open vim for multiline message and text pasting.
Anthropic
Add ANTHROPIC_API_KEY env variable.
Then run
uvx --from wcgw@latest wcgw_local --claude
You can now directly write messages or press enter key to open vim for multiline message and text pasting.
Release history Release notifications | RSS feed


Download files
Download the file for your platform. If you're not sure which to choose, learn more about installing packages.
Source Distribution
Built Distribution
Filter files by name, interpreter, ABI, and platform.
If you're not sure about the file name format, learn more about wheel file names.
Copy a direct link to the current filters
File details
Details for the file wcgw-1.5.3.tar.gz.
File metadata
- Download URL: wcgw-1.5.3.tar.gz
- Upload date:
- Size: 595.8 kB
- Tags: Source
- Uploaded using Trusted Publishing? No
- Uploaded via: twine/5.1.1 CPython/3.9.20
File hashes
| Algorithm | Hash digest | |
|---|---|---|
| SHA256 |
6f9550369a030c20f9748d4561f519483d7a2e24376e7e96d3b7695a1a45f249
|
|
| MD5 |
0f095447fd036cc0f6440681c80b424d
|
|
| BLAKE2b-256 |
7c875189d61d7d49838ba6f43d4c332e8b98c5c68a47faf8792943df687db75e
|
File details
Details for the file wcgw-1.5.3-py3-none-any.whl.
File metadata
- Download URL: wcgw-1.5.3-py3-none-any.whl
- Upload date:
- Size: 39.6 kB
- Tags: Python 3
- Uploaded using Trusted Publishing? No
- Uploaded via: twine/5.1.1 CPython/3.9.20
File hashes
| Algorithm | Hash digest | |
|---|---|---|
| SHA256 |
ac3074bcb7ed41c6f31b1bdca4a0285bd11ee080f0eb42b897f8388ed6bb4ada
|
|
| MD5 |
6d5cafe376b862ad32de6f8e15414c0f
|
|
| BLAKE2b-256 |
cb96767f0224003d7ab59159c81bfc50c59b64802844c3bdb19ef1805198de11
|


